Everyone always wants to know how much a bathroom renovation will cost…
Well the answer is not as simple or clear as one would hope for.
A bathroom renovation costs anywhere from 10 to 100 thousand dollars, much of which depends on the finishes you select. It’s also why it’s so important to build a footprint for each project so you know exactly where your money is going. Take flooring for example, if you prefer large stone marble walls and floors in lue of ceramic ones, you best get ready to pay more!
These Germ Eliminating Fixtures and Hacks are about to change your entire bathroom experience.
This blog was written in partnership with American Standard. All opinions are my own.
There is nothing quite like the feeling of a clean and tidy house! When my home is put together and sparkling from corner to corner, I feel relaxed and ready to tackle whatever comes my way (except spilled milk!). I love getting Lennon involved in chores whenever I can because it’s a great way to teach responsibility and make her feel like she’s an important contributor in caring for our home. It’s me + you kid!
That’s one of the reasons why I love my American Standard sink and accessories. The company produces high-performing fixtures, stylish faucets and sinks, and other wellness products for the bath and kitchen. And, since I’ve been on a cleaning kick lately, their touchless product offerings and clean technology make my life a whole lot easier and my home a whole lot more sanitary! Check out these tried and true cleaning hacks that will save you time, simplify your life, and instantly boost your mood.
• Hack #1•
Clean In Every Corner
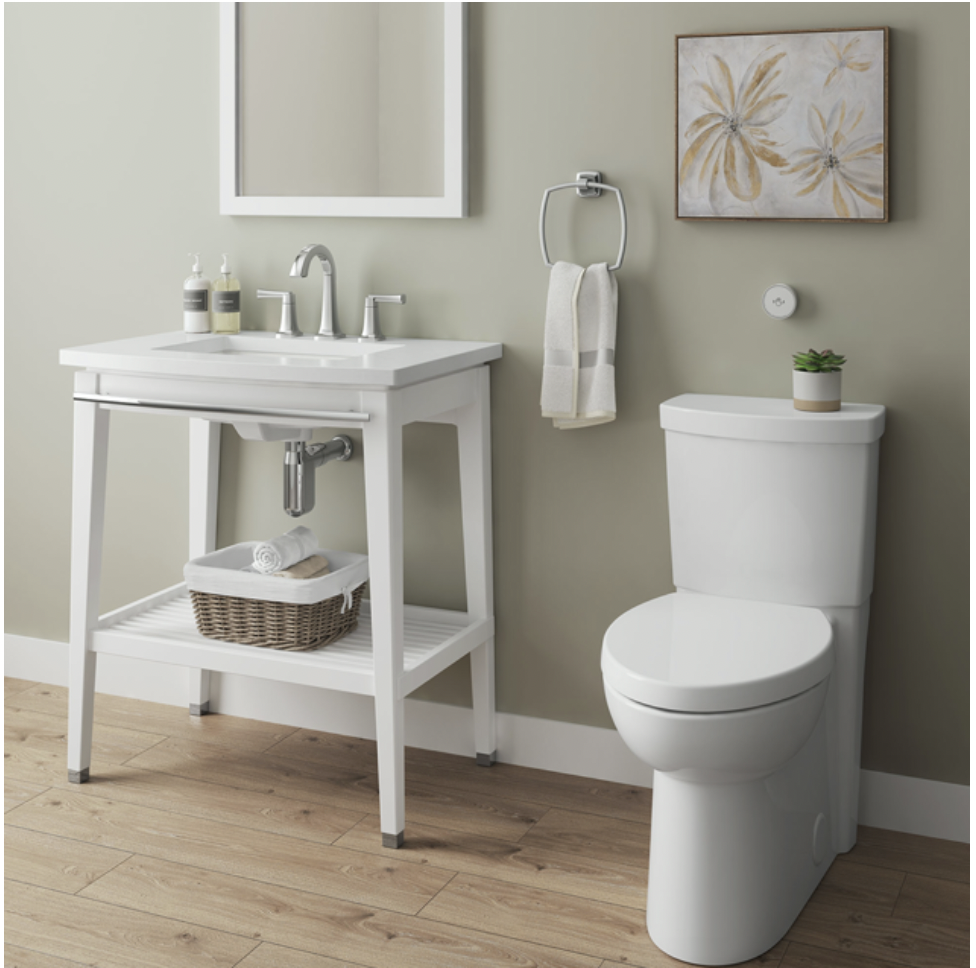
If you struggle with cleaning the nooks and crannies around your bathroom and kitchen, you’re not alone. These hard-to-reach crevices can be incredibly frustrating, especially for die-hard cleaning aficionados like us. I’ve come up with an easy hack that will make those tricky areas sparkle faster than you can say “clean as a whistle!”. Wrap a soft cloth around the end of a butter knife to clean the gunk around faucets, vents and other small fixtures. The knife is small enough to get into those tiny corners, and the cloth prevents scratches. They’re the perfect deep cleaning duo in my humble opinion. American Standard sink and accessories
Studio Carre Undercounter Sink
• Hack #2 •
Pearly White Surfaces
The power of a soft-bristled toothbrush goes beyond healthy gums and teeth. Wet the bristles with a mixture of baking soda and water and gently brush over the shower and wall grout. Leave it on for 10 minutes, rinse and voila! Gleaming tiles every time!
• Hack #3 •
When Life Gives You Lemons….
If you hate water spots on your chrome faucets as much as I do, I’ve got you! Cut a lemon in half, rub it all over your faucet, rinse and buff with a soft cloth. Easy, peasy and done in a flash.
Beale Pull-Down Kitchen Faucet
• Hack #4 •
Let The Fixtures Clean For You
If there’s one job I hate, it’s scrubbing toilets and I know I’m not alone on this one! The American Standard Everclean surface makes cleaning toilets a cinch!The double-coated surface inhibits the growth of stain and odour-causing bacteria, mold and mildew on the surface, and that means less backbreaking work for this mama! It's like a self-cleaning oven for your bathroom!
Studio Touchless Toilet
• Hack #5 •
Keep Your Hands Out Of It!
My American Standard Studio Carré Undercounter Sink was made for me– someone who loves clean, contemporary lines, but not the maintenance as the EverClean Surface and Technology makes it super easy to keep clean! American Standard understands that dirt and build-up happen, which is why they’ve created the double-coated surface to inhibit the growth of stain and odour-causing bacteria, mold and mildew on the surface. The smooth, mirror-like surface stays cleaner longer, even after years of use, making my life a whole lot easier. I use some vinegar, warm water and buff it with a soft cloth to make it sparkle and that’s as much work that’s required from me. Heaven.
Beale Pull-Down Kitchen Faucet
I’ve also become obsessed with American Standard’s Beale Pull-Down Touchless Kitchen Faucet, which features a Selectronic hands-free technology sensor so you can stop and start the water with a simple wave of the hand. The pull-down faucet spray head will also help you reach all regions of your sink with ease, while the sleek and contemporary design is sure to complement any home design perfectly.
• Hack #6 •
Even Your Mirrors Love a Clean Shave
If you have a can of shaving cream lying around, you can kiss foggy, dirty mirrors goodbye- for a couple of weeks anyway! Simply pump some foamy shaving cream onto a soft cloth or paper towel to stop your mirrors from fogging up when you’re in the shower. Who doesn't love a clean reflection?
Designer Rebekah Higgs loves to repurpose and redesign.
If someone told me 2 decades ago that the kitchen would be my favorite room in the house, I would have said, “As if!”, (while watching my favorite movie, Clueless). Back then, hanging out in my bedroom with my girlfriends in tow, talking about our boy troubles while listening to sad tunes, or rummaging through my closet for try-on sessions was how I spent the majority of my time.
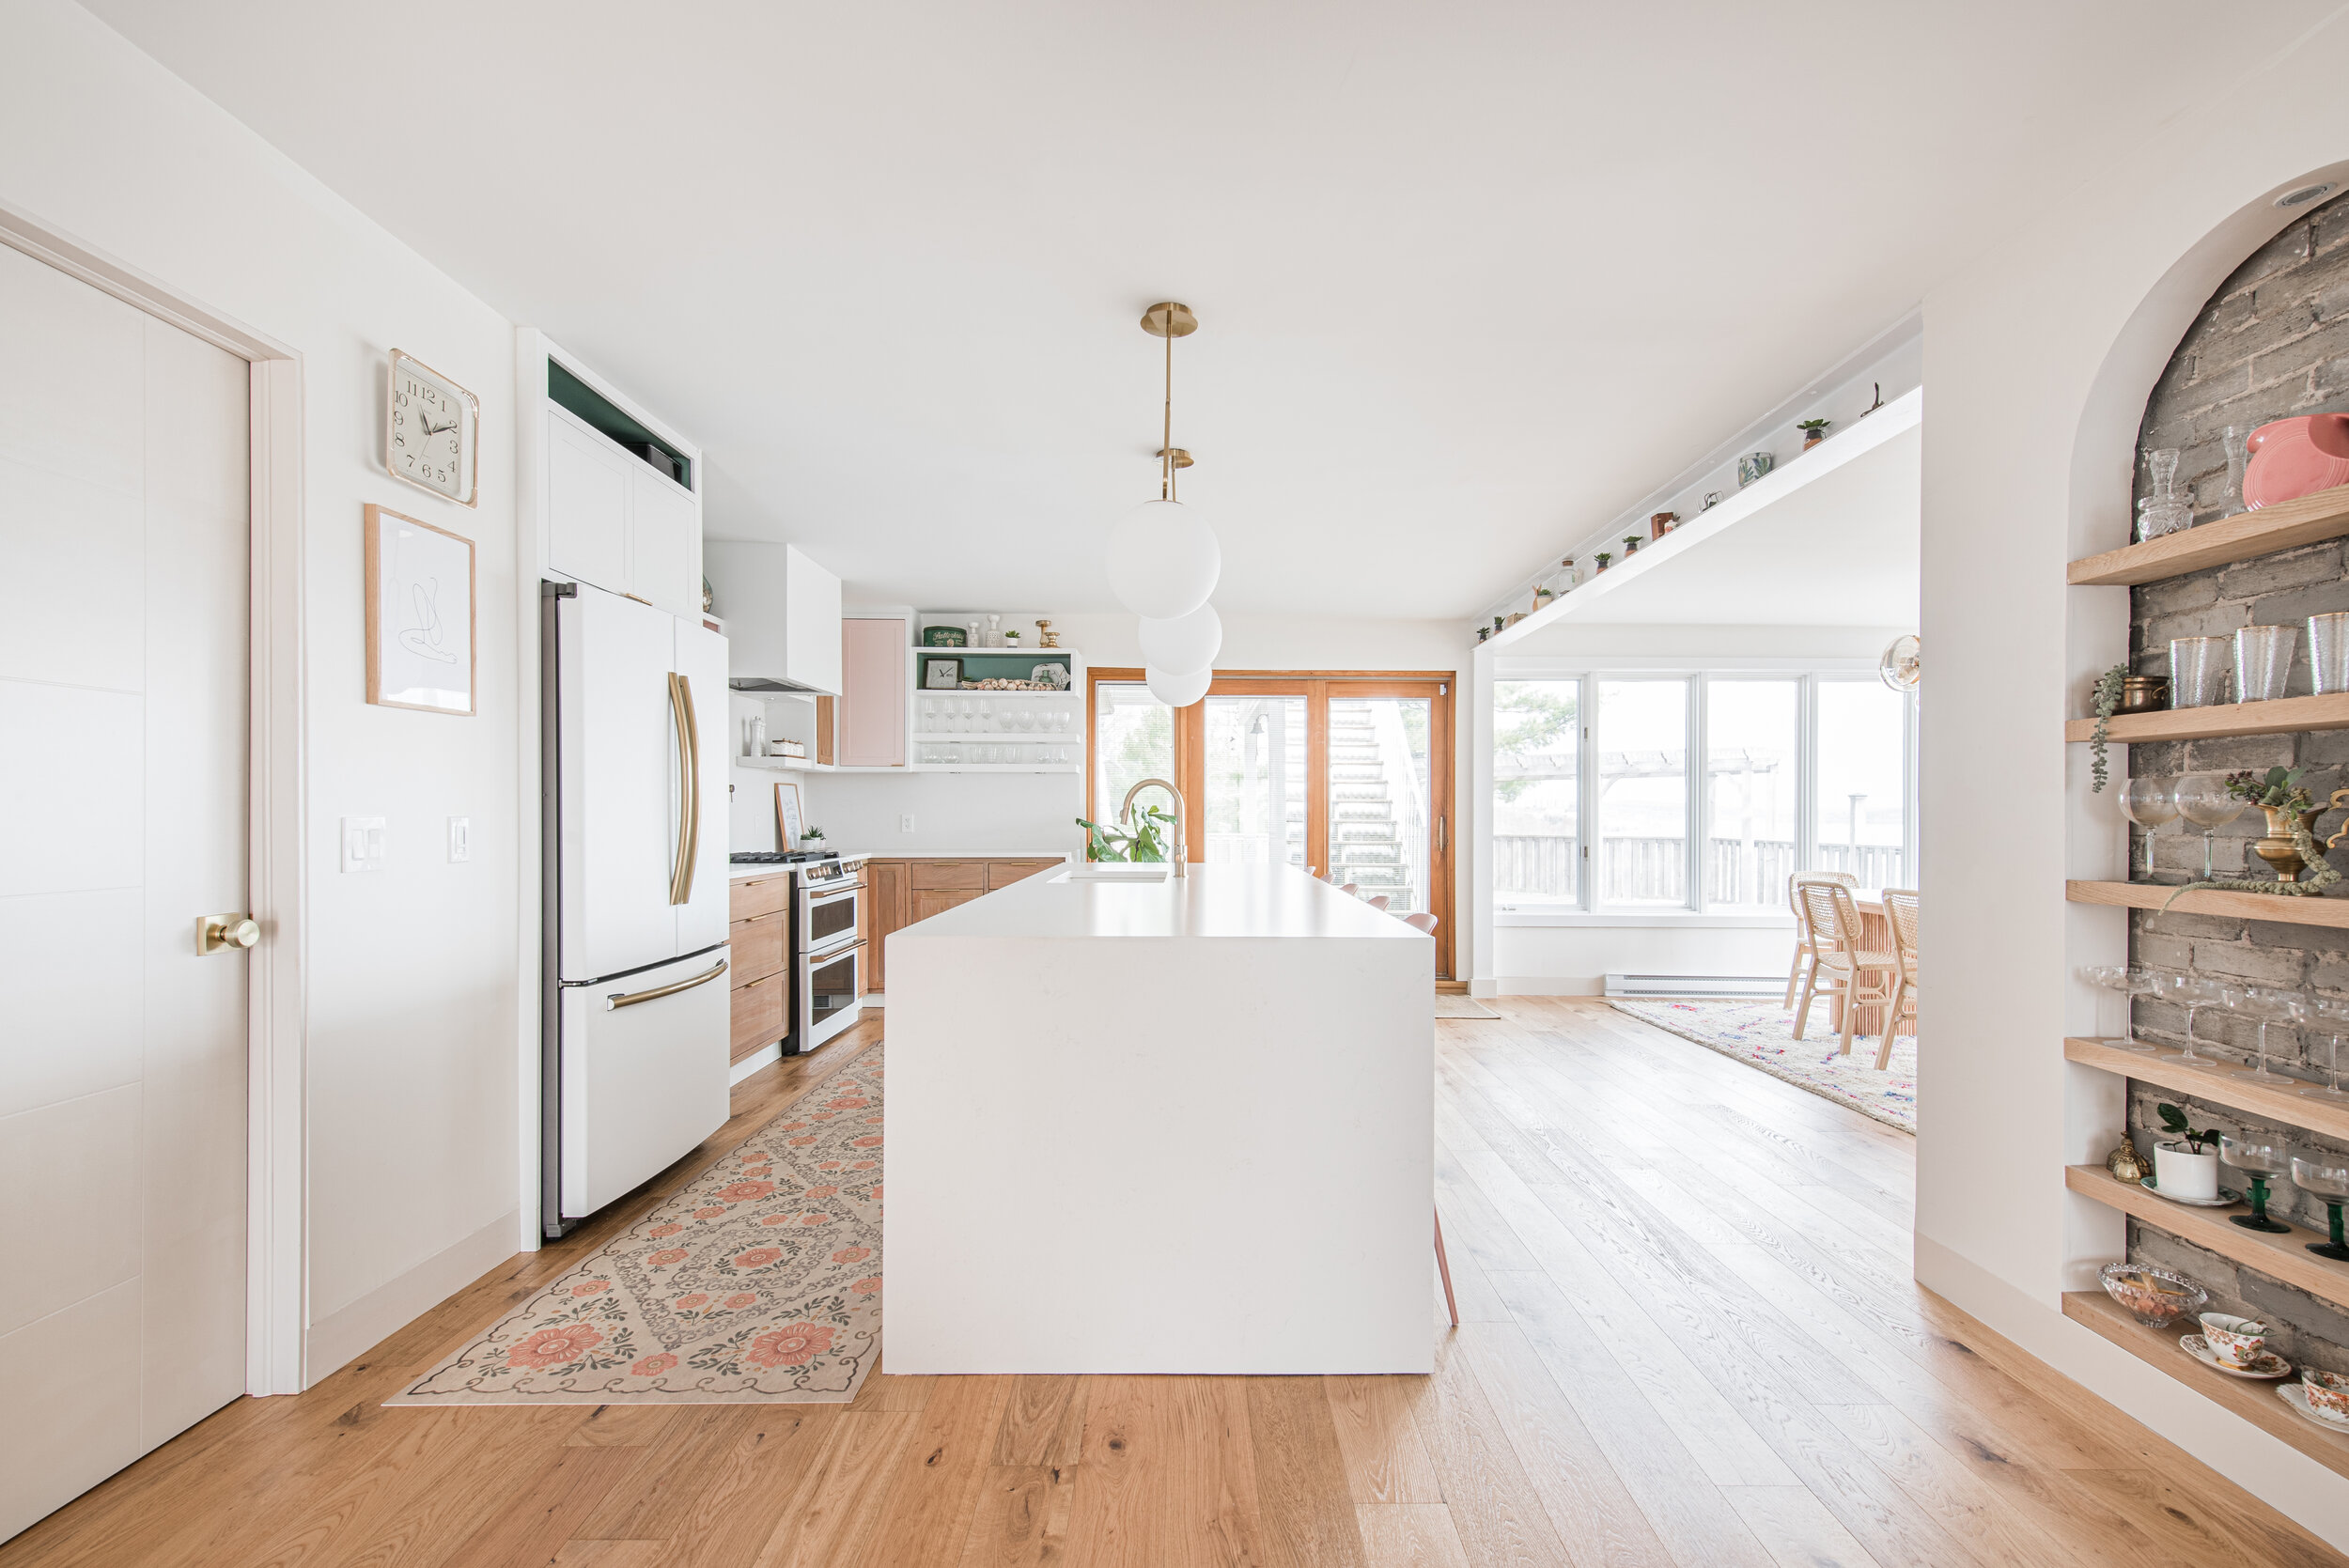
Fast forward to being a single mom with a busy 7-year-old daughter, the producer of a TV show featuring our latest renovation and a never-ending list of DIY projects and I can sincerely declare that the kitchen has my heart. Where else can I simultaneously make a grilled cheese sandwich, help Lennon with her homework, and jot down notes on my latest design plan? Did I mention the kitchen/dining room in our new home has the most expansive and breathtaking view of the Bedford Basin? When I say I love my kitchen, I mean….I LOVE my kitchen.
My vision from the very beginning was to design an inviting space that was both functional and stylish. This is the center of our home and that means it needs to work for every member, including @ziggymygirl who has created her very own special nook near the back door. While it’s hard to narrow down my favorite features, there are some that have stood out as fan faves from the very beginning. Interested to know what they are? Keep reading!
A resilient kitchen counter topped the list of absolute must-haves. The Et Statuario Silestone countertop from Cosentino Canada was such a great selection for our family. The anti-scratch and stain surface means I can cook, plan and work without worry, and the velvety touch of the suede finish elevates the entire look. We used the same material for our backsplash to carry the sophisticated aesthetic seamlessly throughout the space and I’m thrilled with how it all came together.
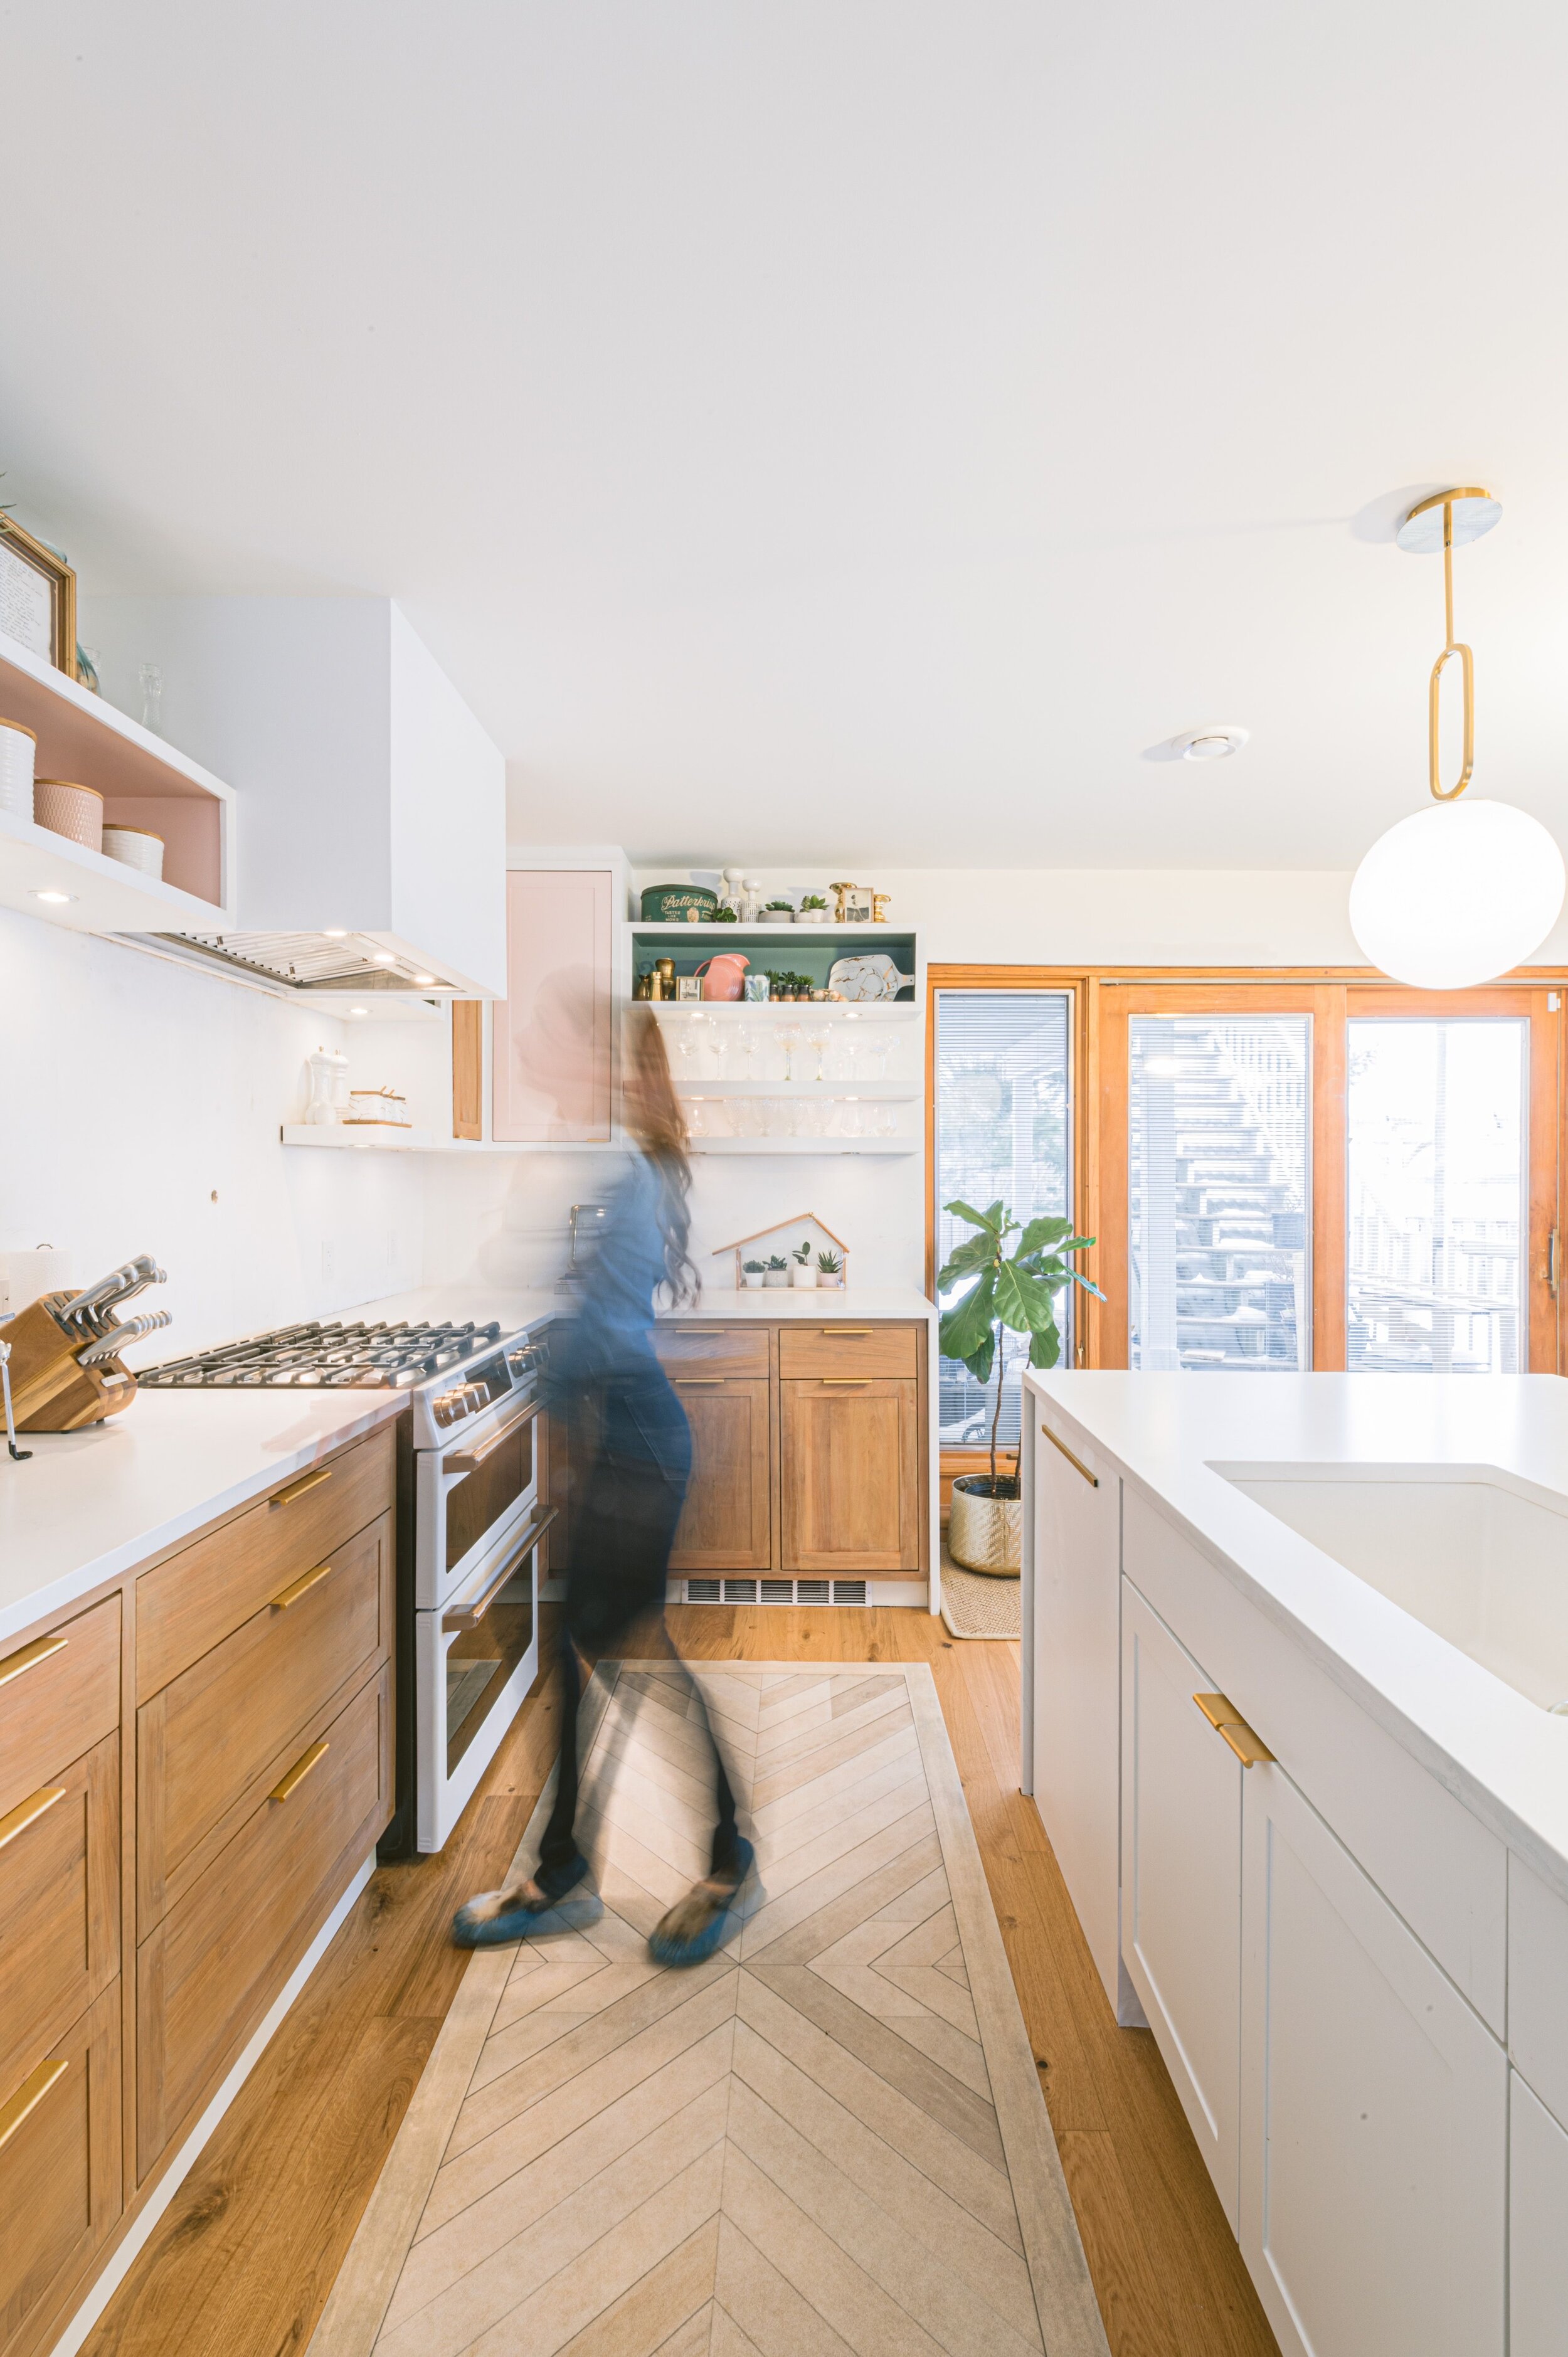
When I saw the 12” round Prospect pendants by Eurofase – blown glass spheres suspended from looped gold metal framework, I knew they were meant for me. This trio sits above my kitchen island and not only provides the perfect ambiance – think lulled, muted light versus bright and blinding, they also add that extra level of urban refinement that takes this entire space up a notch.
My Trinsic Single-Handle Pull-Down Sprayer Kitchen Faucet in Champagne Bronze featuring MagnaTite Docking has been a beautiful addition to this space. The dock keeps the kitchen pull-down spray wand firmly in place with a powerful integrated magnet, so it stays docked when not in use and I love that I can easily remove mineral build-up with the touch of a finger using touch-clean spray holes. It’s worth mentioning, the price point on this little beauty is incredible and the sleek, minimalistic design blends in perfectly with my vibe.
My new Blanco Precis U super sink has come in handy more times than I can count, especially during lockdown when there always seemed to be an influx of dirty dishes to wash. Trust me when I say that the extra large bowl and floating grid will be a kitchen dream come true for that reason alone. It’s easy to clean, non-porous, and heat and scratch-resistant so you never have to think twice about taking extra special care.
A contemporary wall mount pot filler is one of those luxury features you don’t realize you need until…well…you really need it! The Delta pot filler faucet in champagne bronze is a showstopper for several reasons. It’s easy to fill large cooking vessels quickly and without the walk from sink to stove. That may not sound like a big deal, but large water-filled pots can be deceivingly heavy! The dual shut-off valves allow me to turn the water off at either the wall or the spout, which has proven to be incredibly convenient and the beautiful finish adds a touch of old-world charm that makes it irresistible!
I was initially drawn to the pale pink hue and minimalist design of my kitchen island stools, but when I realized how easy it was to wipe and go, I loved them even more. The form-fitting seat makes them ultra comfortable and the contemporary base gives them a sleek, contemporary feel. This design from Wayfair is no longer available, but I’ve linked a similar option here.
One of the biggest showstoppers in my kitchen has to be my Spicer and Co, vinyl floor cloth. In fact, I get asked about it a lot in the run of a day. A high traffic area like the kitchen needs something durable and stain resistant, but I also wanted something comfortable and curated– a nod to my love of vintage style and pink everything. Take it from this DIY mama, if you want something low maintenance without sacrificing beauty, this was made for you.
The coveted Café Appliances in matte white have been in high demand lately and for good reason! The polished finish makes them a designer’s dream, but it’s the added functionality that really sets them apart. My commercial-style range is inspired by professional kitchens and comes with a versatile cooktop that has it all– inspiral and multi-ring burners that evenly heat my cookware, and a caterer’s oven complete with precision cooking modes that make cooking dinners, small or large, a treat.
NDR Auto Solutions came to my rescue in a big way when I found out my refrigerator was on backorder and we were weeks away from filming season 4 of DIY mom. Let’s just say that we couldn’t halt production because of a delayed delivery. The NDR team swooped in with the most genius idea – taking a basic stainless steel refrigerator and wrapping it in white vinyl for a nearly identical finish to my Café Appliances. Confession time: I considered keeping this a secret because the dupe is THAT good, but the premise of my show is learning to find alternatives when things don’t go as planned, and guess what? That’s real life in a nutshell.
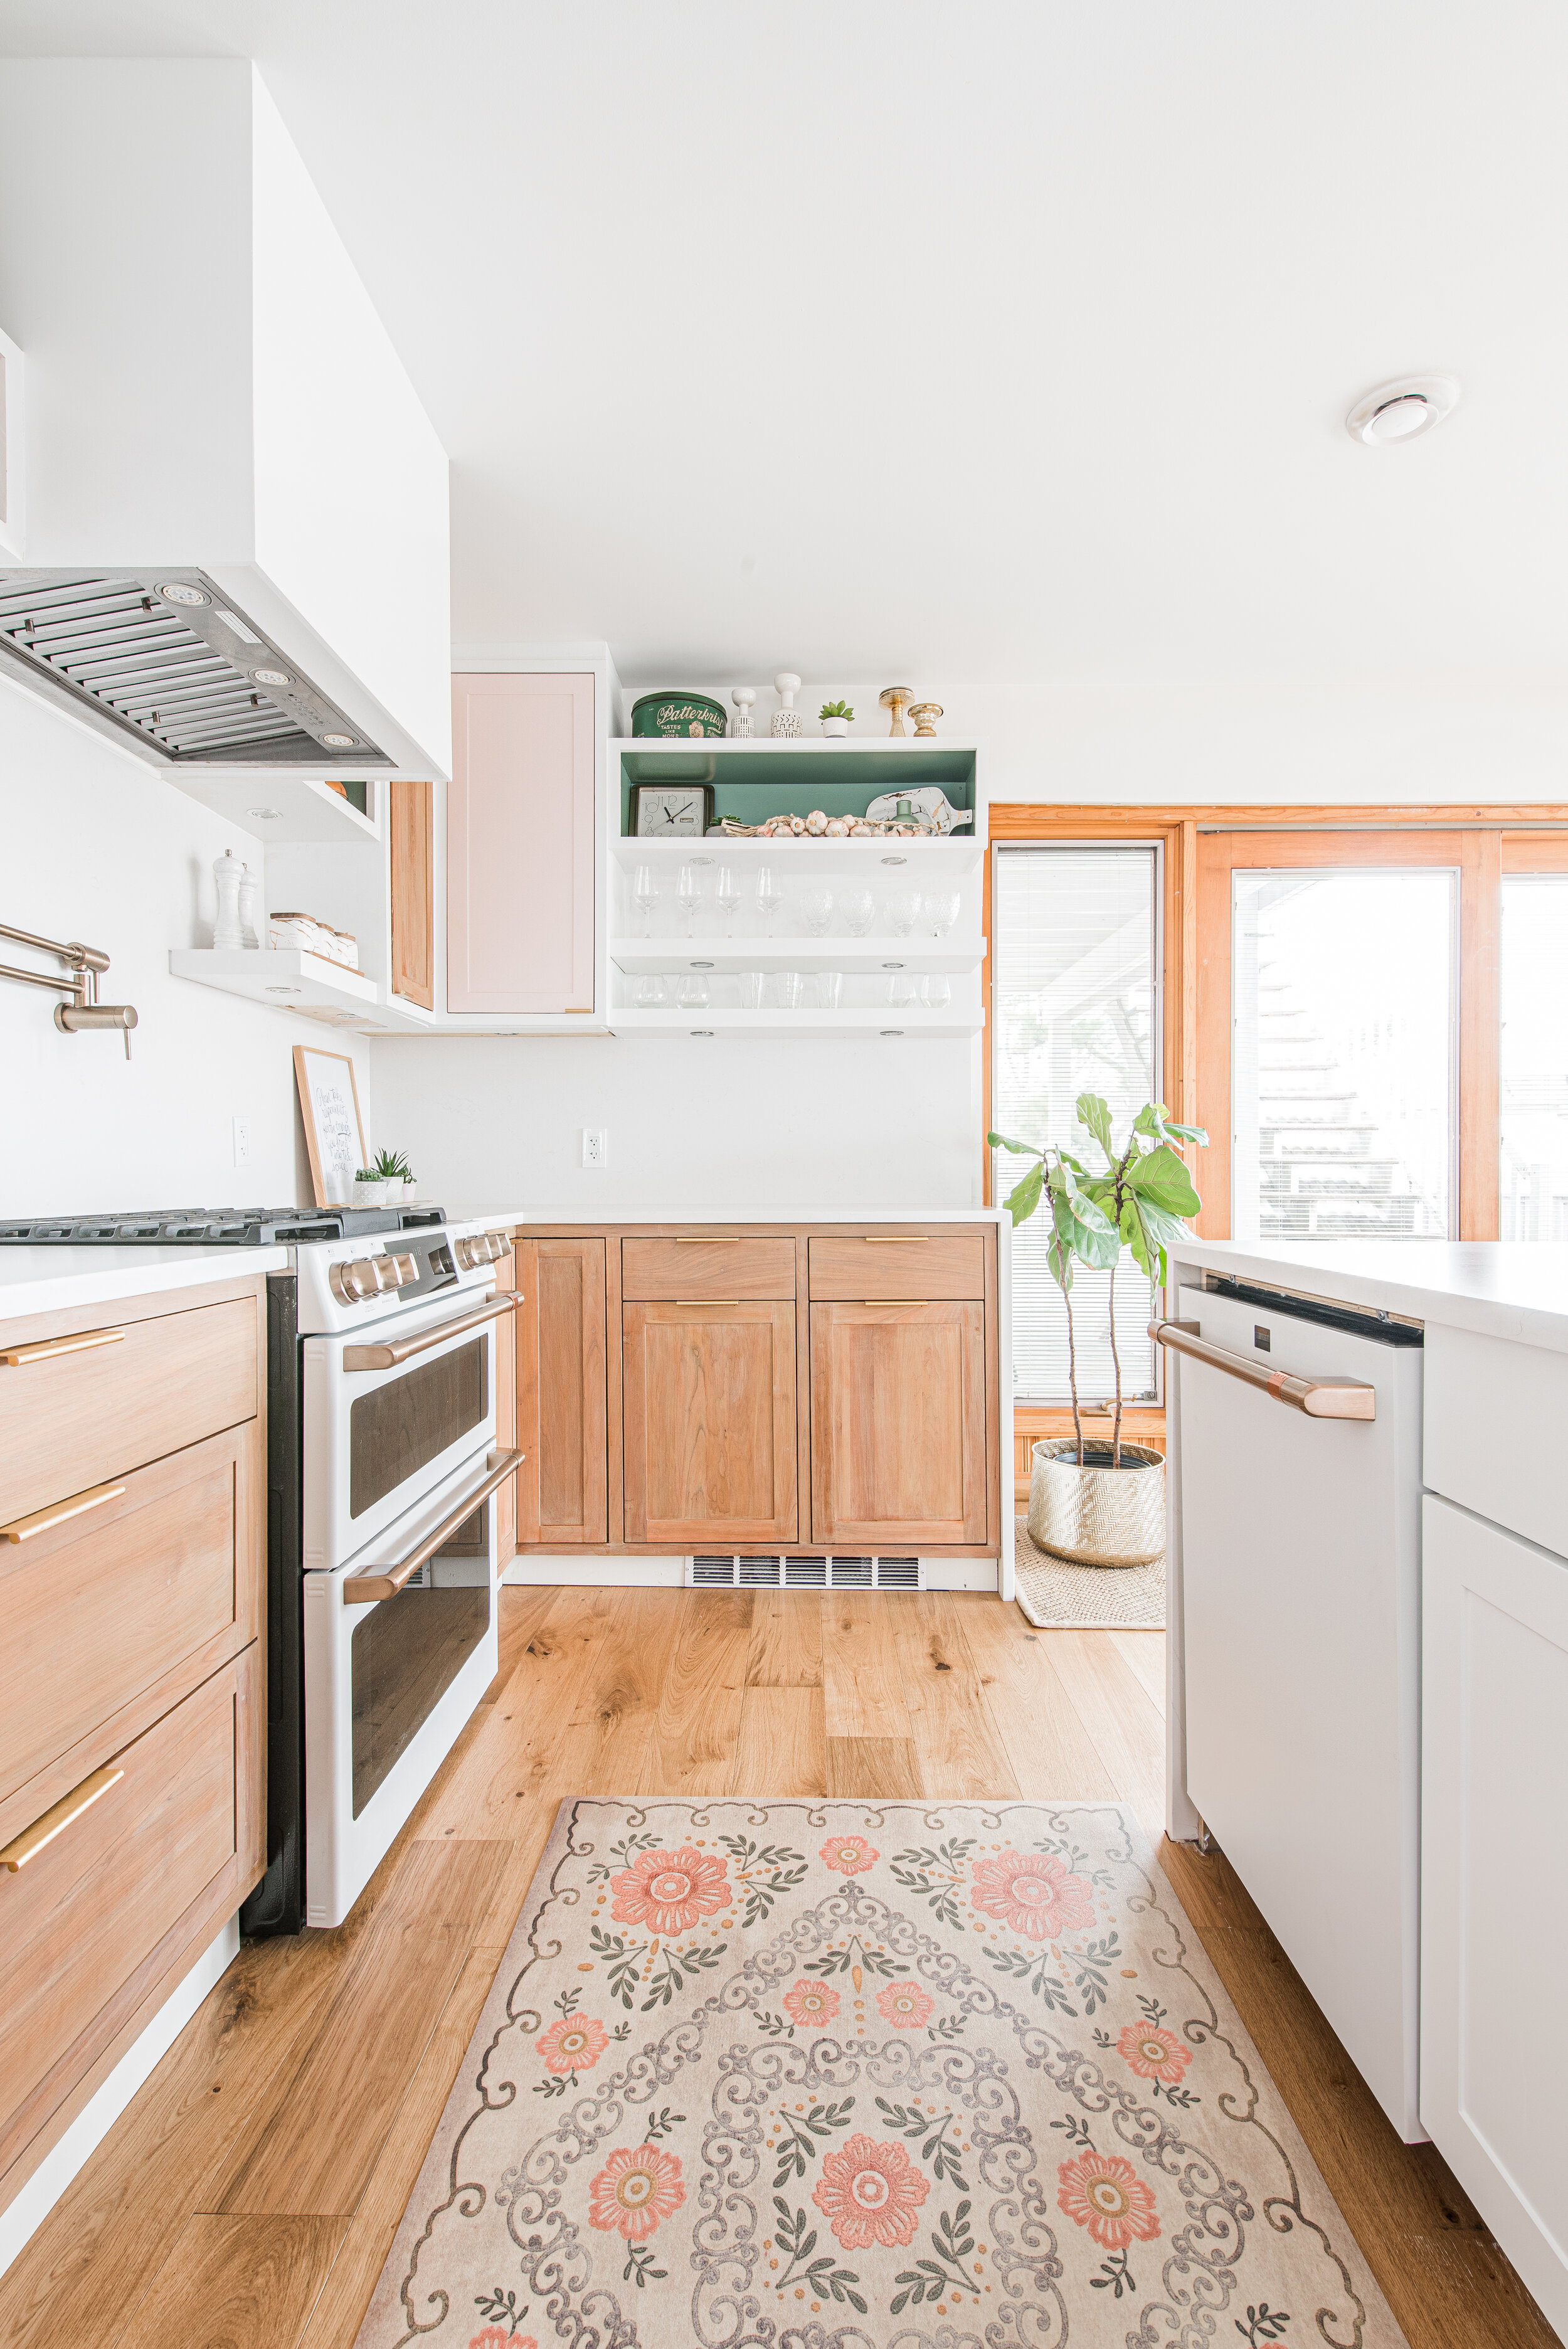
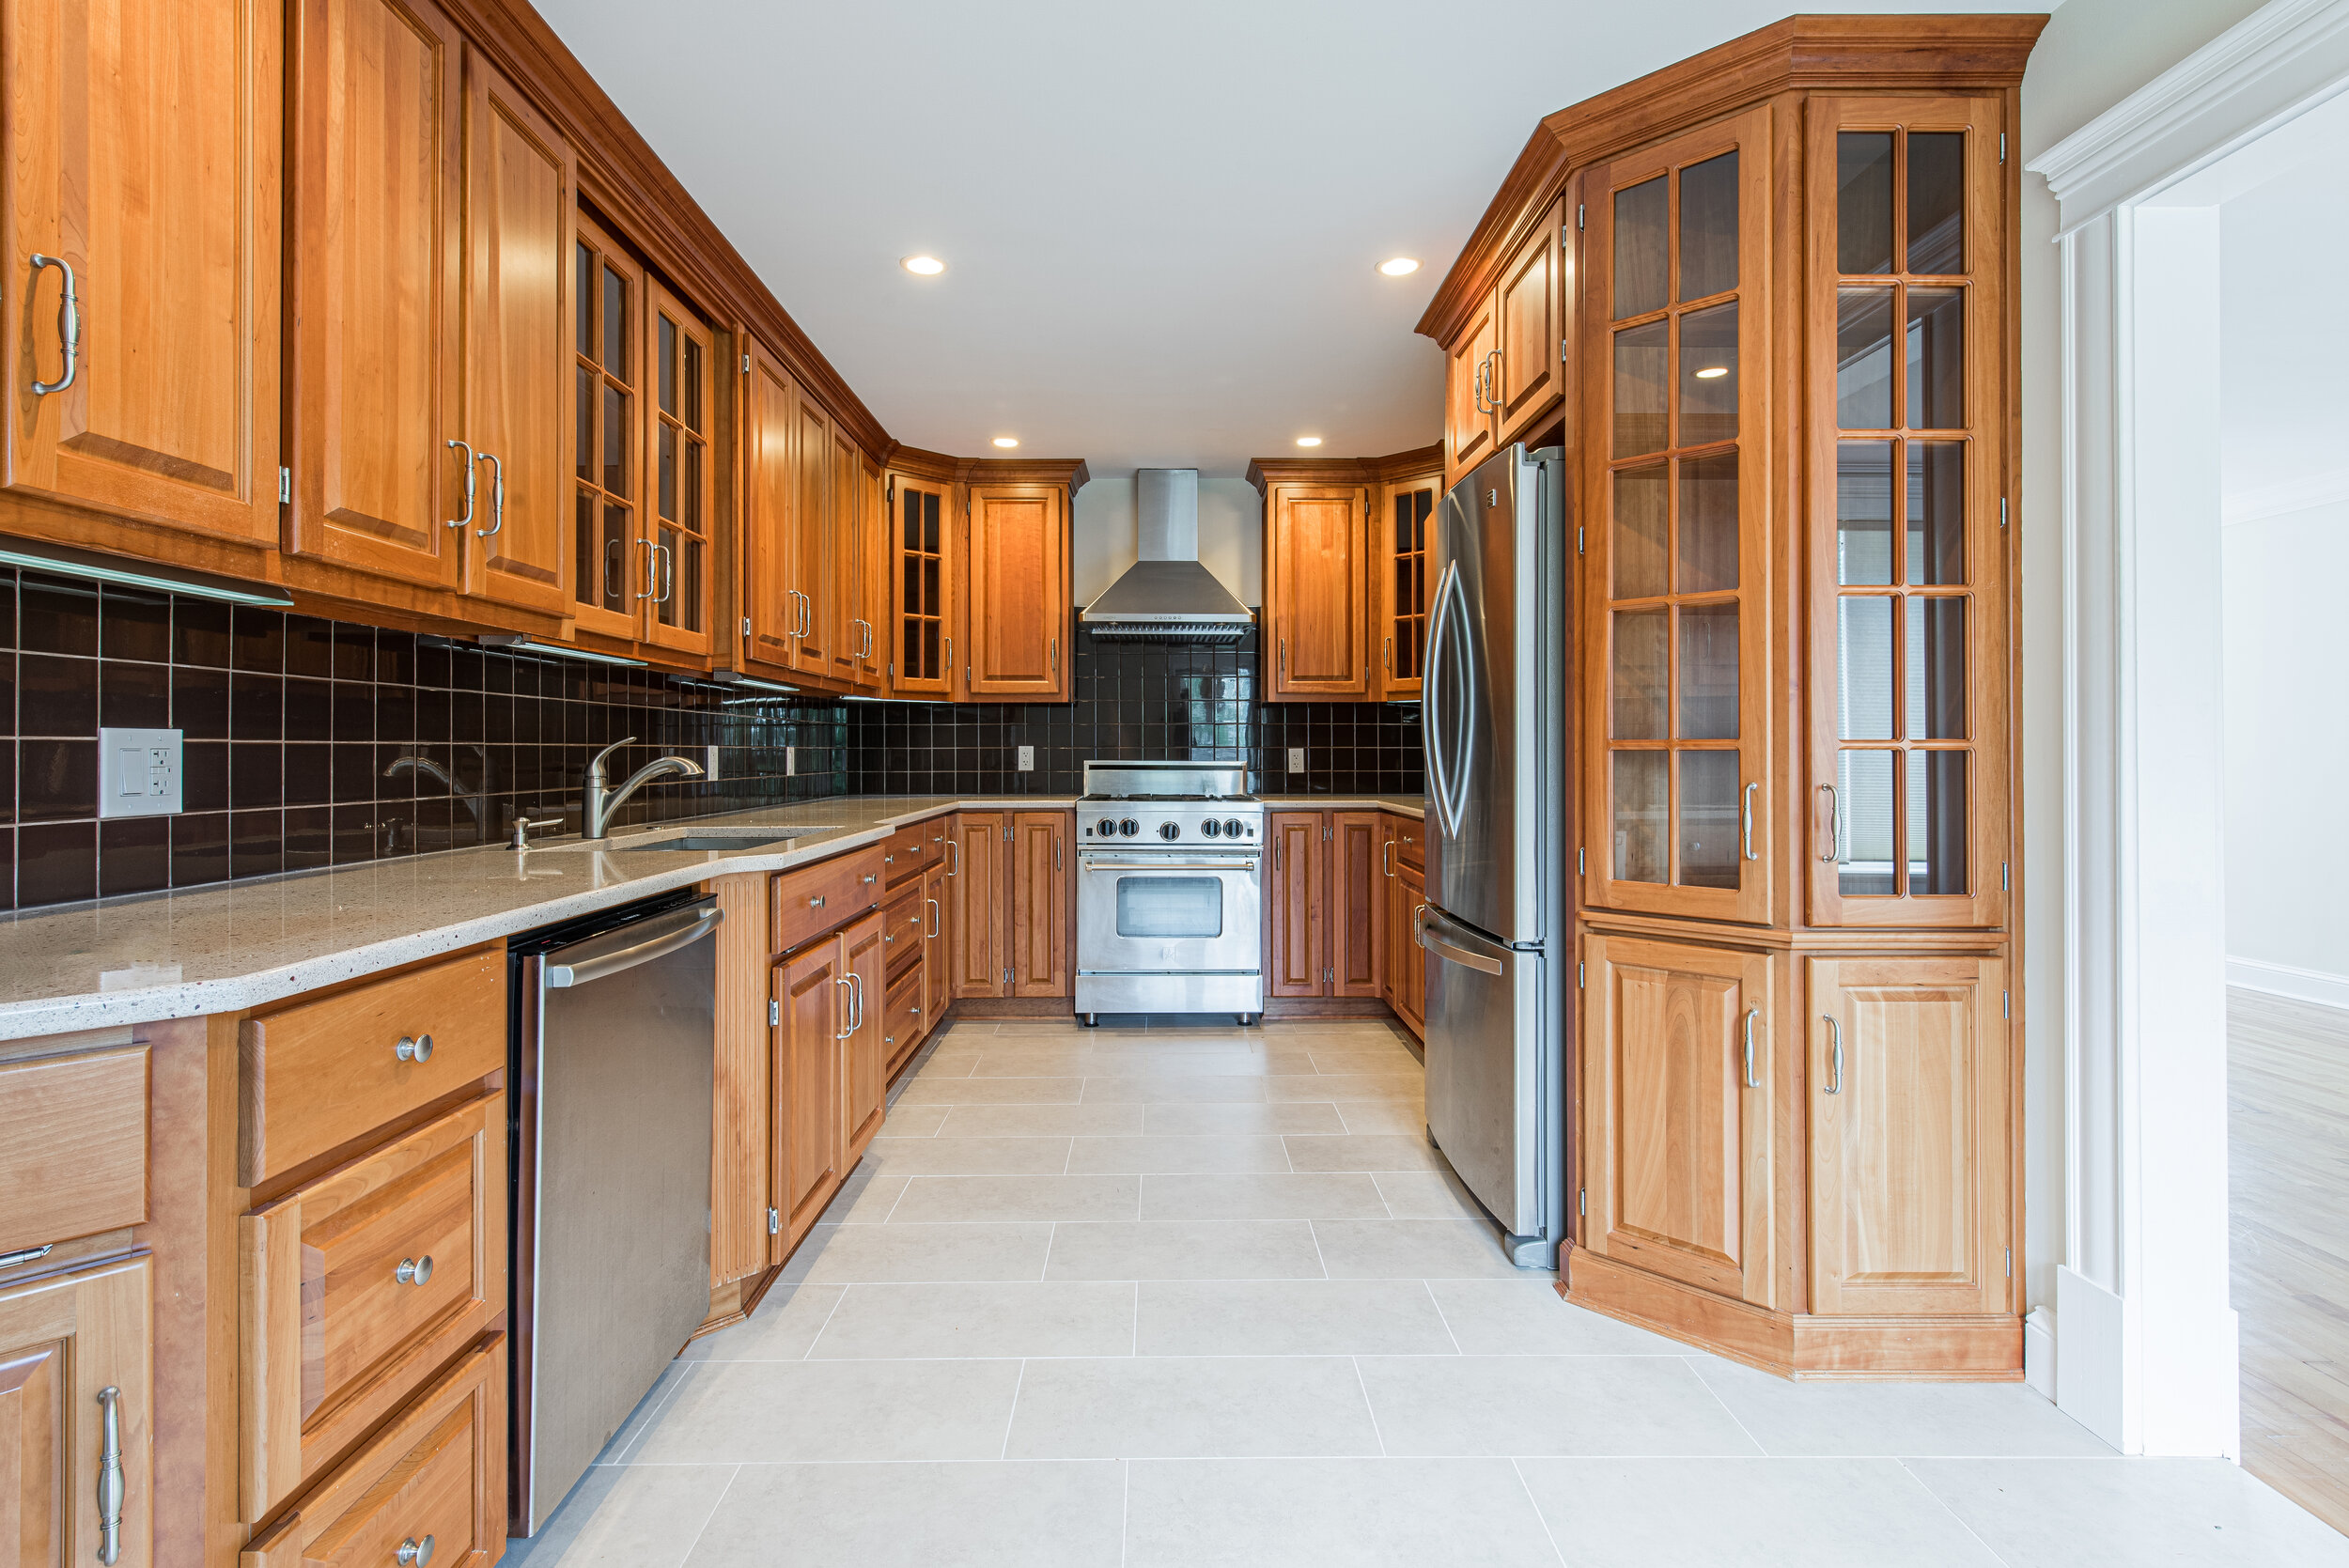
I wanted to repurpose the kitchen cabinets from the original house because they were in great shape and the quality was amazing, so I decided to put a modern spin on an old classic. I flipped and sanded the cabinets with my Ryobi tools and varnish from Home Depot, to give them a shaker style finish, then filled the holes, and moved the entire kitchen from the front of the house to the back for an open-concept design. For the island, I used the pre-assembled Hampton Bay Edison shaker style cabinets from Home Depot and had them color-matched to the kitchen cabinets for a streamlined look and feel. Then we added these pretty Contemporary Aluminium Edge pulls from Richelieu. The entire room received a chic and modern facelift– a brilliant way to create style on a budget.
I love looking back to see how my home has been transformed. What do you think of these before and afters?
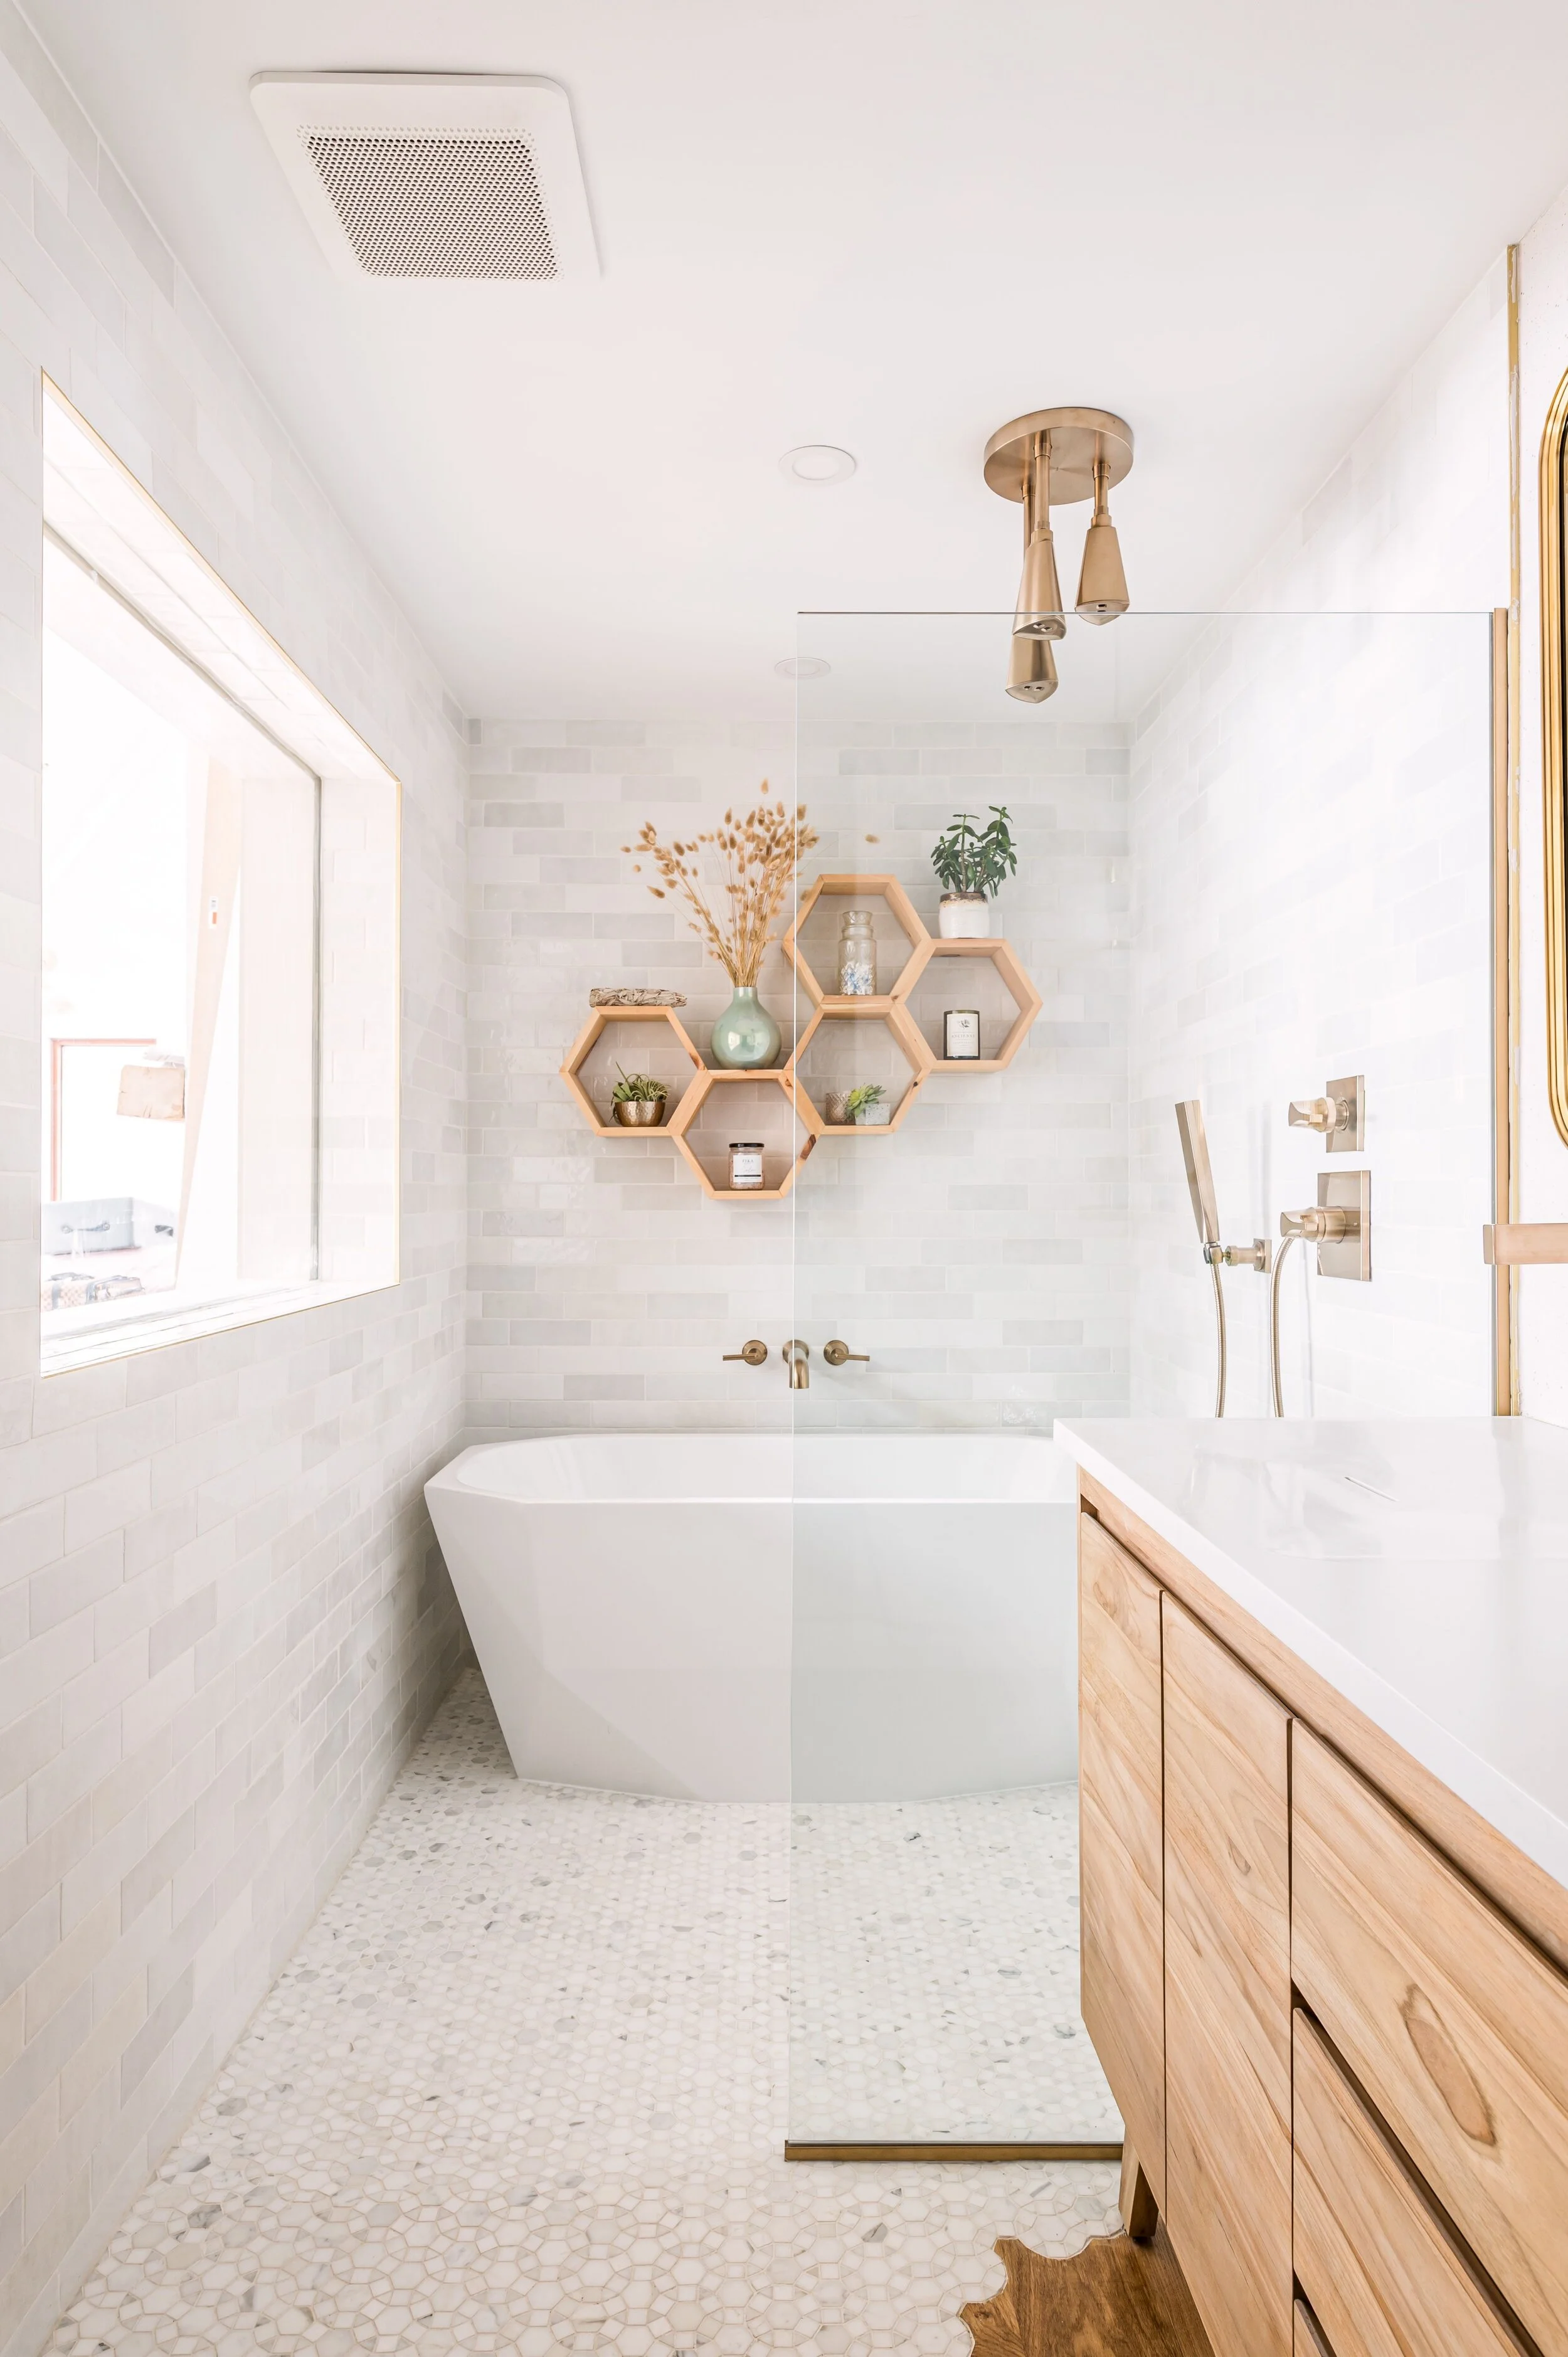
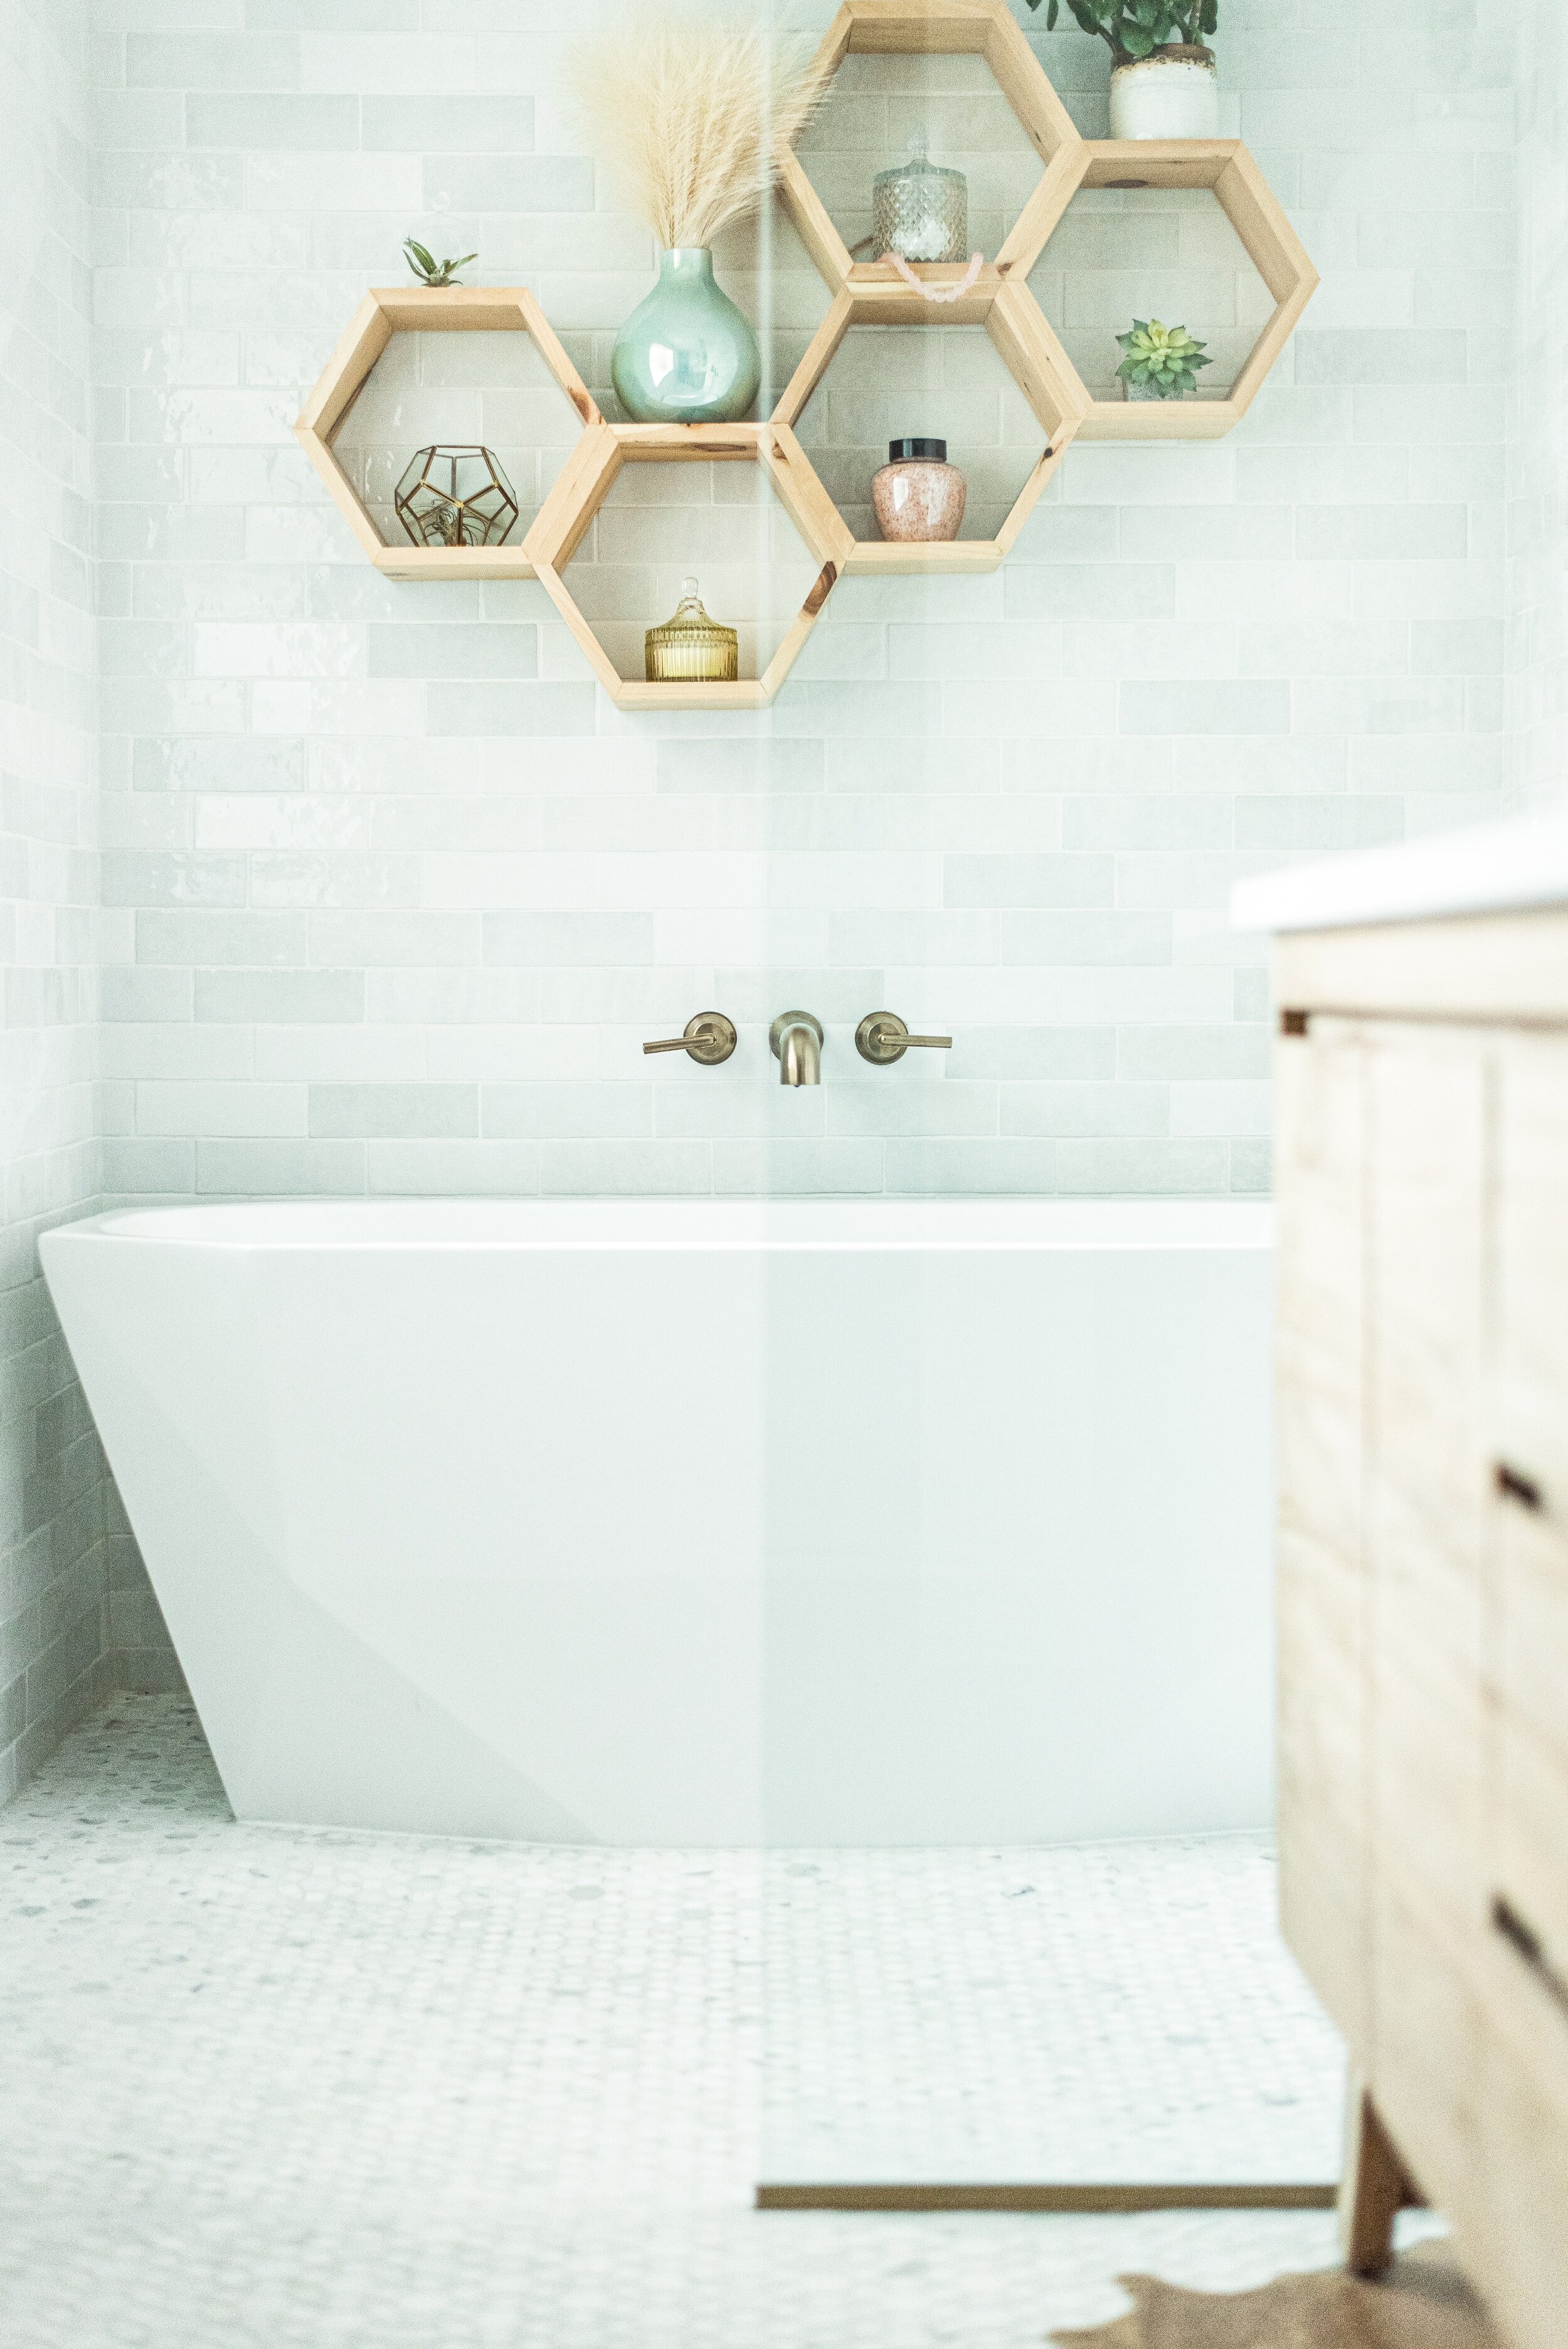
My ensuite bathroom is my happy place. A little haven that allows me to unwind after a busy day with some basic self- care rituals that have proven to be essential for me. Sometimes, it’s a decadent face mask before bed, other times, a long, lingering, sudsy bath or a quick pep talk in front of my vanity before I start my hectic day and have a lot of fires to put out. Lennon and Ziggy love it too (the heated floors might have something to do with that). It’s a good thing I don’t mind sharing!
I get asked a lot about my favorite features in this space and while it’s hard to narrow them down, I’ve come up with a list of highlights. If you’re considering a bathroom renovation and don’t know where to start, you’ll want to keep reading!
My freestanding soaking tub is by far one of the most celebrated features of this room. It was easy to install, crafted from durable acrylic making it incredibly resilient, and comes in a modern, glossy white finish. The best part however has to be the 63 gallon capacity which makes it nice and spacious– perfect for a relaxing night in.
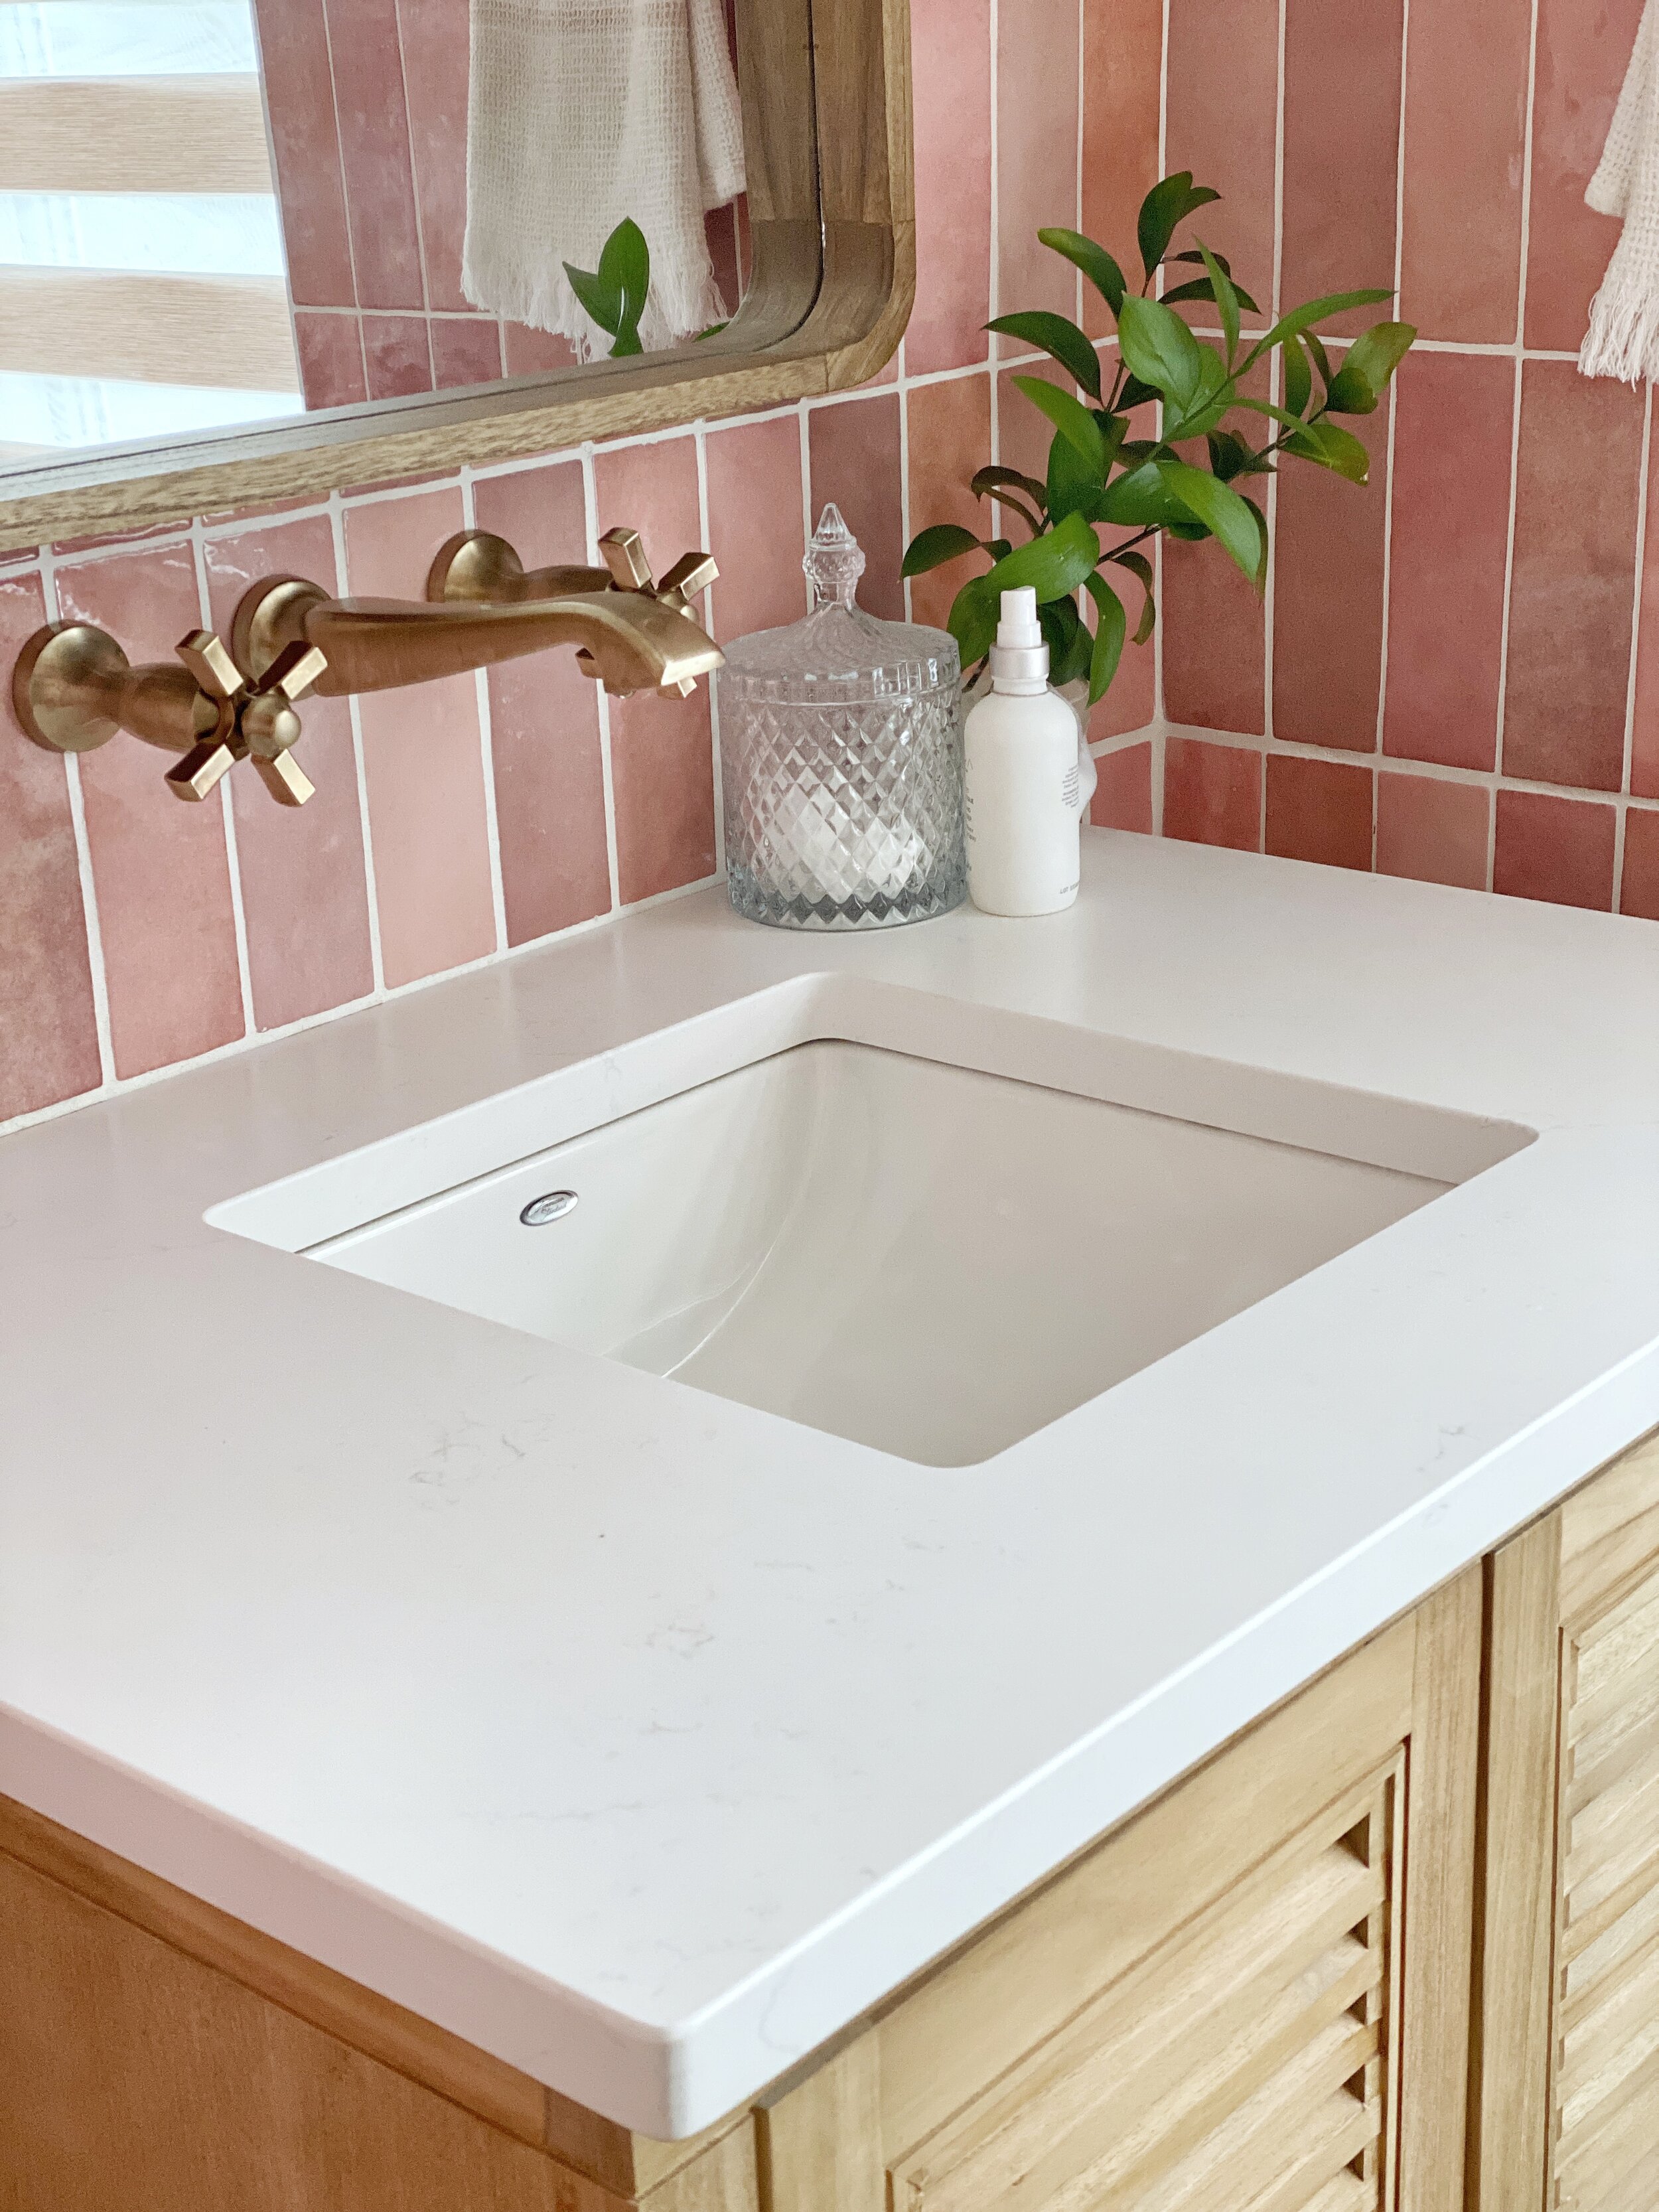
The mosaic Miki Flower tile in Snow White & Crystal White from Centura Tile was the perfect addition, and what was left over, I used in our pantry. We pieced these Artisan tiles from Centura together like an intricate puzzle for a dazzling backsplash that feels like marble.
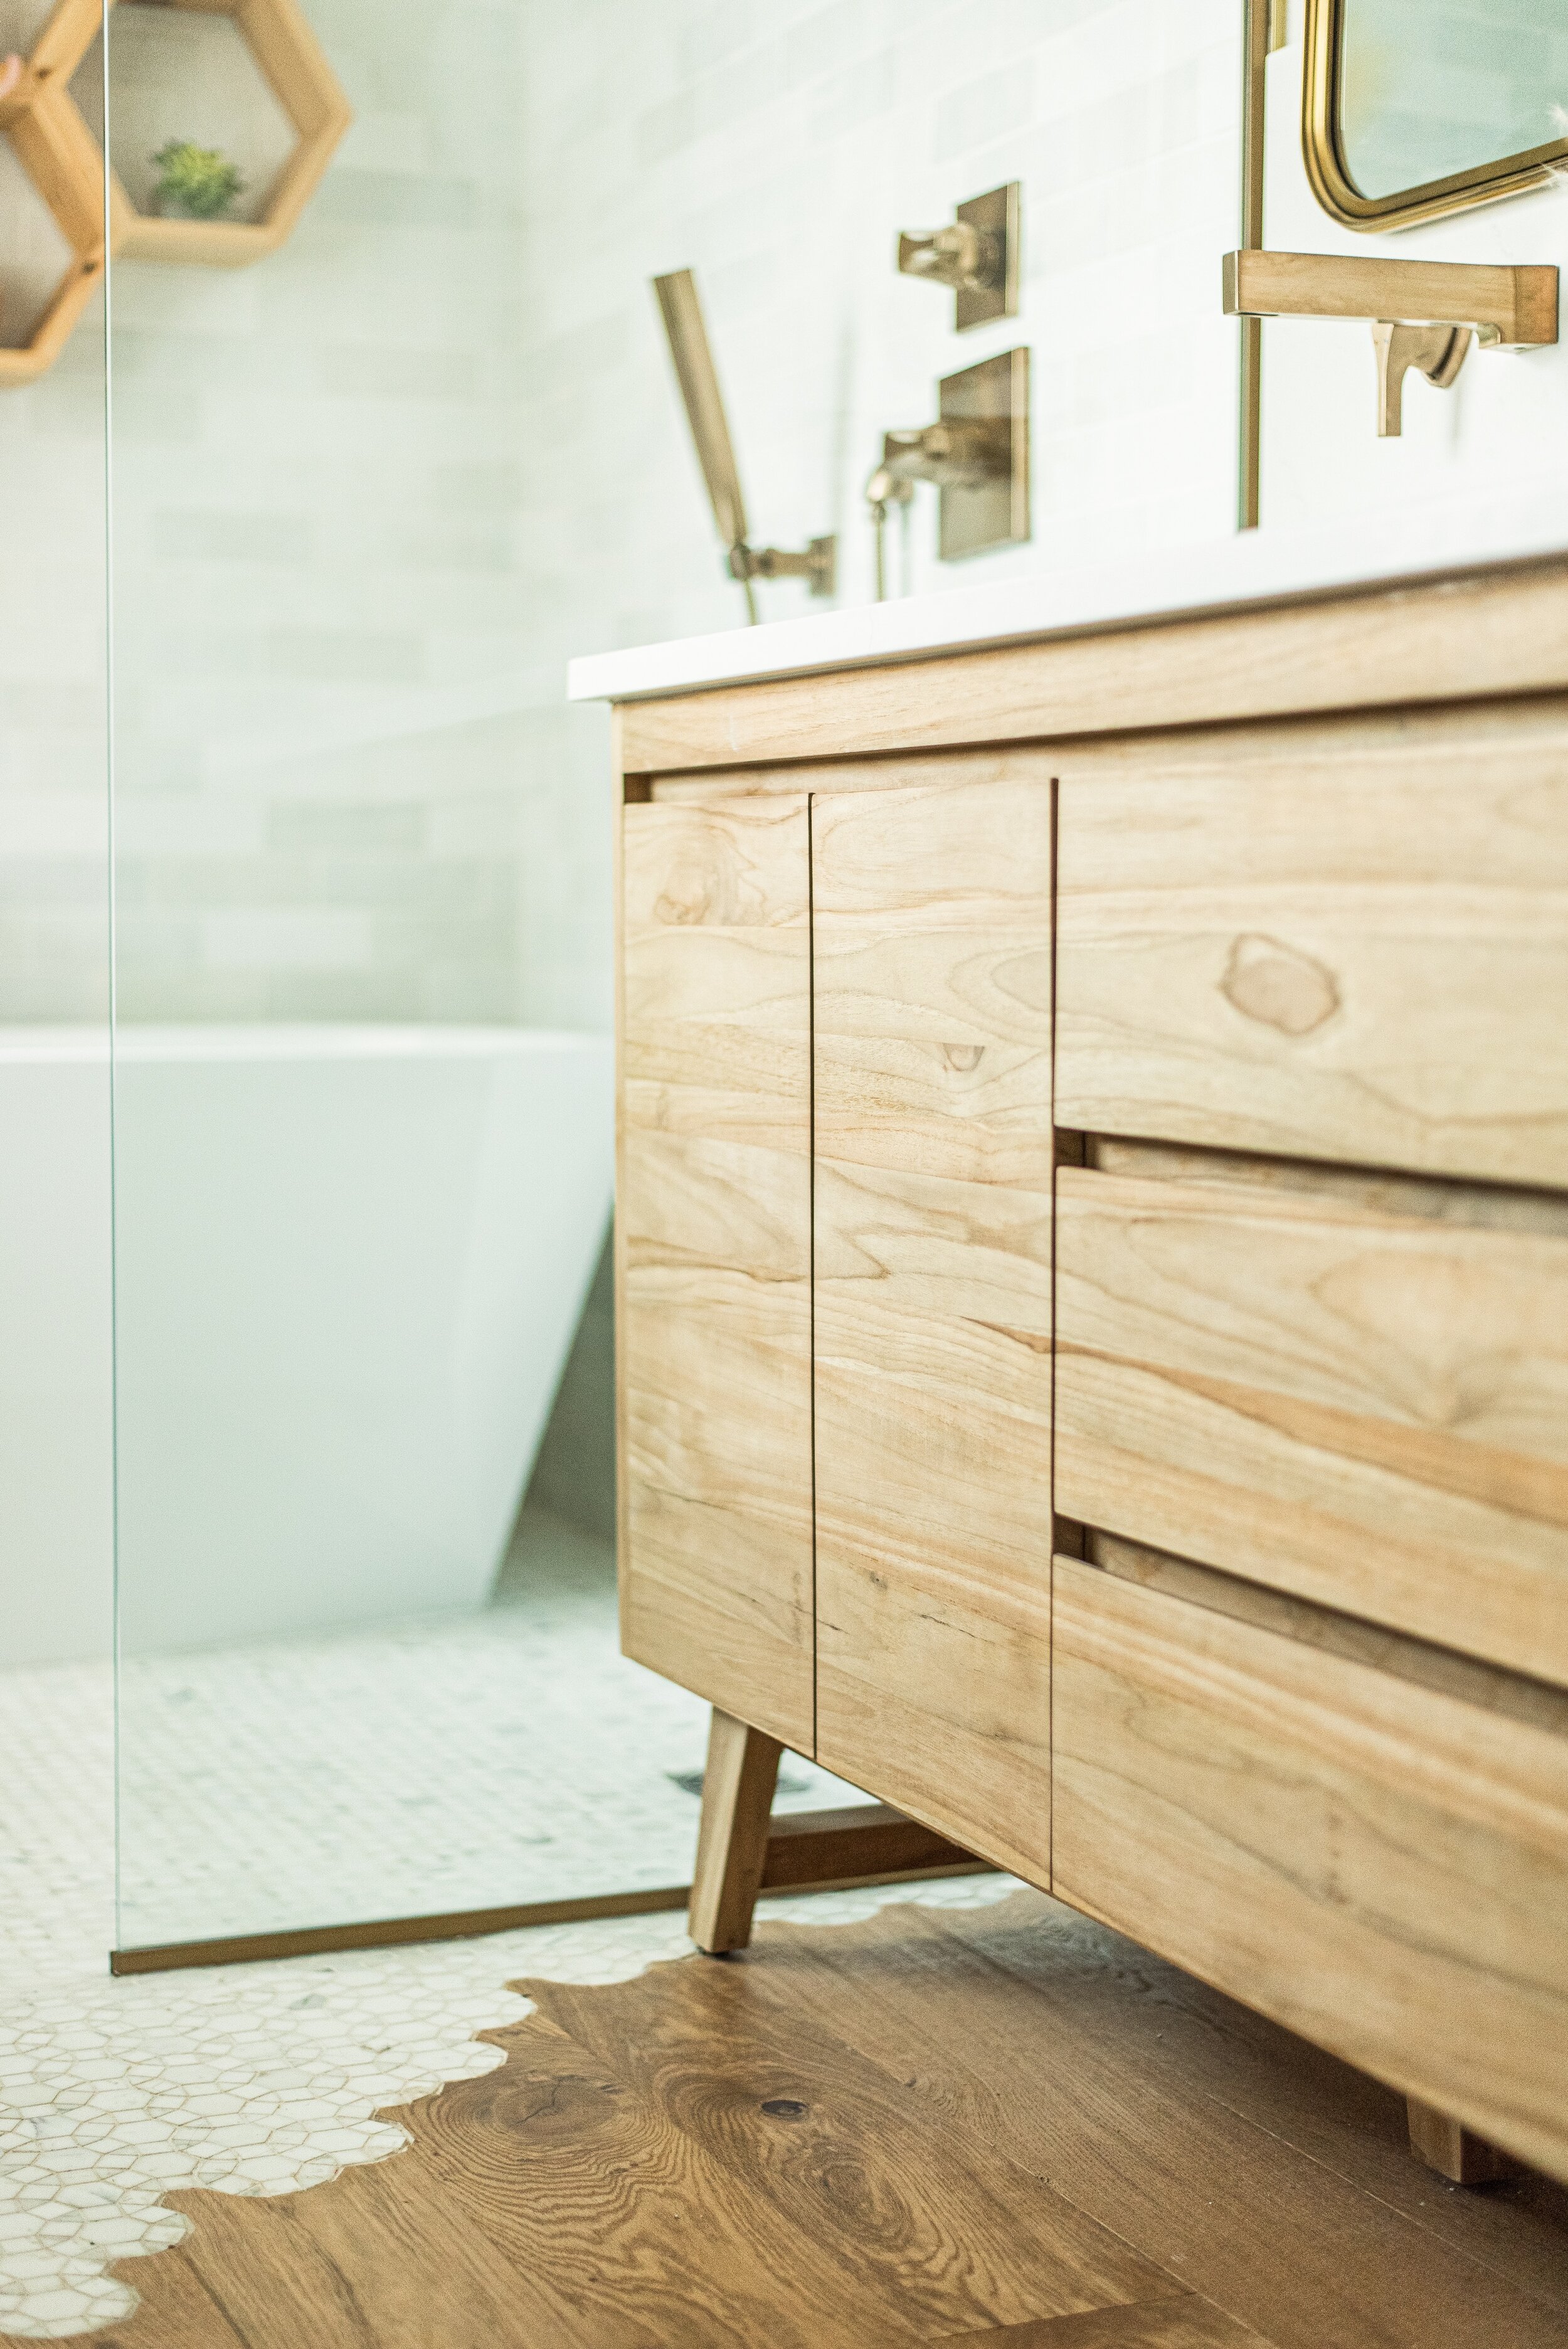
It’s no secret that mid century modern is a vibe I gravitate to. That’s one of the reasons love my 72 inch solid teak Coventry Vanity from Home Depot. The minimalist console vibe feels like an extension of my personal style philosophy– sturdy, spacious, simple design with a classic undertone that makes it timeless.
For a streamlined look, I carried my Torly’s Engineered hardwood flooring in Dorset Oak into my ensuite. I love that the warm, matte wood matches the rest of the house and offers clean lines and wide planks for a modern feel.
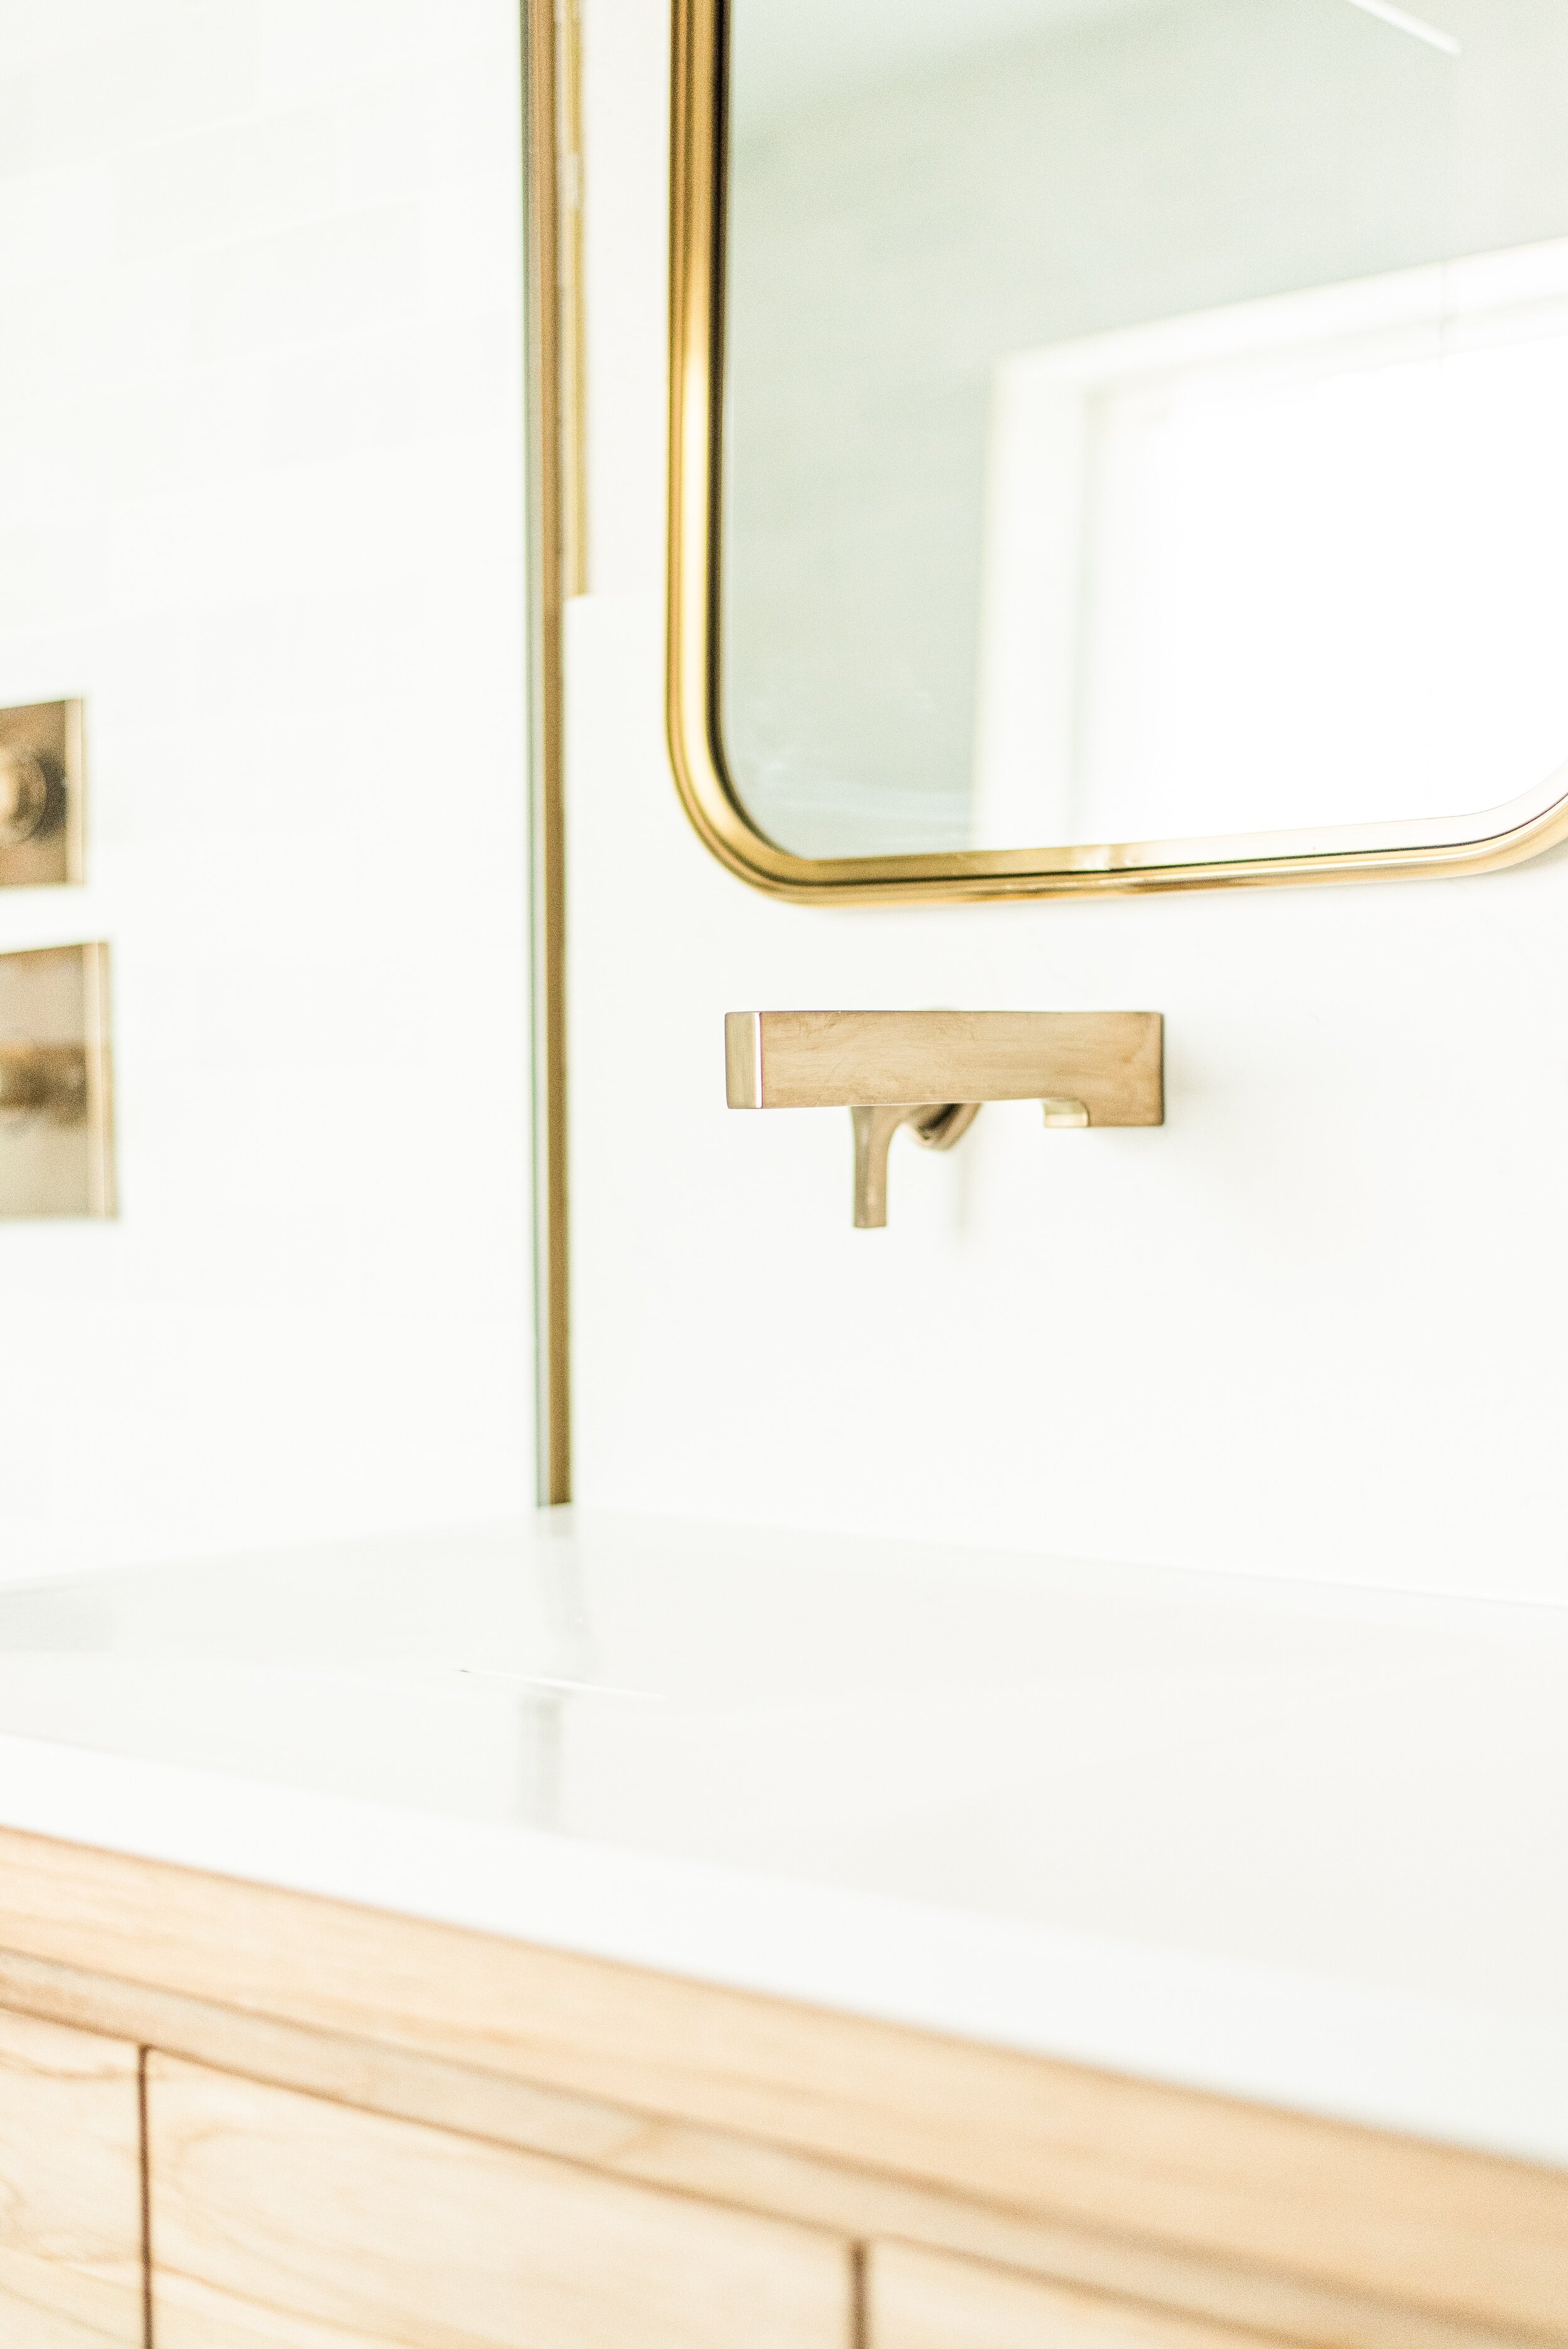
My Trinsic wall-mounted tub filler in champagne bronze from Delta offers classic, old-world charm and is guaranteed not to corrode, tarnish or discolor. Long-lasting, durable, and chic– that’s my DIY love language! We chose the same finish for our Delta Zura showerhead and handheld pendant, and I love the warm undertones, the added touch of sophistication, and the reminder that every room in the house deserves special attention to detail.
It’s all in the details! Find this Delta faucet here.
Belisimo Home always has a great selection of high-quality wallpaper. I love that I can take stacks of books home with me, hold them up in various light and sit with them for a while so I can be certain I’ve made the right choice. For my ensuite, I chose a muted style from JF Fabrics’ Bungalow collection– a plain textured wallpaper in a beige hue with metallic gold speckles. I love that it adds warmth and helps create the perfect ambiance for this space.
My custom teak shelves from East Coast Specialty Hardwood provide extra space for storing little trinkets and keepsakes I’ve brought back from my travels. They’re trendy but classic at the same time and they compliment my floors and vanity perfectly.
Finding the perfect pair of mirrors for your ensuite vanity is no small feat. I searched high and low for modern, stylish accent pieces that complimented the space, but offered a custom look at the same time. My Renwil mirrors were the perfect choice! I love the brass finish, decorative hook, and the way they reflect my personal style– swanky and sophisticated with a touch of glam to spice things up.
Simplicity was top of mind when I chose my frameless fixed glass shower screen. The Vigo Zenith model from Home Depot resists dangerous breakage and shards, making it incredibly safe without compromising style. It comes with premium clear seal strips to prevent water from leaking into the bathroom. Genius!
There you have it! A round up of my favorite ensuite features – guaranteed to make your bathroom experience luxurious and relaxing from start to finish!
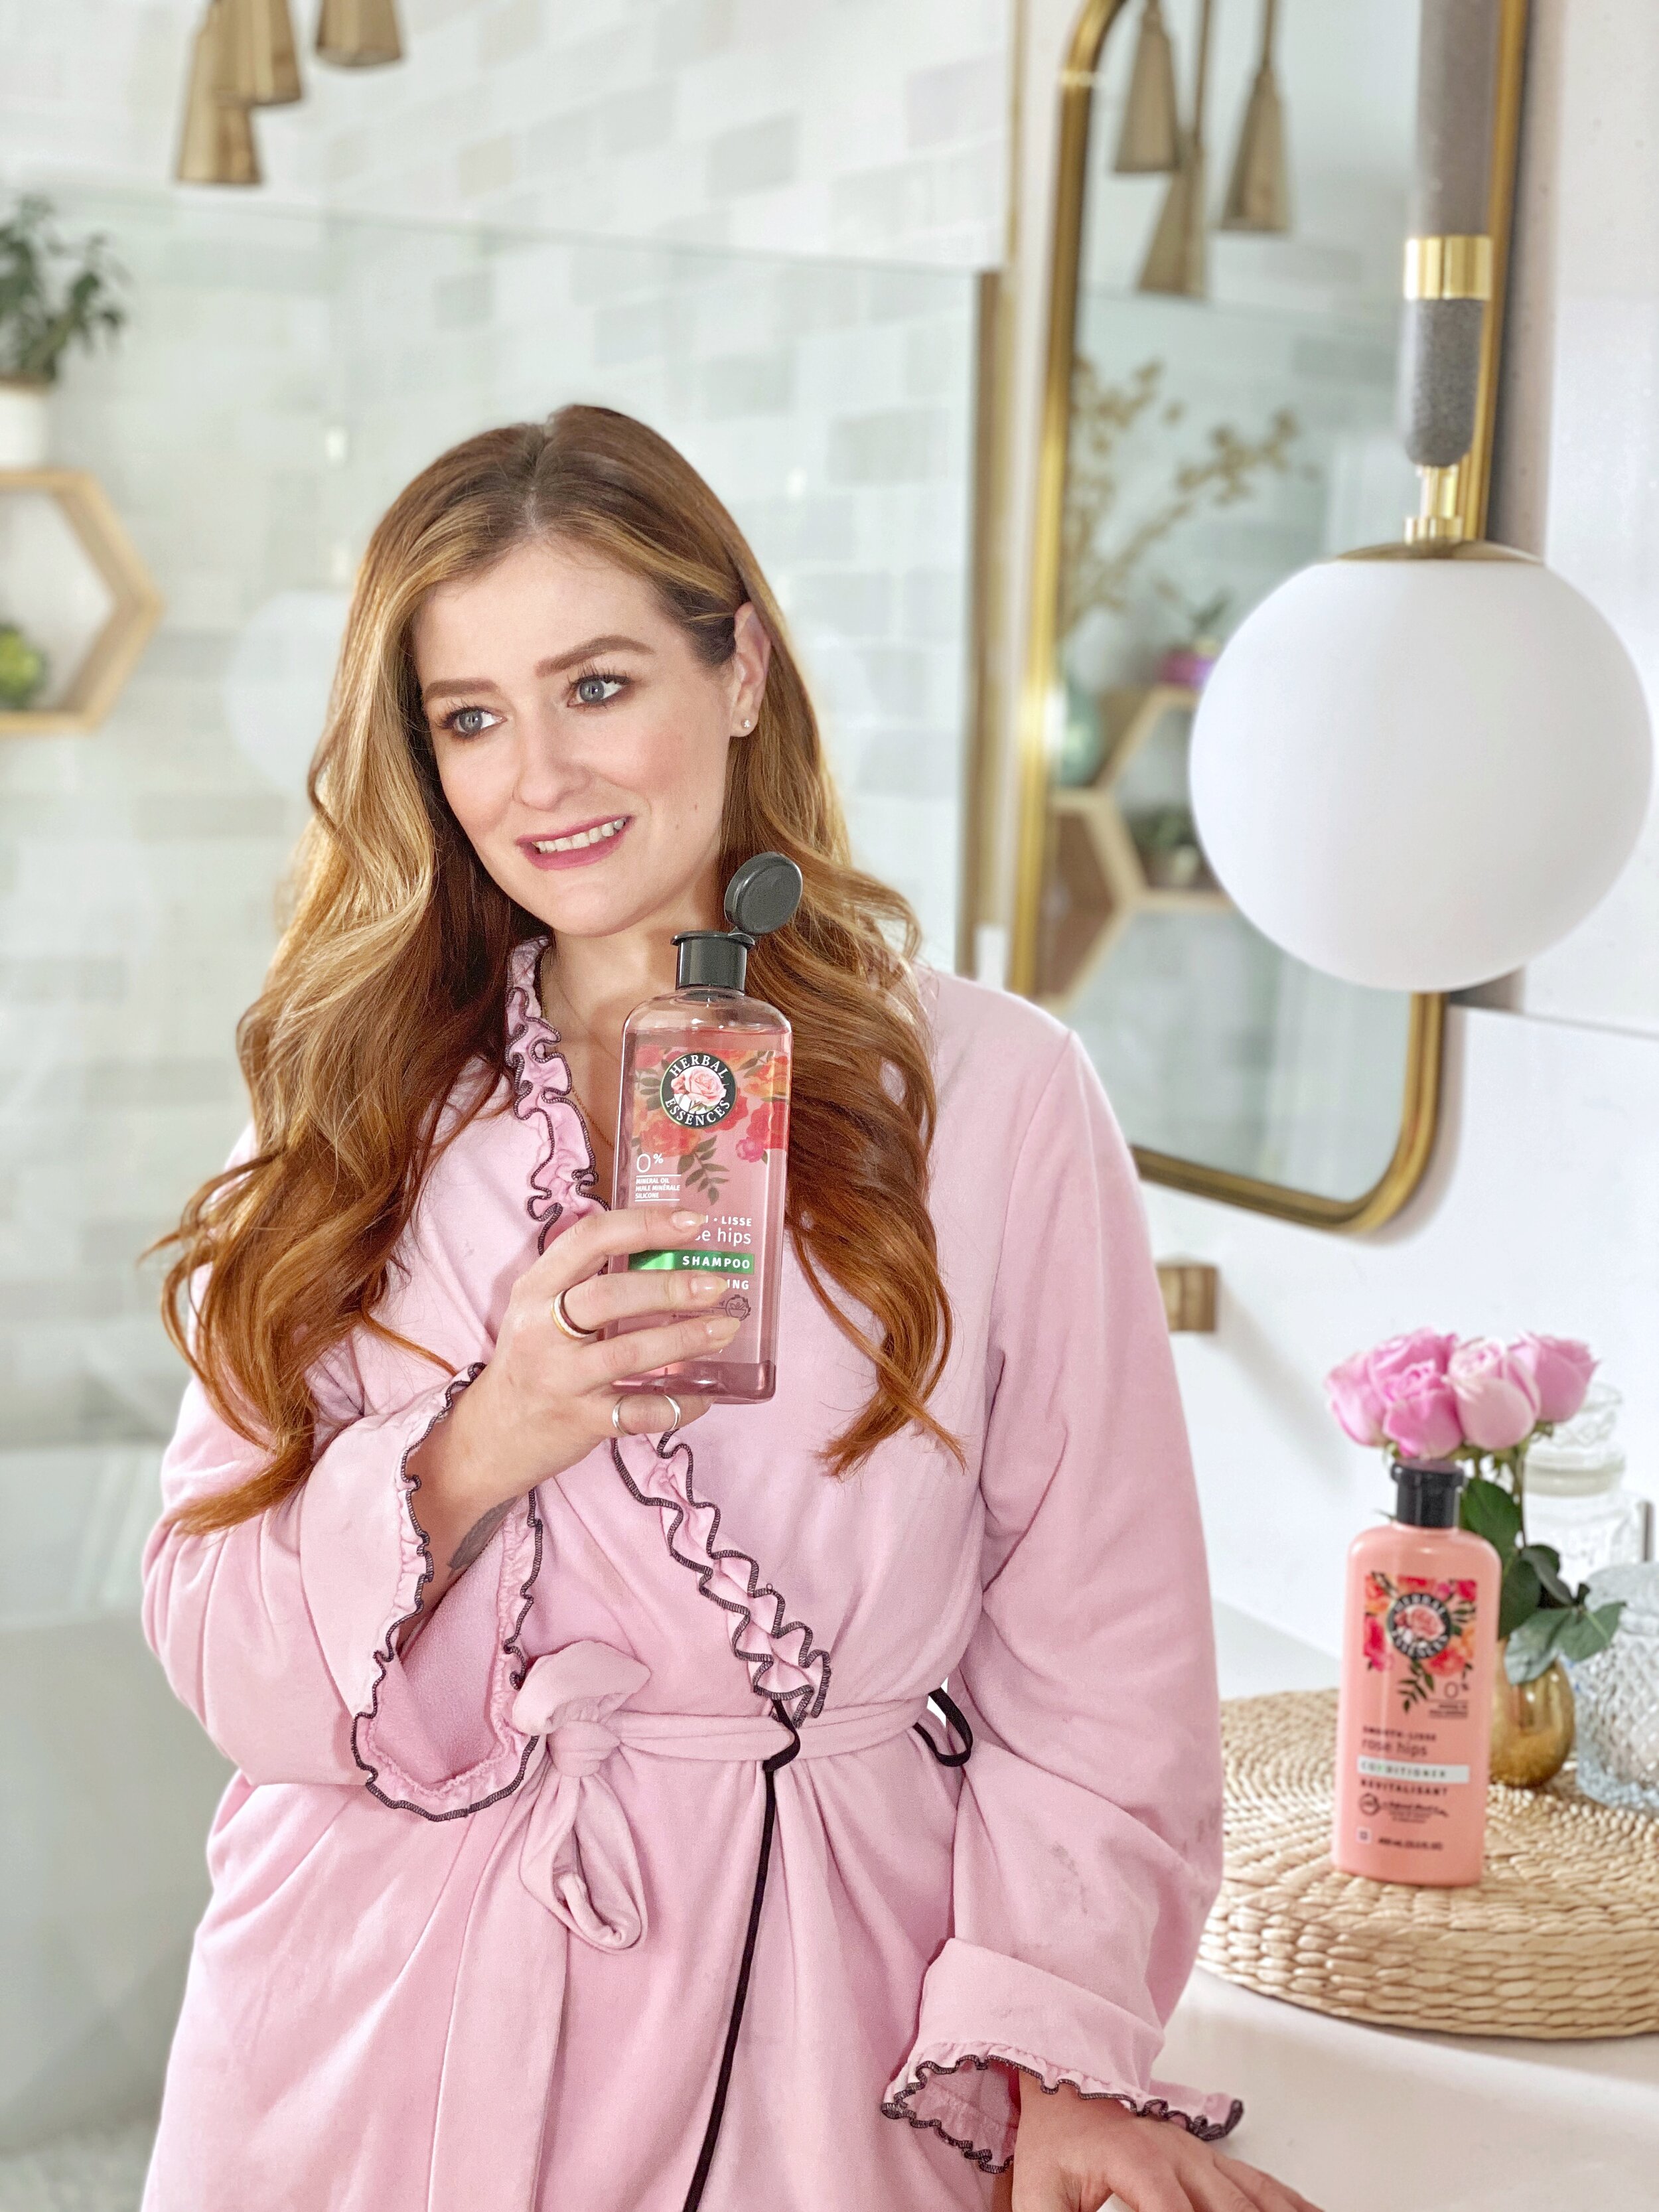
This blog was written in partnership with Herbal Essences. All opinions are my own.
I’m a busy DIY MOM
I run a production company, tv show, am renovating my home, taking time for some charitable projects AND am a single mom. So in order to make any time for myself, I need all the beauty hacks to save me a few extra minutes here and there. This also means my beauty products must work out of necessity, self care and affordability. The little free time I get to myself, I need to make sure the products I buy are necessary, affordable, and also WORK. Who else can relate to being on-the-go 24/7, with next to no time for getting ready?! Or, struggling to get the right products for you because they’re way out of your price range?
That’s why I’m excited to partner with Herbal Essences on my money saving, beauty & hair care hacks for busy women.
• Hack•
Here are some personal beauty hacks that save me time and money:
Find haircare products that bring out your best, natural hair
Find haircare products that bring out your best, natural hair.
As I said, I’m mostly always on the go. Which means I rarely have time for styling my hair. So, I rely on high-quality hair care products to help nourish my hair – leaving it smooth, silky and soft, without the styling! It’s even better when it’s a low cost option, that doesn’t compromise on quality ingredients and is cruelty free and dermatologist-tested! The Smooth Rose Hips Shampoo & Conditioner from Herbal Essences is a new spin on their classic line-up (and they’ve still kept that iconic scent we know and love!) It leaves my hair feeling restored, nourished and extremely smooth – plus the scent of roses is exquisite! It’s also colour-safe (perfect for my red locks!), mineral-oil free and pH balanced. You really don’t have to compromise on quality ingredients when this comes at such an affordable price. CLICK HERE for a link of where to buy!
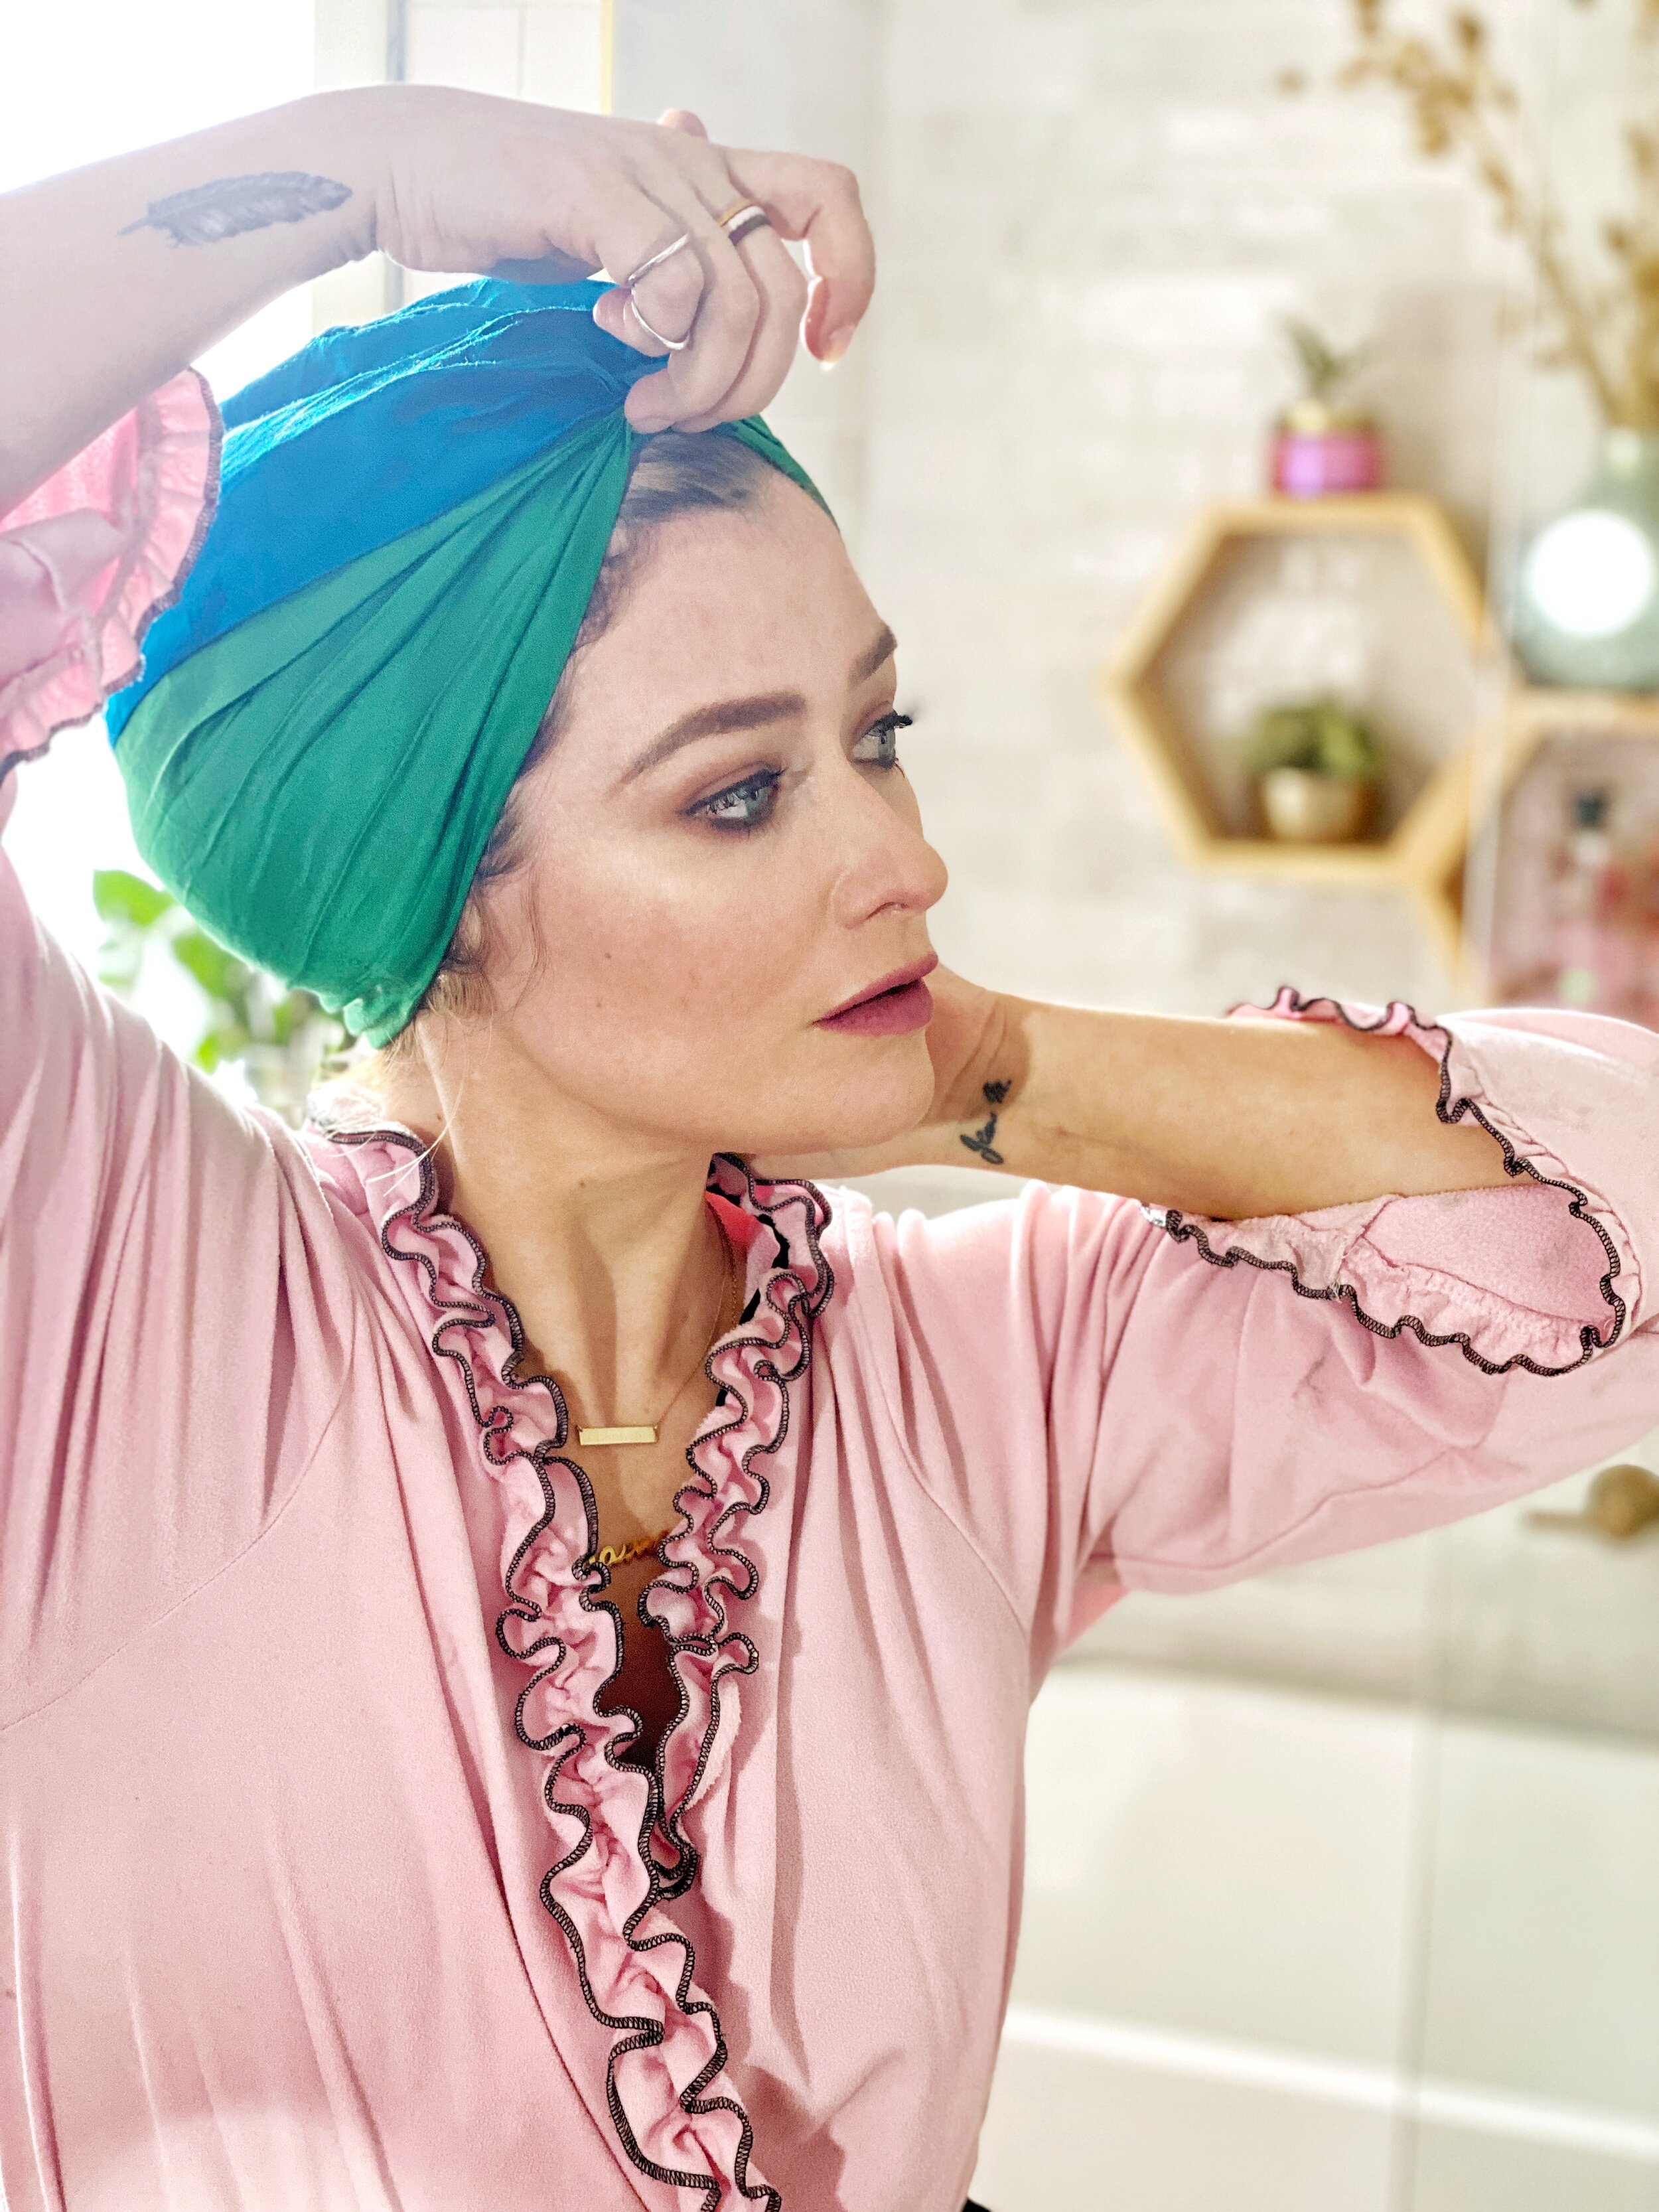
Silk Scarves
I’ve recently discovered the magic of wearing a silk scarf in my hair at night. After I have gone through all the trouble of blow drying my hair and curling it, wearing a silk head wrap or scarf extends my blow out for up to 4 days - that adds up to being a huge timesaver as well as a hair strengthener by keeping the heat off my ends a little longer! A great tip to find a silk scarf that works within your budget is to head to your local second hand or consignment shop. Make sure you check the tag- because it’s easy to get fooled by polyester.
No-Beach, Beachy Waves
Since I’m on the go morning to night. I don’t have a lot of extra time for styling my hair. On a typical day I just wash and go- Here is a quick beauty hack you can easily make at home - If you’re feeling beachy, mix a bit of coarse salt with a drop of essential oil and water then spritz it in - towel dry your hair, brush it out and then put it back in a towel and let it set your beachy waves for the day.
Make BB your Bestie.
Did you know you can mix your foundation with moisturizer or sunscreen to create your own BB cream that will give you a glowy fresh no makeup look. It will also save you money by stretching out your foundation. Taking care of your skin is always a money saver so by wearing sunscreen every day and drinking lots of water you will have healthy looking skin for years to come.
Save on Clean up Time by Picking Products that Match your Décor
My final tip is a timesaver- and one that comes from the home décor enthusiast in me. To keep my bathroom looking sweet and ‘insta-ready’, I like to choose products that match my décor- and you all know I’m into those pink touches so Herbal Essences rosy pink bottles incorporate perfectly into my personal style. At an unbeatable price, you can leave the Smooth Rose Hips collection out for the whole family to use!
I’d love to hear your go-to time and money saving hacks – share yours with me by commenting below!
When I’m knee-deep in home renovations and DIY projects,
I know Lennon is watching how I handle stressful situations, the way I pause and reassess if I hit a stumbling block, the energy I put into my work and the way I prioritize down time with her.
And while I’m often immersed in work traditionally viewed as masculine, I want her to know this…
What determines her path in life
is not what others believe she can do,
but what she knows she can do.
Gender-specific roles no longer define our capabilities or determine our journey and outcome. It will be Lennon’s effort, her willingness to work through obstacles, her belief that she is smart and able and worthy that will determine her success.
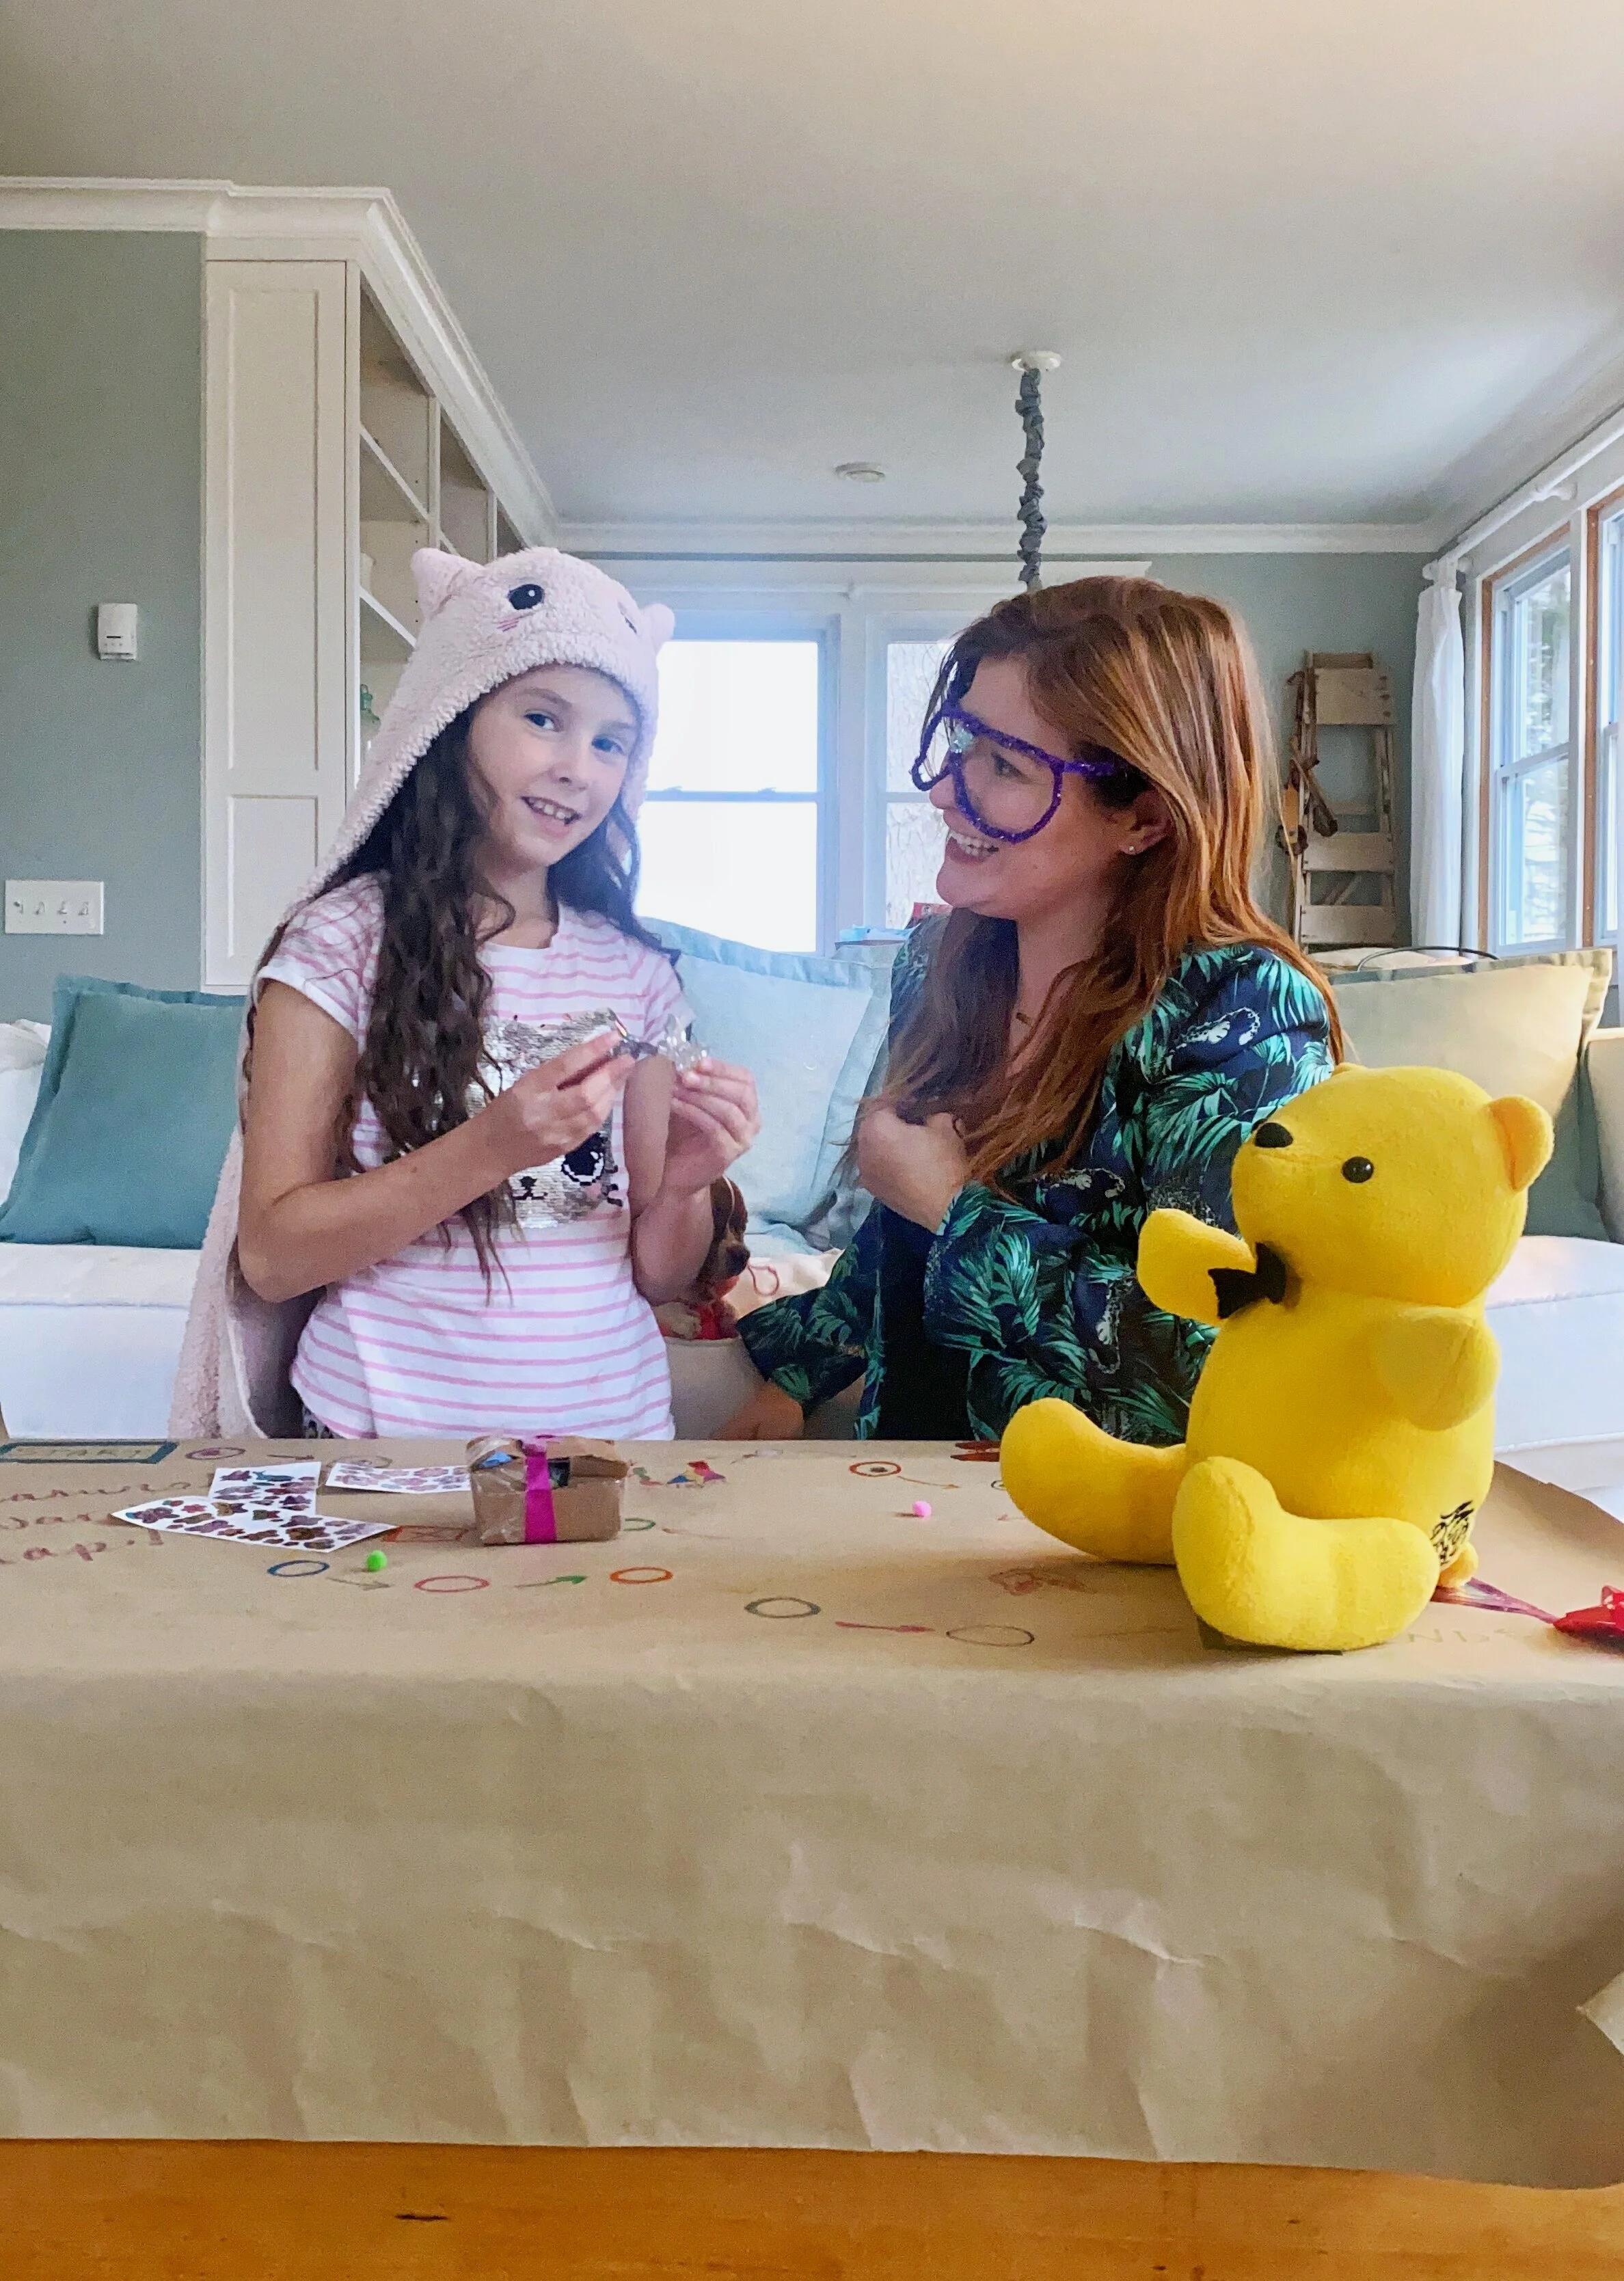
As a single mom, it’s important for me to ensure she is immersed in a culture that values the contributions of women. Even at her young age, females that model strength, resiliency and critical thinking are important for her personal development. That’s one of the reasons we are both die-hard fans of the daytime Emmy nominated series Miss Persona! The main character is curious, industrious and analyzes problems from every angle before trying to solve them. Lennon also loves Miss Persona’s sidekick Brandon Bear.
What’s not to love?
Cuddly, cute, the perfect size for snuggling and a wonderful little friend to Miss Persona. I want Lennon to know that it’s okay to lean on trusted friends and family as we try and navigate the trials of life.
Inspired by Miss Persona’s whimsical approach to life, I created a reward chart that teaches valuable lessons in responsibility, helps sharpen her problem-solving skills, and prompts her to find resourceful ways to handle complex problems. Win/win situation in my books!
A reward system is a great way to reinforce positive behaviour and keep your child motivated to keep pursuing the changes we want to implement. It helps children grasp accountability in small, digestible ways that are also fun, and in typical mom fashion, teach them something without them even knowing. I’m pretty good at recognizing and praising good behaviour, but a reward chart is a good reminder nonetheless.
Here’s how we did it:
I selected a theme that Lennon identifies with and gets excited about. As I mentioned, we are big fans of Miss Persona so we modelled this project using designs and colours that reflect the look and feel of the show.
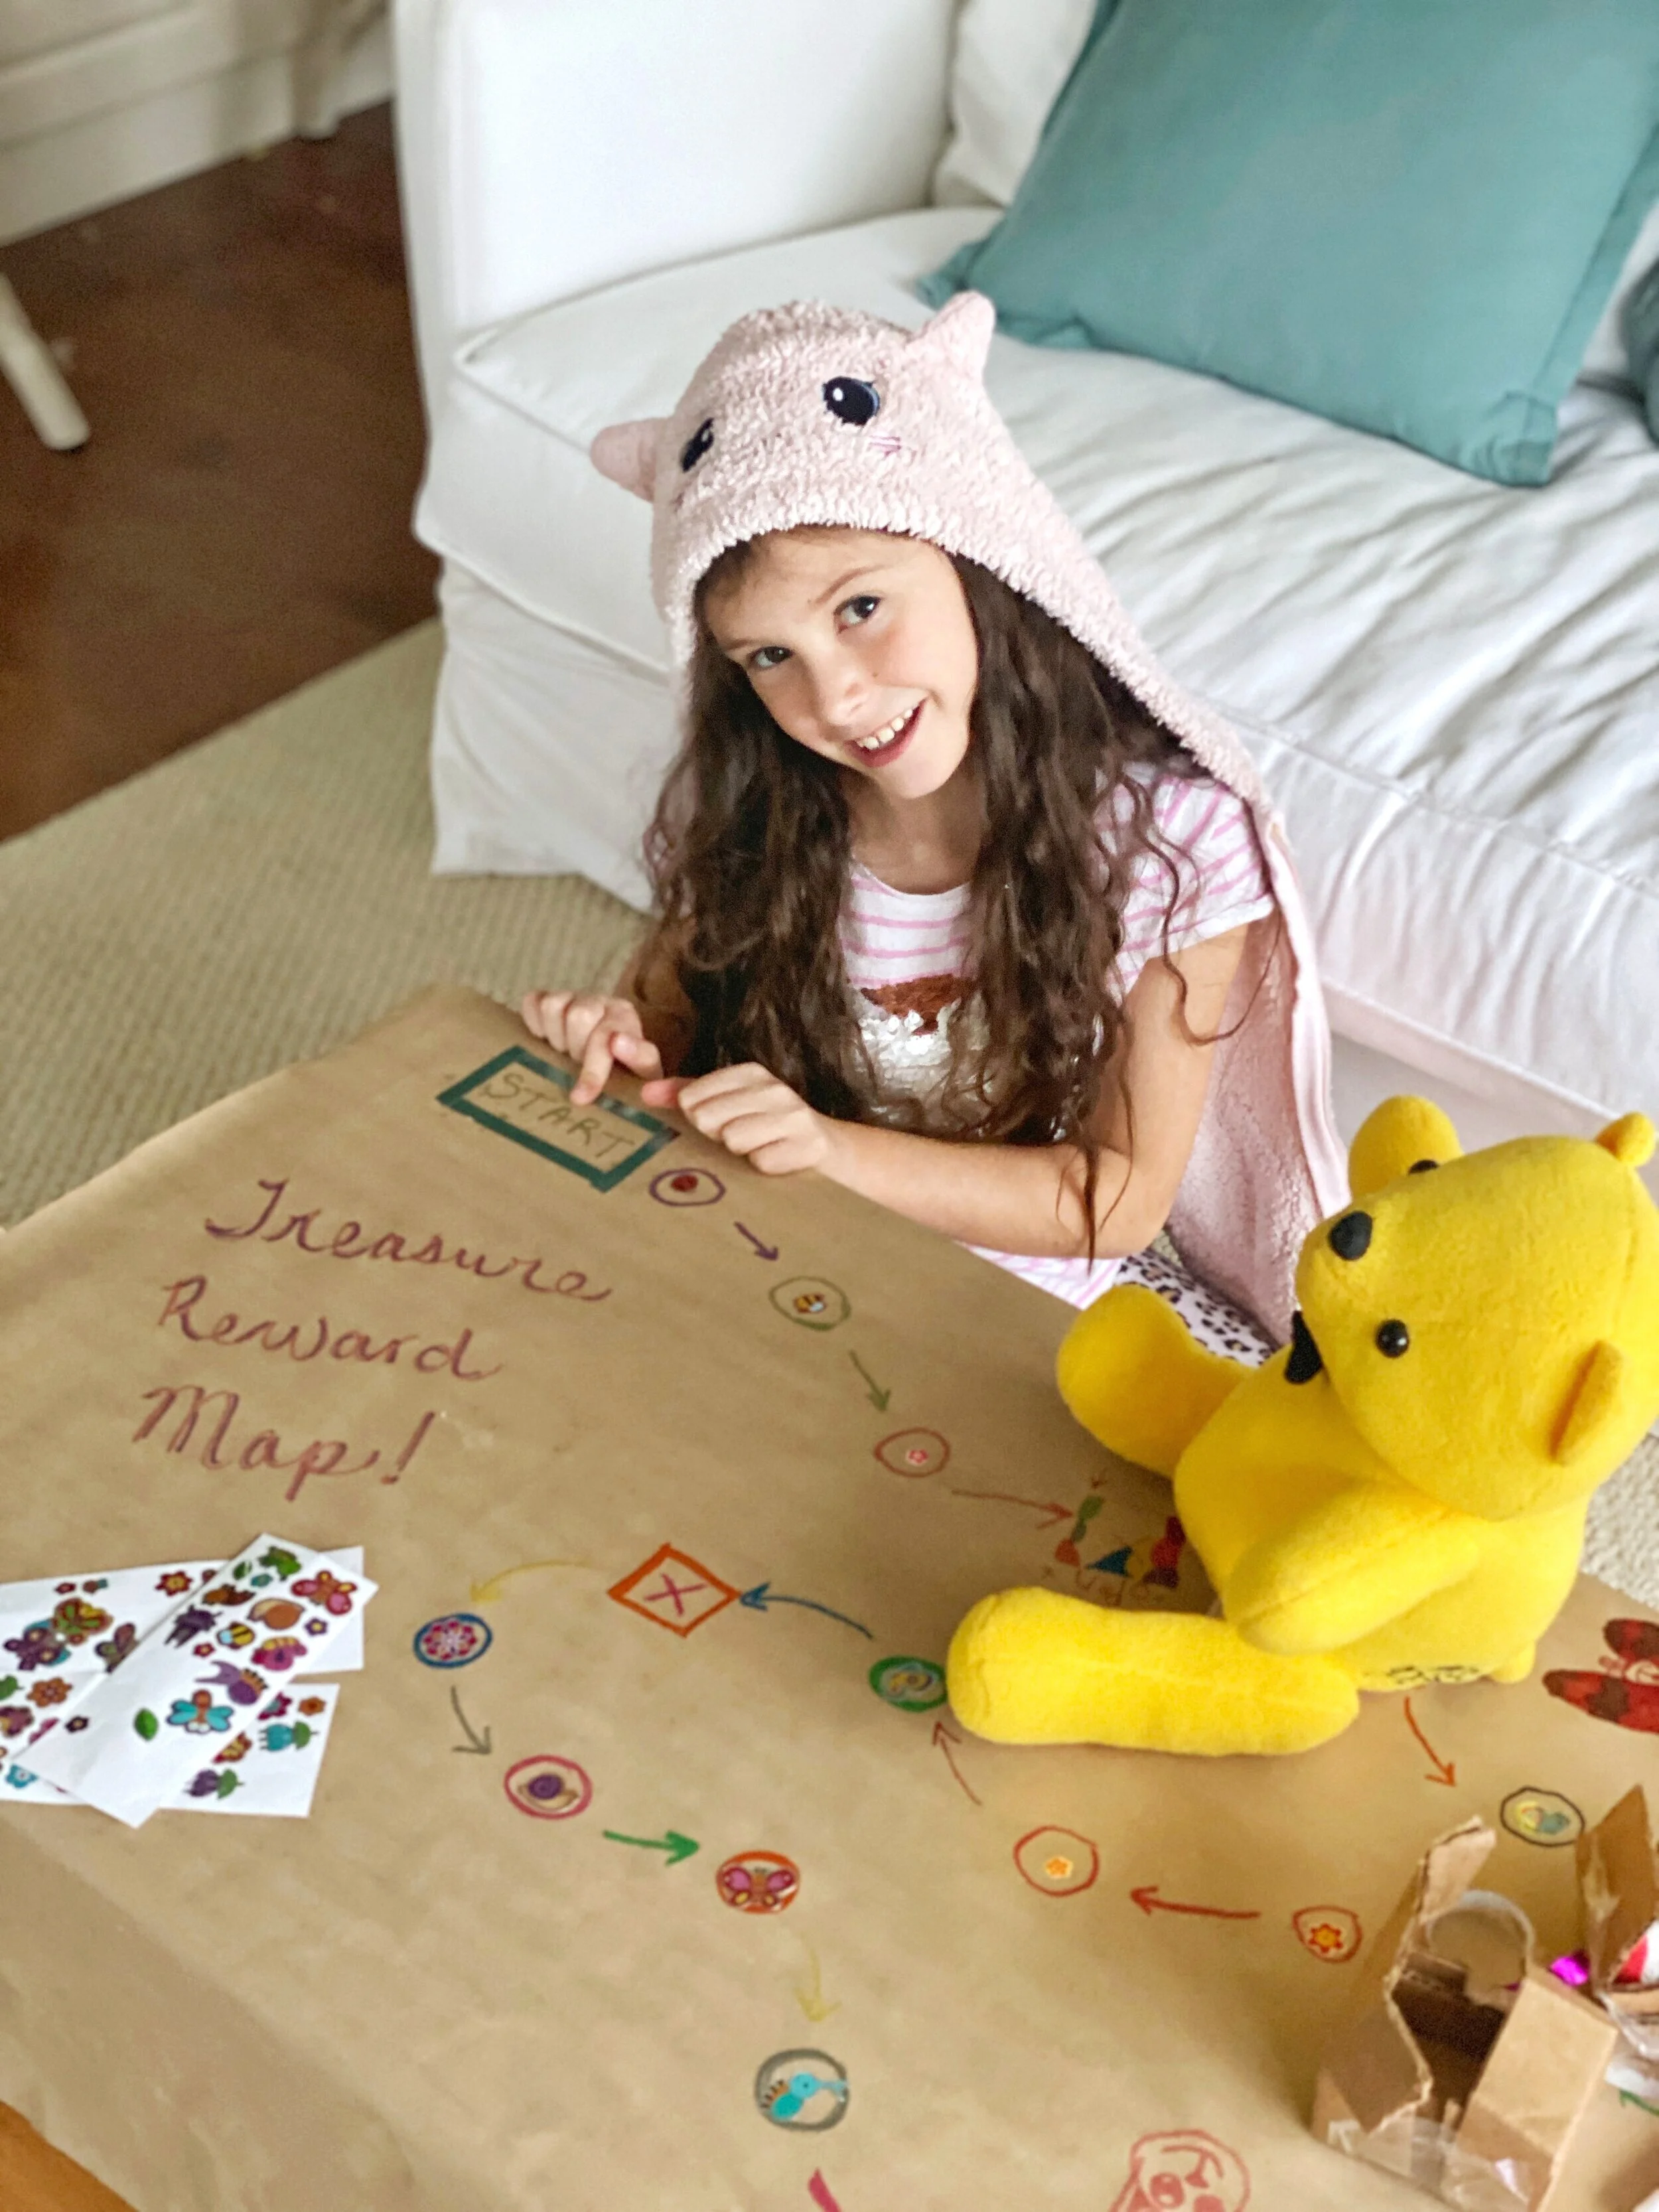
Lennon and I sketched out the plan on brown craft paper to make sure the flow worked for both of us. In true Miss Persona fashion, we got dressed up to play the part of “inventive cartographers.” Brandon Bear was with us too of course. He’s the unofficial member of our little family and has been tagging along with us on all our adventures.
We decided on 3 prize stops. She pressed for more (I would have done the same), but this felt like a good number to help motivate and encourage her along her journey. Each phase gets progressively harder, but not so hard that she’ll want to throw in the towel. The premise is to increase responsibility, but still stay within parameters that are attainable.
Keep the rewards simple but thoughtful. You want your child to know you put some thought and effort into selecting just the right things. They do not have to be expensive, but they should be considerate. Things like hand drawn certificates for activities you can do together, supplies for future craft projects or a book they’ve been wanting are always popular around my house. Choose rewards specific to your child- ones that will keep them motivated to continue putting in the effort.
The most important thing of course is to have fun along the way and be tolerant. Incorporating chores into daily routines or asserting behavioural changes can be a lot of work for young children who are trying to navigate these adjustments with poise and patience. We need to remember to acknowledge their effort.
Lennon’s Treasure Reward Map Download; Click the map above to open image in new window.
You can download this free reward chart and personalize it by writing your child’s name at the top in fancy letters. Lennon likes glitter, so her name is adorned in pink and blue sparkles. Be sure to let me know how this is working for you and your family and tag me in your stories so I don’t miss it.
Join us in your best dress up to watch the new season premiere of Miss Persona (December 7th) at 6:30pm EST on Treehouse with new episodes premiering every weekday!
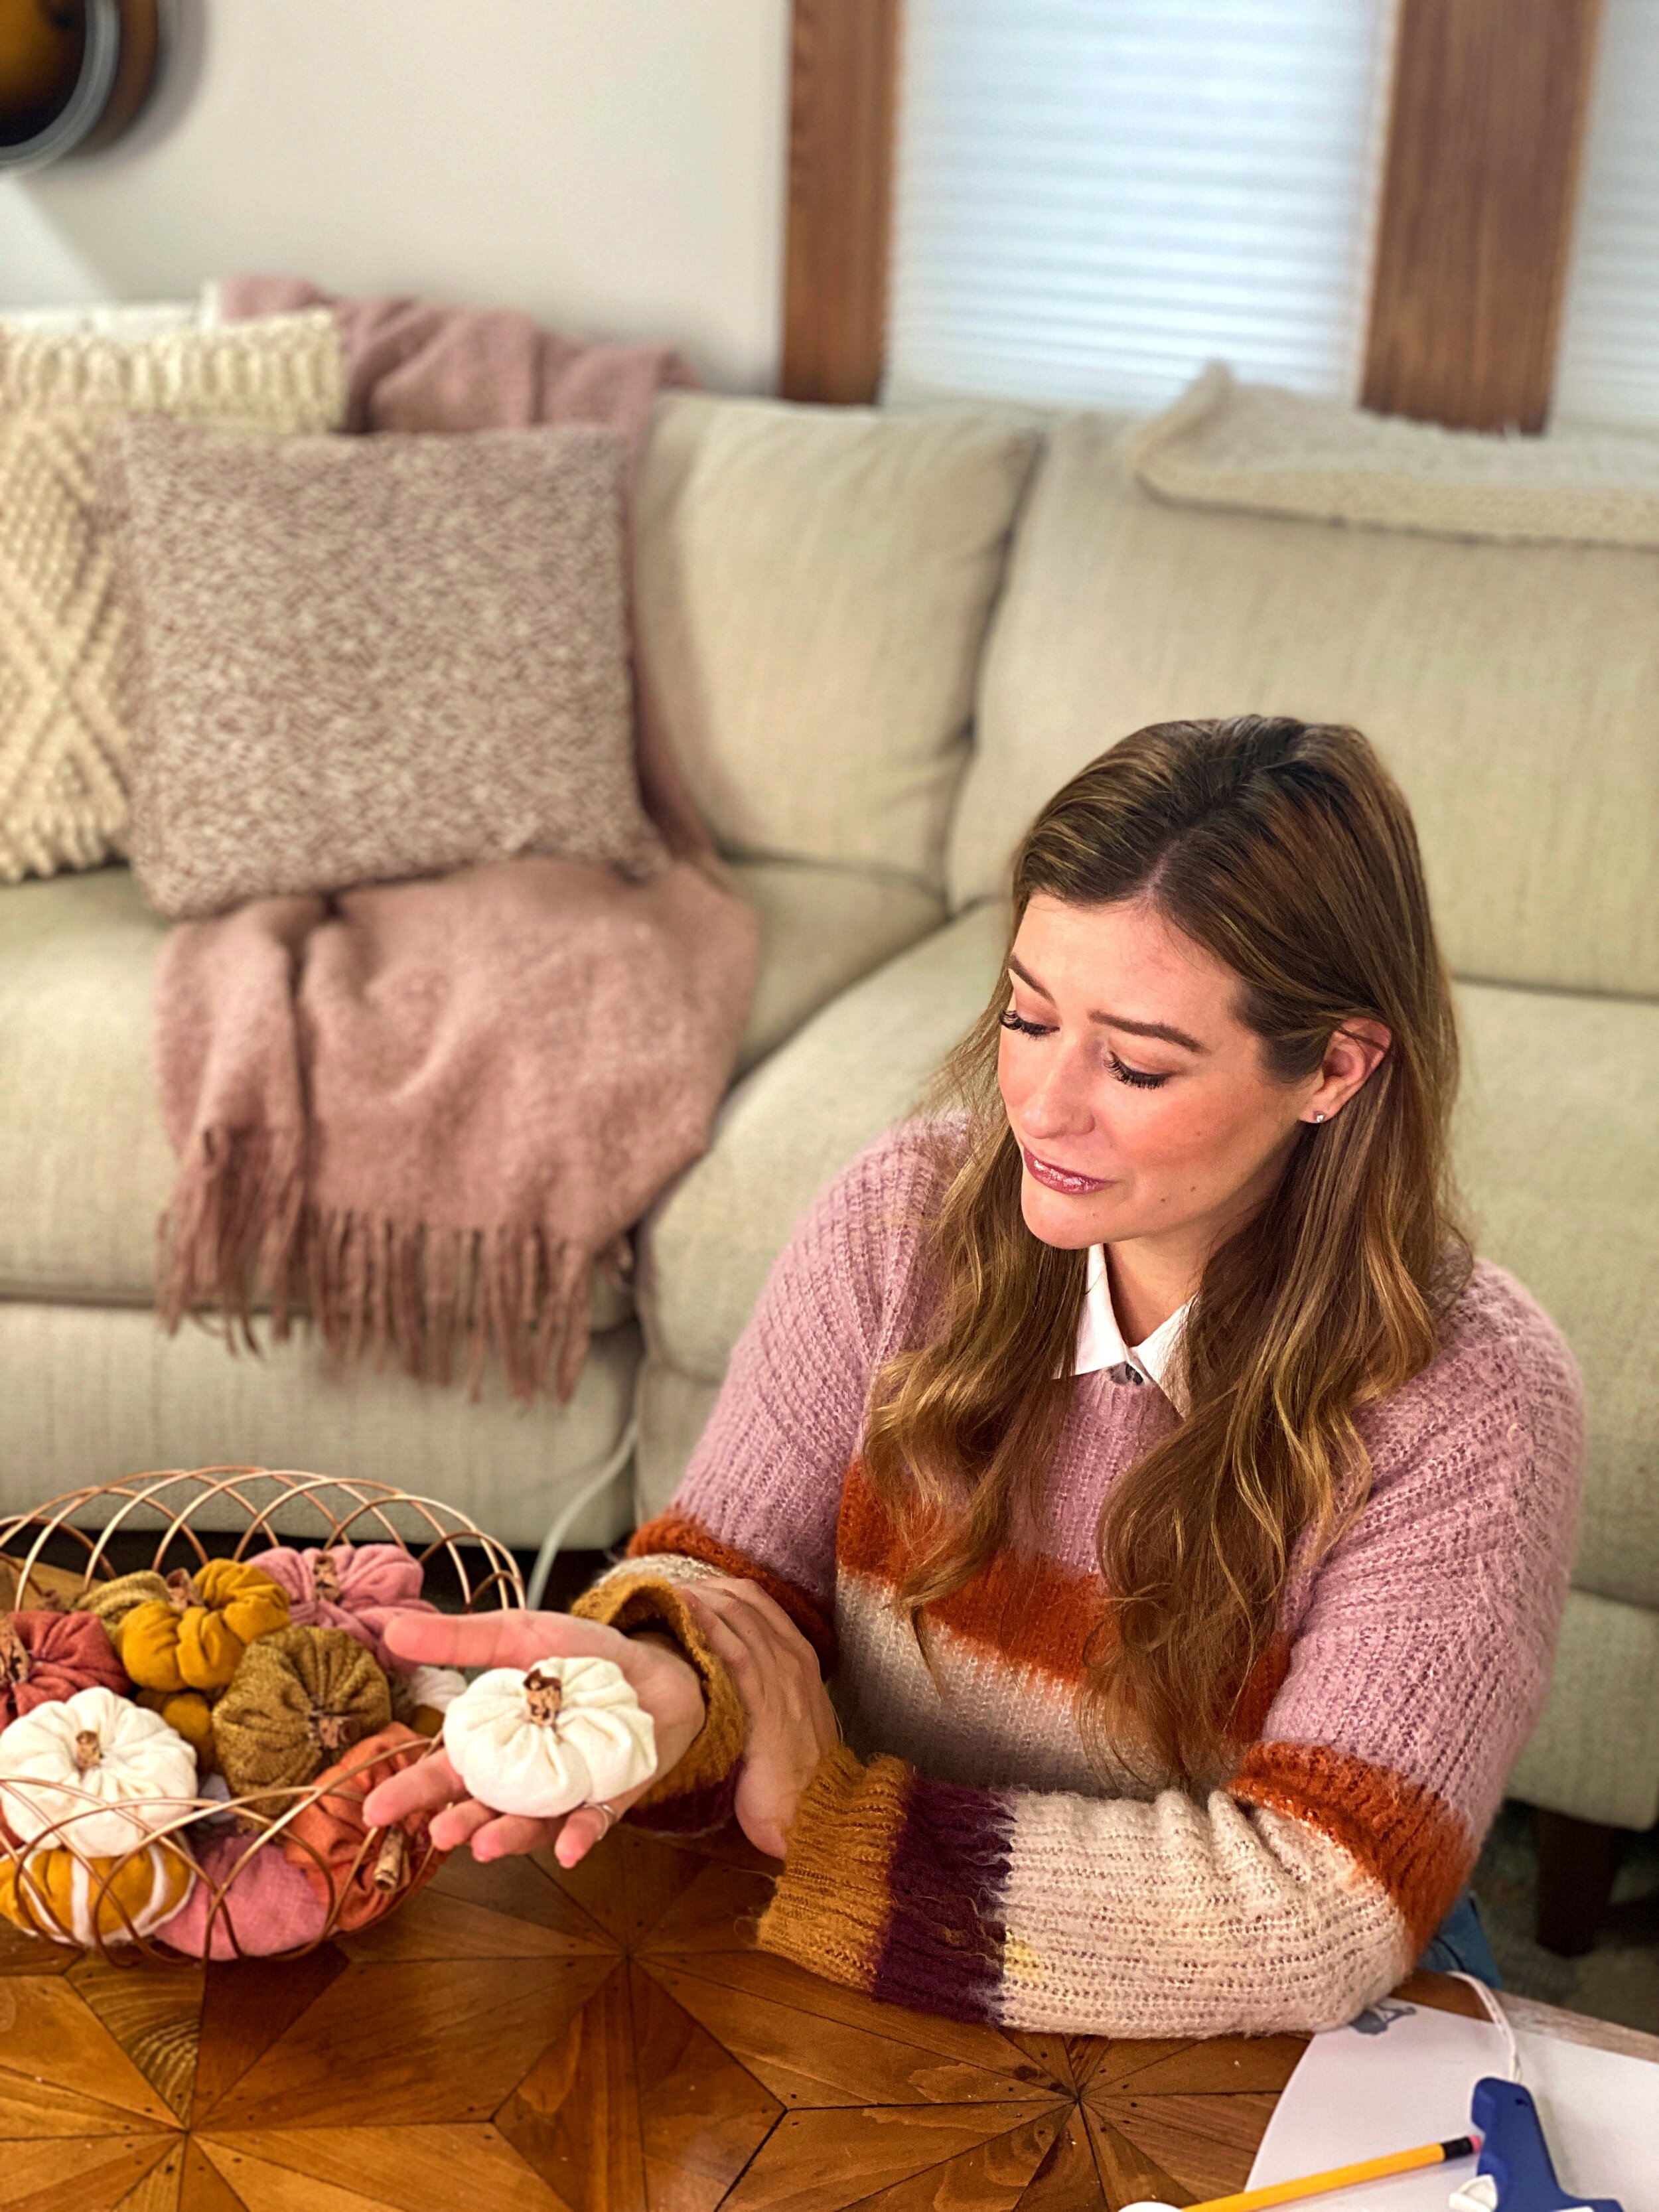
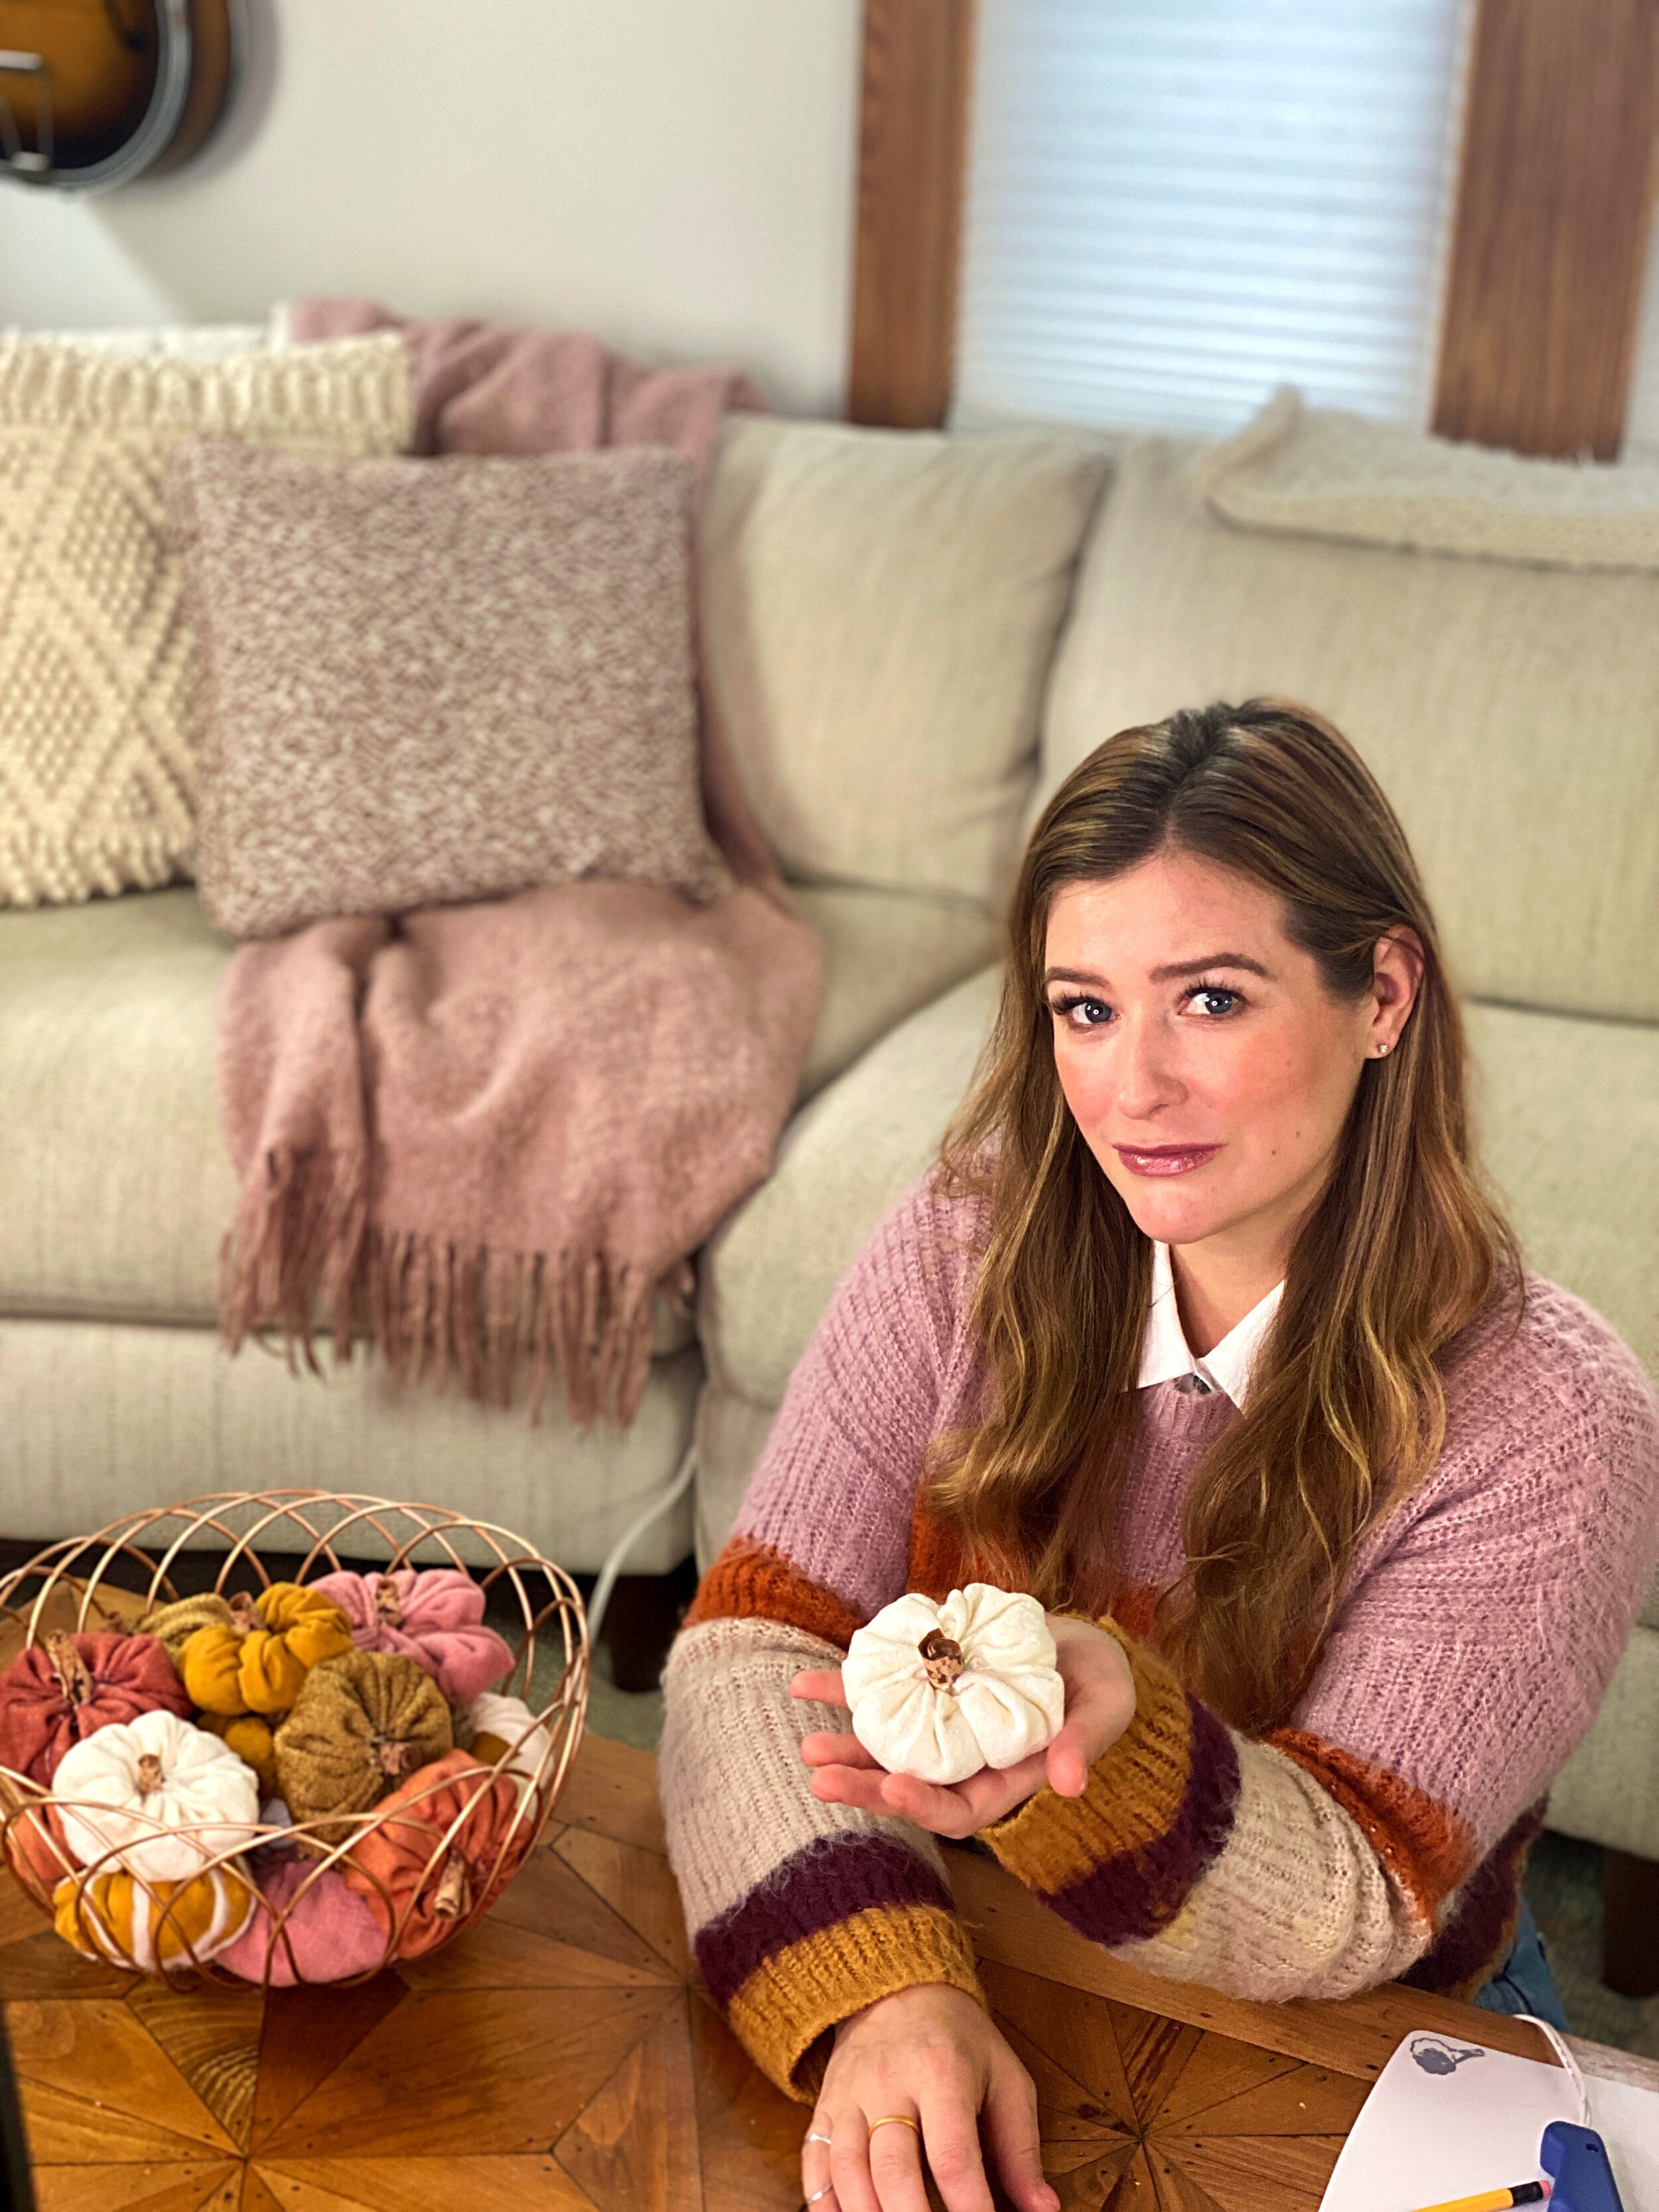
Are you in quick crunch for some last minute seasonal decor?
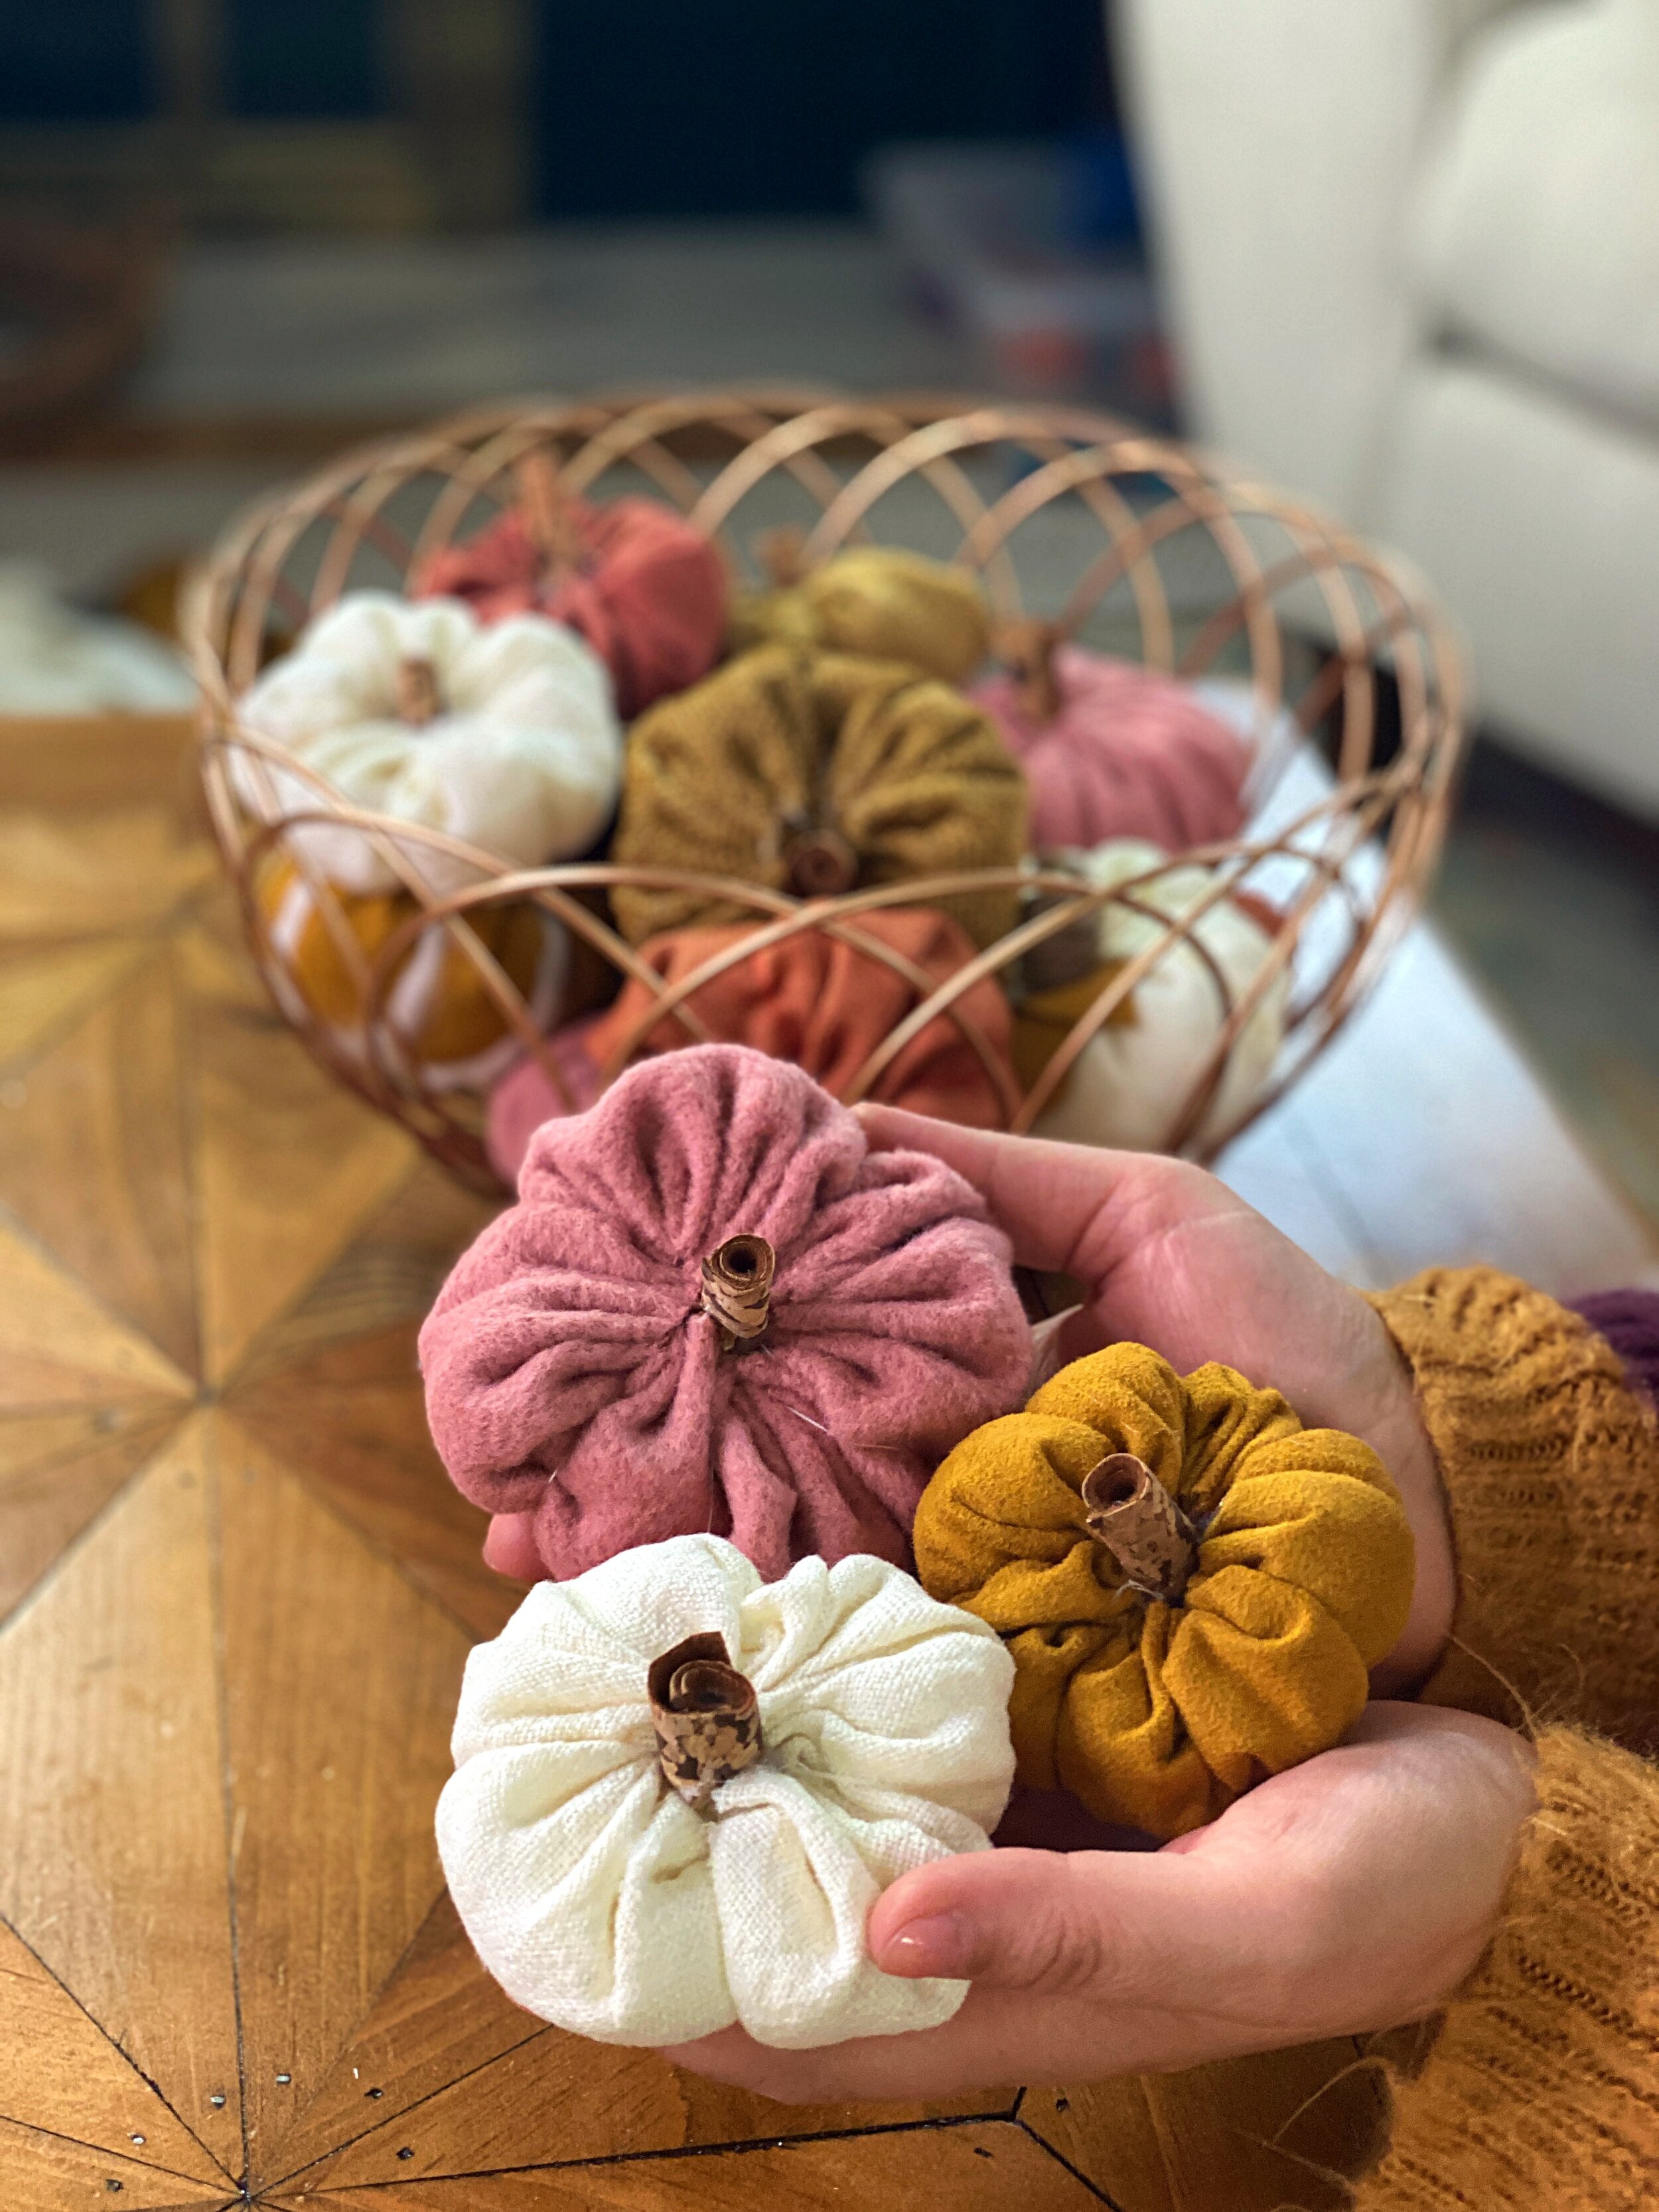
Here is something better than a Pumpkin Spice Latte to quench your seasonal cravings, no carving necessary. Cinderella Style Fabric Pumpkins are a super easy and fun DIY! “Pump-n-Spice” up any space with these adorably cozy cushions. Luckily you can make these Cinderella style pumpkins on a Cinderella style budget!
• SUPPLIES •
These cushy pumpkins can be made from any spare fabric that you may have laying around the house. Whether it be from a previous project or simply an old sweater… lovingly repurposing clothing is a great way to give it a whole new life! — Quite magical indeed Cinderelly. Now go gather the supplies!
FABRIC
SCISSORS
COTTON BATTING
NEEDLE & THREAD
GLUE GUN
POT LID (or something circular to trace)
• STEPS •
Trace & Cut A Circle From Your Fabric:
You can do this using a pot lid, like the true innovateure herself. The bigger you cut the circle, the larger your pumpkin will be. Have fun creating multiple sizes and shapes for some variation in your decor.
Sew A “Slip Stitch” Around The Circumference Of The Circle:
Keep about a 1/4” away from the edge— that way you don’t risk ripping the gathered thread through the fabric. Pro Tip: You can keep your thread attached to the spool to ensure that you never run out of thread until finished.
Stuff Your Pumpkin:
Now that you’ve got your slip stitch in place, it’s time to stuff that pumpkin with cotton batting. If you find yourself short, there are plenty of alternatives that you can use! News paper, rice or repurpose an old stuffed animal. Note:If you are aiming for the cinderella style, less stuffing is best to achieve their flatter silhouette.
Cinch Your Citrouille (Pumpkin):
With your pumpkin now stuffed, cinch the two loose threads together by pulling them tightly and creating a gathered hole. Note:DO NOT tie off or rip off your threads yet! You’ll need them for the next step.
Create The Cinderella Style:
Hold your pumpkin in one hand with the hole facing upward. With the attached needle and thread in the other hand, sew through the centre of the pumpkin then wrap the thread around to create segments. Continue to puncture through the centre to create that Cinderella style. When you have achieved your desired shape, tie off that thread or sew a knot in the fabric to finish.
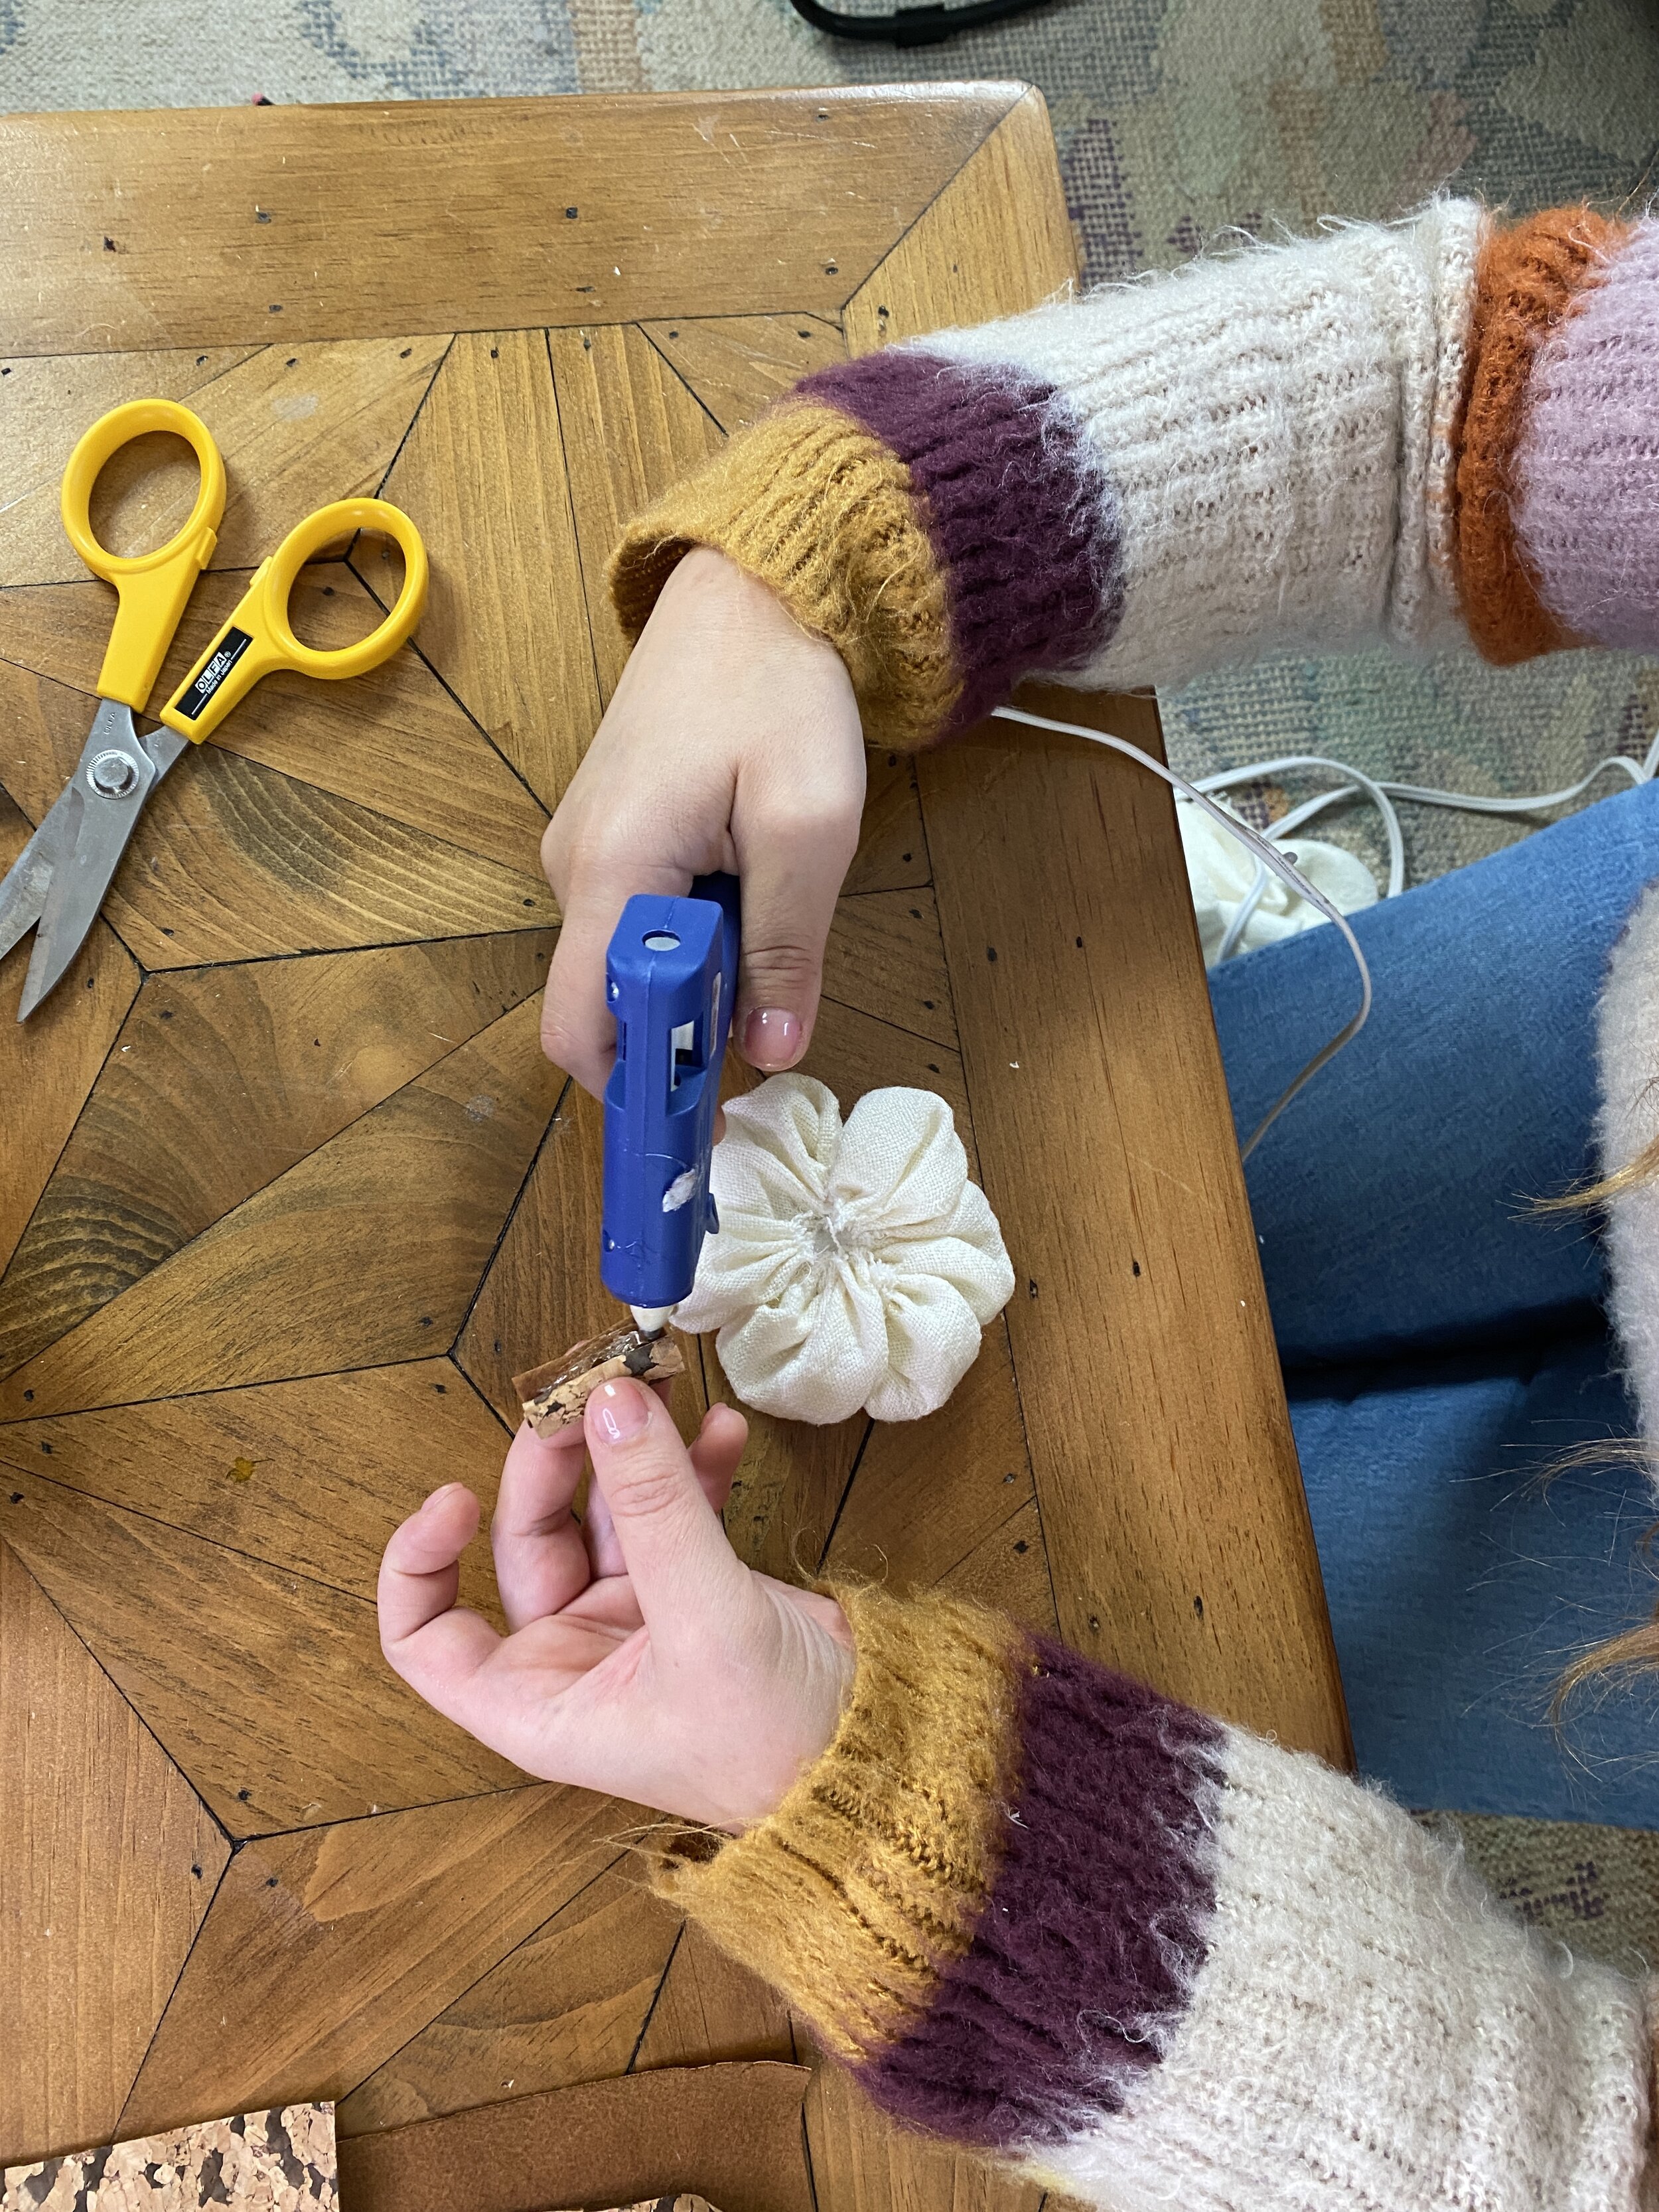
Stylish Stems:
To top off your perfect pumpkin, it’s time to get creative with the stem! I opted for some leftover cork fabric that I had, which I then cut into strips, rolled then glue to the top using the hot glue gun. Note: You can use anything to create the stems— Pipe cleaners, twine, twigs, rubber bands! Get crafty & get creating this Autumn.
Trace a circle then cut.
“Slip Stitch” around the circumference fo your circle, stuff your pumpkin then pull both threads together to cinch.
Get that stuff’n in.
Cinch it like Cinderella’s corset
Sew through the centre of the pumpkin and wrap it back around to create segments. Repeat until you’ve achieved your desired shape.
Decorate your pumpkin as you see fit! Get Creative with the stem.
Now that you’ve got the Bippity Boppity Boo of it all, you can make enough pumpkins to fill an entire patch! (Granted, such a project would be much easier if you did happen to have a joyous army of furry critters to assist you…) Never the less, It’s time to head to the Fall Ball!
• Styling Your Creations •
Now that you’re knee deep in your custom made pumpkin patch, what do you do with them all?
Styling your pumpkins and working them into your home decor is half of the fun! This DIY craft is truly versatile, especially if you play it smart with your fabric choices. Sticking with neutrals will allow you to place your pumpkins in any space and give an overall “oomph” to your autumnal ambiance. If you chose to work with bolder & brighter patterns, you are sure to have some spirited standout pieces that will really transform a space!
String together your pumpkins with twine or yarn to create a garland. These garlands are perfect for hanging in windows, doorways and make an excellent focal point for your fireplace (then use the spares to really bulk up the mantle.)
Toss all your pumpkins into a complimentary dish and stick them on your dining room table for an exciting centrepiece. Sprawl differing sizes and styles along the table for a graphic effect.
No matter which way you style these adorable little pumpkins they are sure the please <3
What’s one thing a bedroom needs? A bed, definitely. Forever the centrepiece of these self-titled rooms, beds act as a comfortable place to rest while doubling as great decorative pieces. Often, beds set the standards for the rest of the rooms decor. However finding an affordable piece of art to lounge over your mattress can be quite challenging. Purchasing even a simple duvet cover from a retailer could cost a fortune, regardless of the quality and material. Well I’m here to tell you to cut out the middle man, and DIY. Duvet It Yourself.
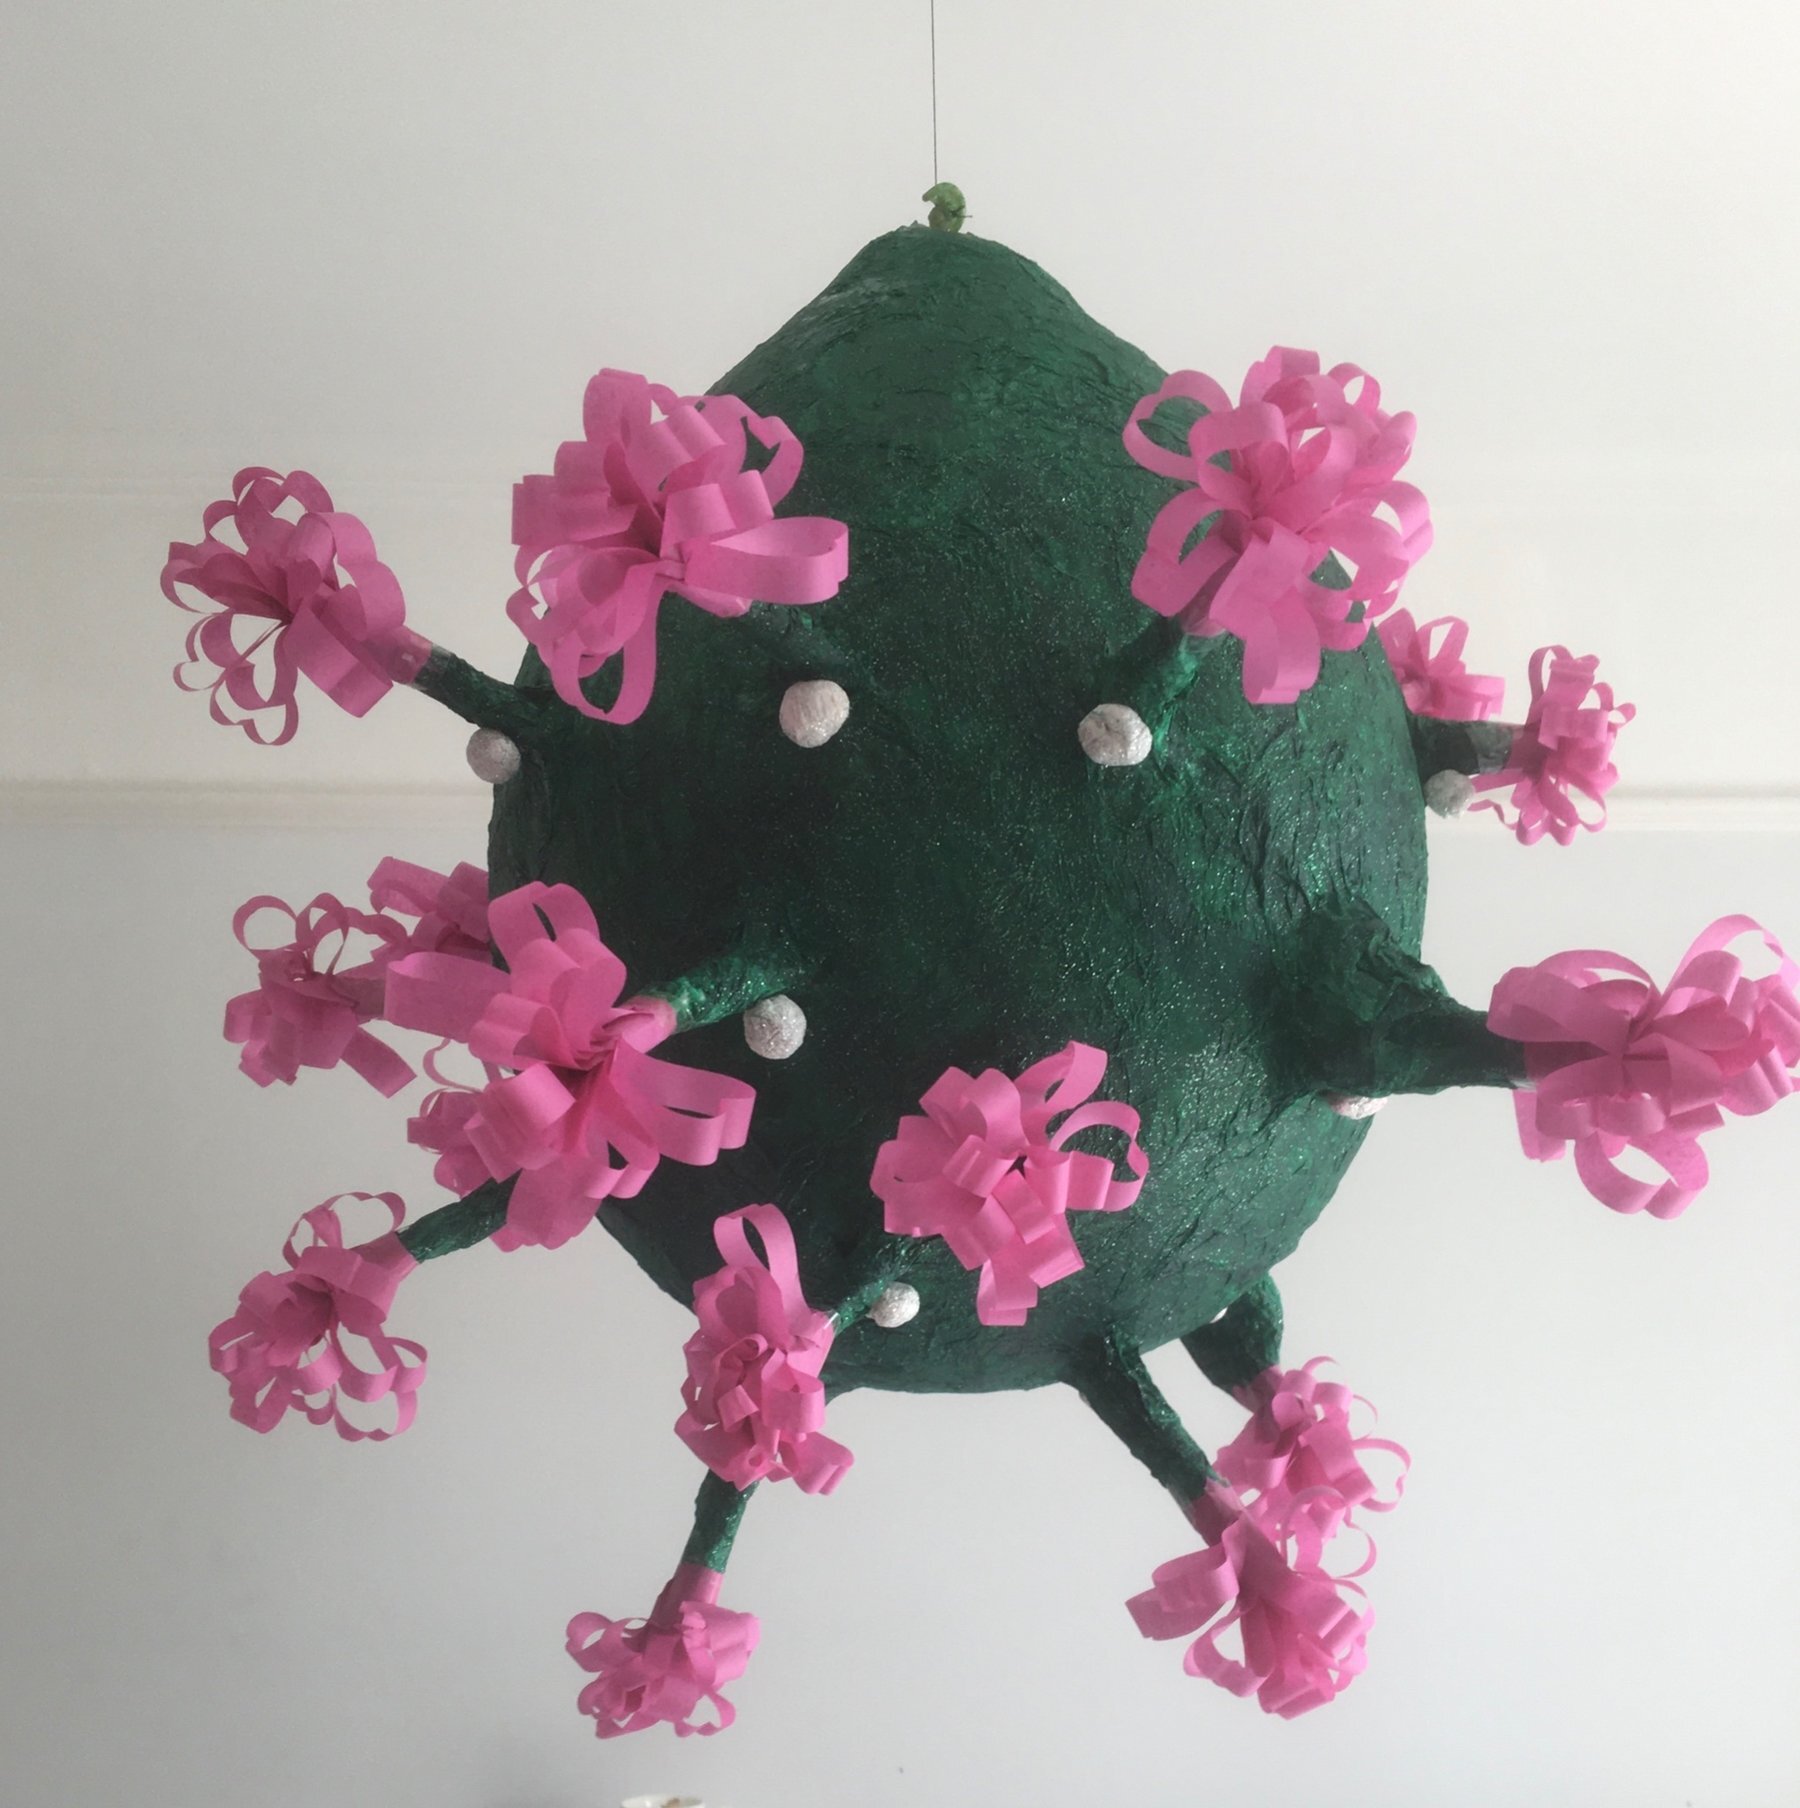
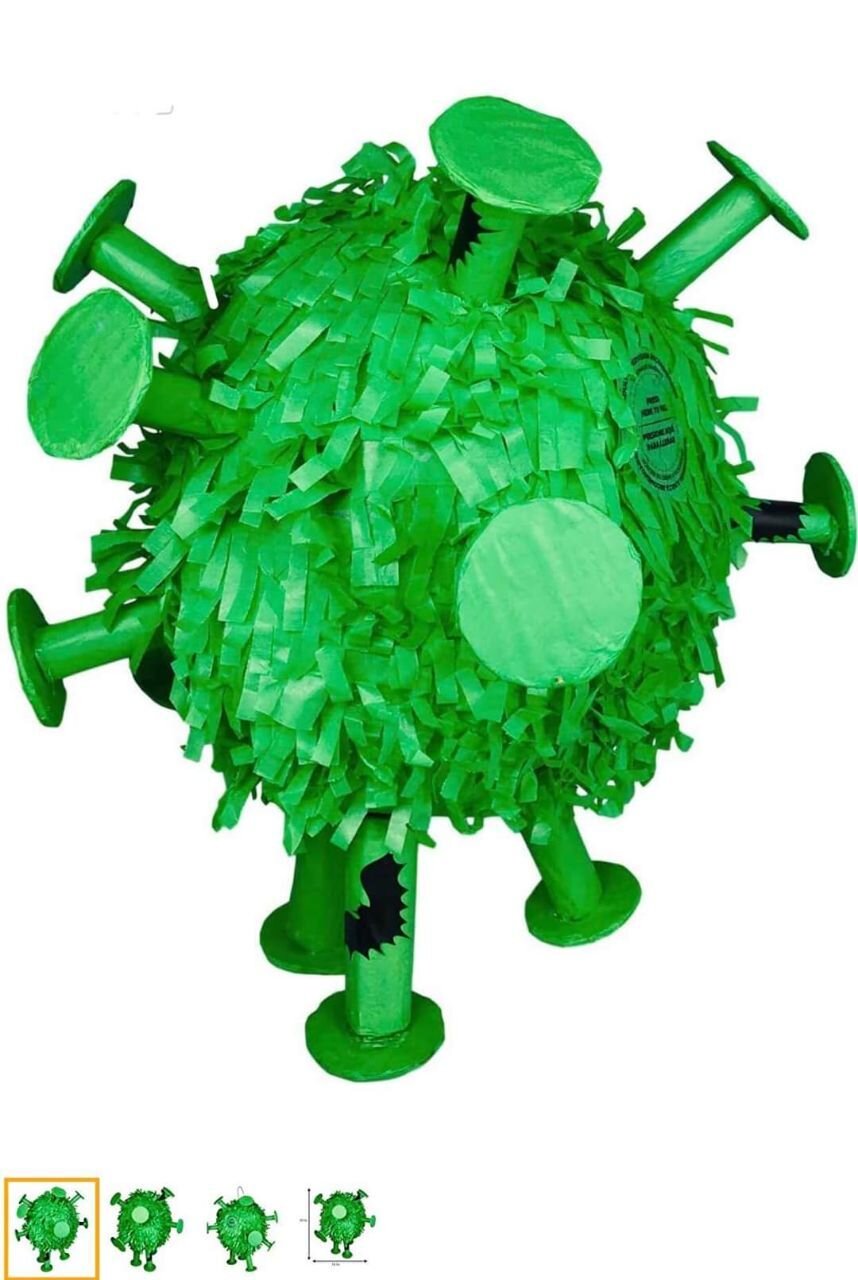
This DIY Piñata Is A Fun and Creative Way to Help “Beat” The Coronavirus
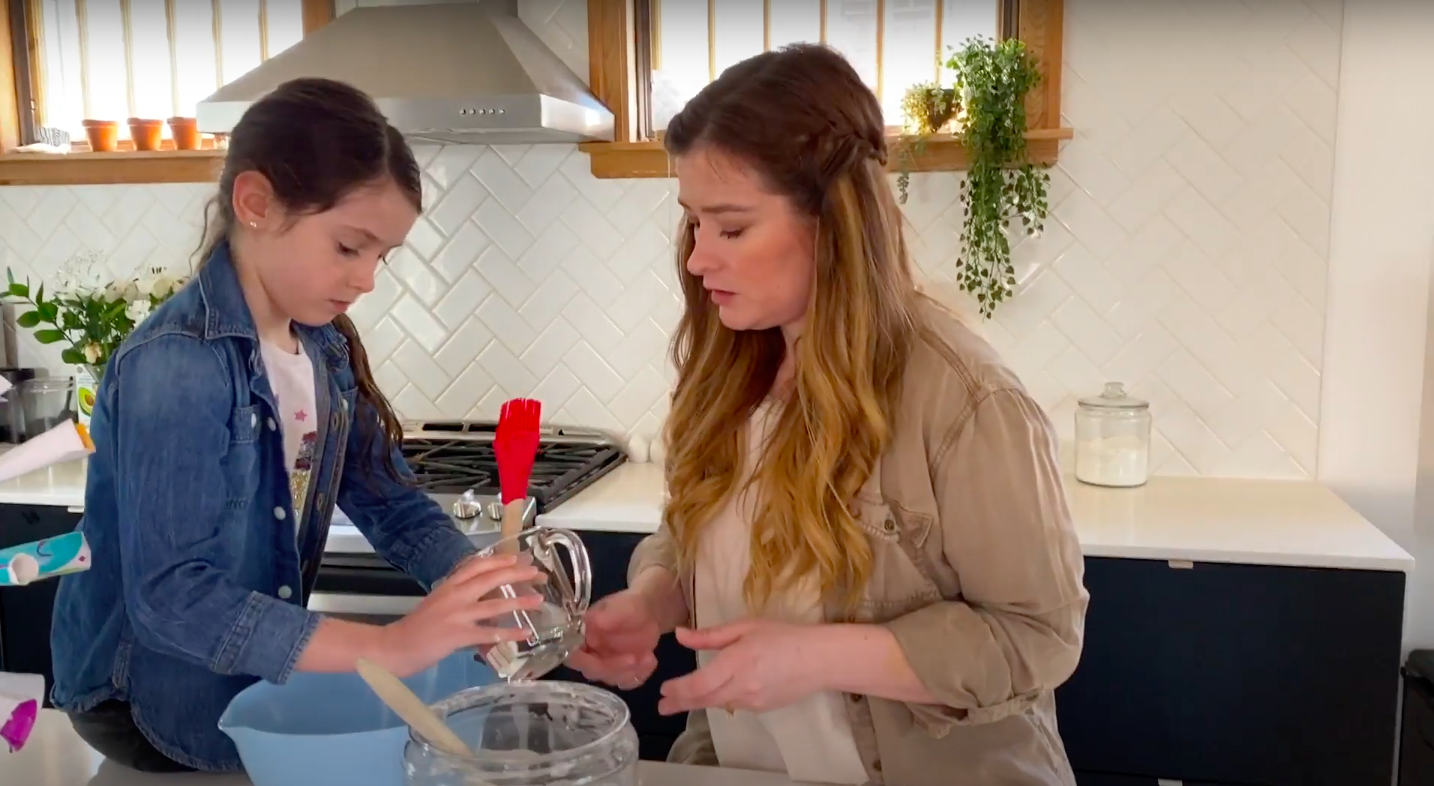
The times are in fact, a-changin’. I must admit that the Covid pandemic has proven difficult to navigate. Being a self-employed, single mother naturally comes with it’s own set of challenges. Throw a quarantine into the mix and then suddenly I need to be a teacher and full-time entertainer on top of it all! I have always had a profound respect and admiration for our school teachers and child care providers, however over the past few weeks, that appreciation has grown leaps and bounds. Finding innovative ways to educate Lennon while maintaining her interest (especially while being surrounded by the temptation of her toys…) was quite the conundrum. Upon some reflection, I decided to teach Lennon the best way that I knew how: DIY Crafts!
Learning doesn’t always have to be sit down, do your work, study and memorize. Sometimes learning can be a little more tactile and hands-on. For example: This Coronavirus Piñata that Lennon and I made for her (quarantine) birthday. Let’s call it Chemistry, Science and Art class all mixed into one dynamic lesson! So let’s gather our materials and get ready to get a little messy with this Piñata DIY.
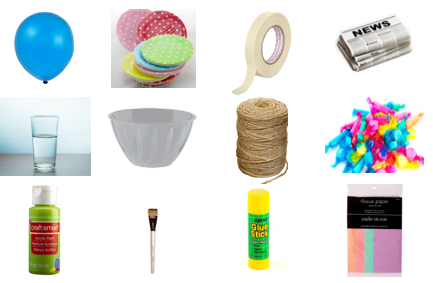
SUPPLIES
Most of these supplies you will likely already have around your house!!
BALLOON
PAPER PLATES
MASKING TAPE
NEWSPAPER
WATER
BOWL (large enough to hold piñata)
TWINE/STRING
CANDY
GREEN PAINT AND BRUSH
GLUE STICK
TISSUE PAPER
DIRECTIONS
STEP 1.
Blow up your balloon and tie a knot at the base.
STEP 2.
Cut a paper plate into quarters (pizza shaped pieces).
Step 3.
Roll the paper plate pieces into cones, tape them so they remain in this shape, and cut one-inch strips at the bottom of the cone.
Step 4.
Flare out the strips and tape them to the balloon.
STEP 5.
Make the paper mache with equal parts water and flour, then mix.
STEP 6.
Tear your newspaper into strips and coat them in the paper mache mixture. Layer them onto your balloon in different directions smoothing out any bubbles.
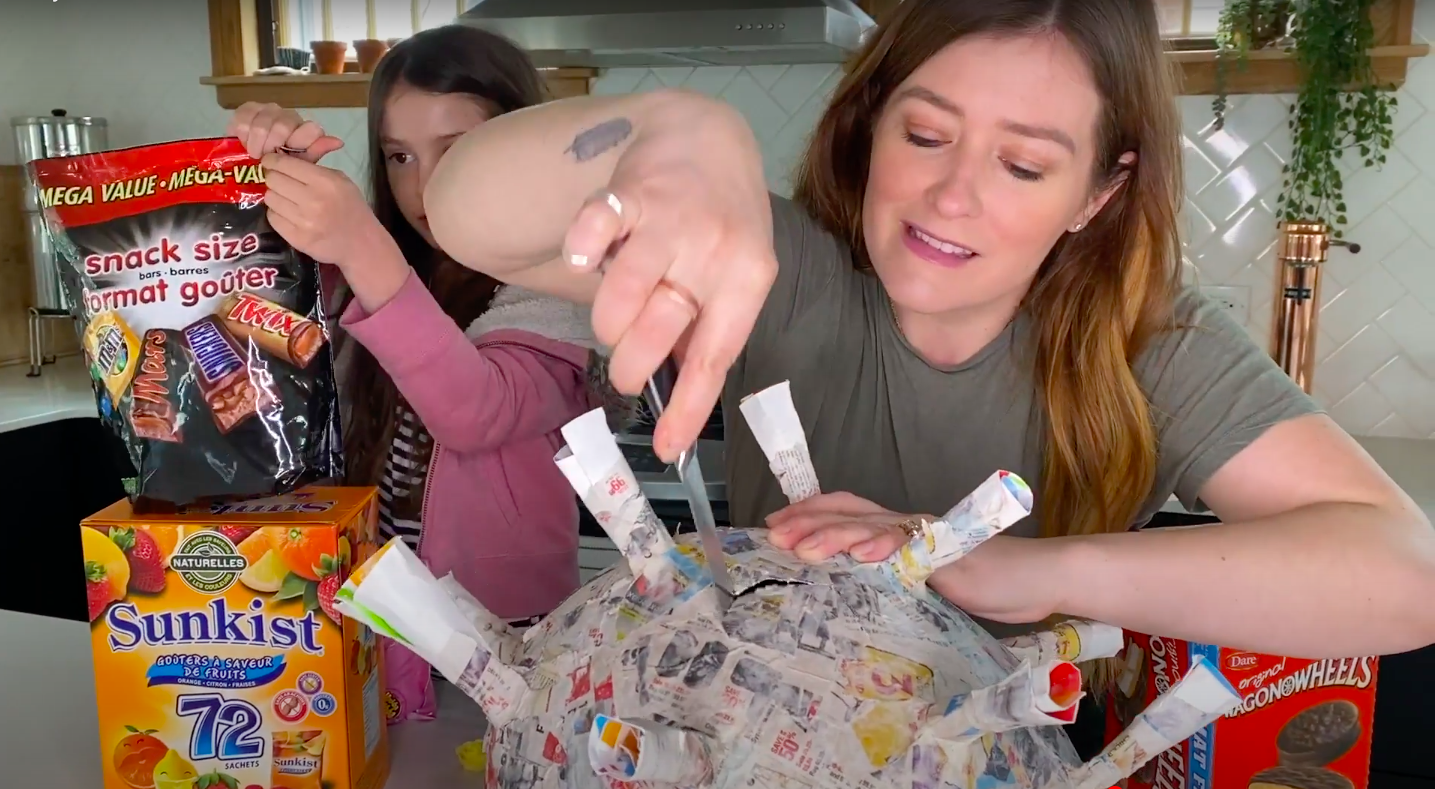
STEP 7.
Let the paper mache dry overnight. Once dry, cut a small flap in order to put the candy in the pinata.
STEP 8.
Stuff the pinata with candy!
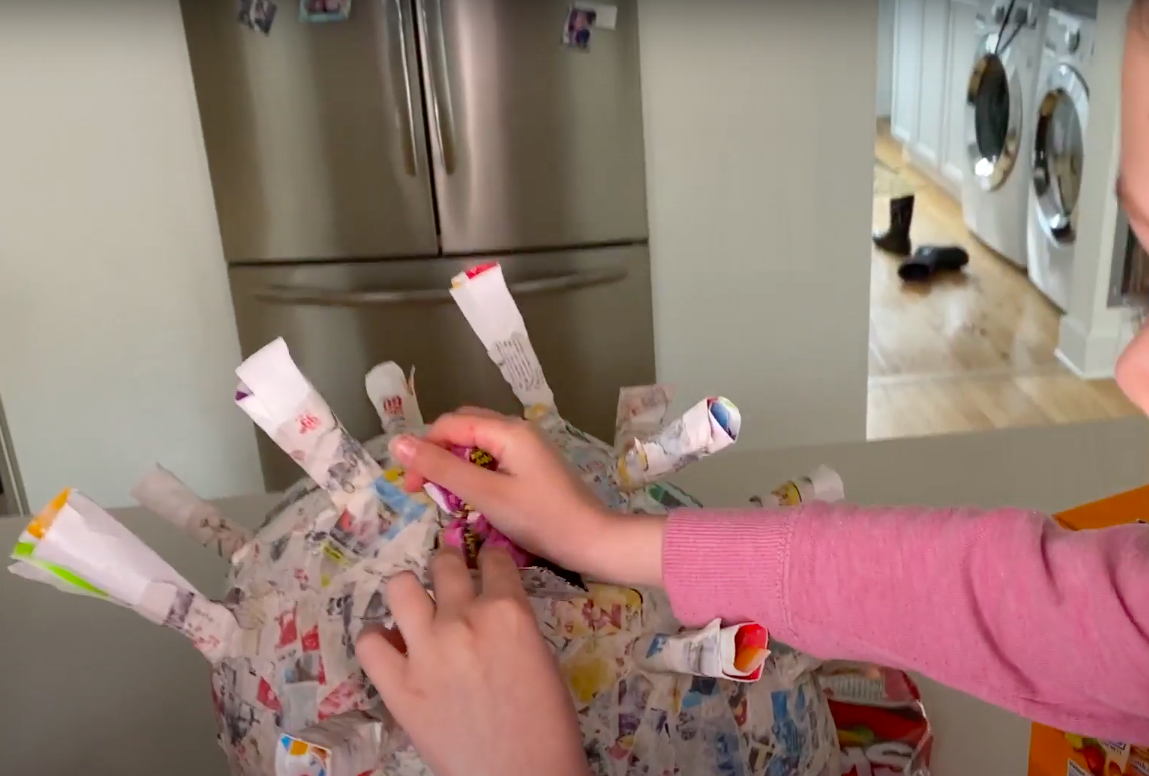
STEP 9.
Using the twine, tie a knot around the balloon leaving some excess to allow the pinata to hang.
STEP 10.
Paper mache over the twine to keep it in place.
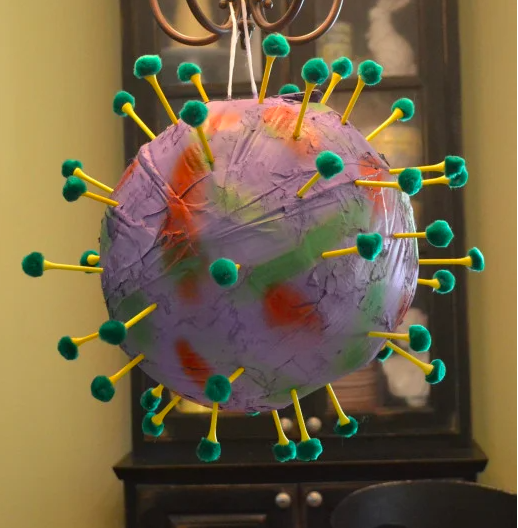
STEP 11.
Paint the pinata using your green paint.
STEP 13.
Roll your tissue paper and stick them into the spikes. Using the end of a paintbrush helps!
STEP 12.
Cut your tissue paper into small squares and glue them onto the pinata.
Step 14.
It’s time to finally get the upper-hand! Here’s Lennon showing the villainous virus what she’s made of! Smash away and retrieve all of the goodies as your reward. Hopefully being a little “batter” will make you feel a little better, about these pandemic vibes.
That’s it! It’s that simple.
I would love to see if any of you attempt a coronavirus piñata! Share with me in the comment section below your projects and how they turned out.
Thanks for following my blog and I can’t wait to connect with you on my next project!
Stay tuned for more do it yourself projects coming soon as well as a sneak preview of Season 3.
xox
DIY MOM
Finding Inspiration…
Inspiration can come from anywhere at anytime. The internet is a great resource for sparking your creative energies and discovering projects that you may enjoy trying! The case could never be truer than for this project here. Being cooped up in the house all day, I did tend to find myself peering on social media sites more often than usual. But upon stumbling onto this New York Times article and doing a bit more research (as well as taking some creative liberties), I decided that this would be the perfect project to elevate Lennon’s Bday and really make it a SMASH!
Now that I’m at home with the kids and my fiancee all day - everyday, I am full of frustration with how much I clean and how little any one else does. The pile of everyones’ belongings at the bottom of the stairs, gets stepped over as people march upstairs empty handed, the kids come in from playing in the mud with their boots on. The dog is ignored and pees on the floor. The laundry piles up and who has to do it? Non other than MOM, cook, dog walker, laundress and general cleaner-upper-er.
My daughter Lennon really loves unicorns, well really who doesn’t! They are magical, colourful and make everyone smile. When I began my renovation Lennon had an idea. She wanted a large Unicorn Head on the wall. Her idea seemed to come out of left field.
I started looking at buying a unicorn online and quickly thought… hmmm…. I bet I could make one myself. So I looked up how to make Papier-mâché and discovered it was quite simple and that I had everything I needed to make something right here at home!
Making your own pillows is super easy (even for a newbie sewer like me) and it’s a fun way to keep yourself occupied during this time where we are all required to physically distancing and keep to ourselves.
While scrolling through instagram I noticed many home decor influencers had lovely round pillows with pom pom’s on them. I thought they were so cute and fun but checking out the online price of them (upwards of $150 a pillow) I decided to take a crack at making some myself.