home design

Bathroom decor, bathroom cleaning, bathroom design, bathroom hacks, Boho Home, home decor trends, home design, home design trends, home ideas, Home Improvement, home life, Home renovation, Inspiration, mom blog, mom blogger, Renovation, Smart Home

A Tale of Texture and Tone in Your Ensuite Bathroom

DIY MOM Rebekah Higgs Ensuite blog Halifax

Everyone always wants to know how much a bathroom renovation will cost…

Well the answer is not as simple or clear as one would hope for.

A bathroom renovation costs anywhere from 10 to 100 thousand dollars, much of which depends on the finishes you select. It’s also why it’s so important to build a footprint for each project so you know exactly where your money is going. Take flooring for example, if you prefer large stone marble walls and floors in lue of ceramic ones, you best get ready to pay more!

Clawfoot Tub Before

Lucky for me, my bathroom ensuite was part of a larger renovation, that included an extension on our old craftsman style home, so I was able to start fresh. The space was an empty canvas ready for me to paint on the plumbing and layout.

During the initial demo we removed the original 1920 clawfoot tub. I’d heard stories of how cozy these tubs were and thought including it in my design was a wonderful way of acknowledging the era of the home.

Other elements I envisioned for my new ensuite bathroom was a double sink vanity, a curb-less shower and a canopy shower head with an extendable hand tap (to make cleaning the claw foot tub easier). I’d also always wanted a bidet toilet and lucked out finding a deluxe model from American Standard, the Advance Clean SpaLet 100 Bidet, which included a heated seat, dryer and multi functioning water levels.

I fell in love the with idea of french doors opening up into the bathroom and sourced two beautiful solid white oak doors from Metrie that fit the space perfectly. In my mind it was clear, the double french doors would open to reveal the old clawfoot tub under a large window centred in the room. What a statement!

american Standard Advance clean spa let toilet

American Standard Advance Clean Spa Let Toilet is a dream come true!

A simple glass partition separates the toilet from the curb-less shower.

Custom vanity by DIY MOM Rebekah Higgs Metrie White Oak french doors

Oak french doors from Metrie swing open to reveal the ensuite.

With my wish list, and the floor plan parameters in place, I started designing a mood board and selecting my tiles. Finding a floor tile was more challenging than I thought, so I ended up taking the lime hex tiles provided by Elegant Flooring, originally intended for my basement bathroom, and moved them upstairs to the ensuite. Next, I fell in love with a textured tile called “Stripes” from Wow tile, and wanted them to be a feature in the room from floor to ceiling and behind the vanity. These tiles were special order, and would take months to arrive so I ordered them early into my renovation journey.

Once I had the physical tiles in hand I quickly realized their texture created concern, perhaps the plumbing finishes wouldn’t fit around them, a less experienced tiler took one look at them and said… I don’t think so.

Champagne bronze rain shower head from Delta Faucet.

In order to skirt around the issue, I decided to pick a wall tile for the shower (artisan white from Centura ) a classic tile I used in my last renovation) . This tile is flat and blends in with nicely enough that I could move forward with the bathroom renovation. Everything was coming together beautifully, all my Delta Faucet fixtures in champagne bronze that I had selected had arrived and the plumbers were well on their way rouging in the shower, toilet and sinks.

Custom double sink Vanity built with furniture grade oak plywood.

The interior of the clawfoot tub was in rough shape!

Then our next issue arose…. where to get the clawfoot tub refinished. I called around, asked my social media audience for leads, but kept striking out. Refinishing this tub was starting to be a real pain. With the tub interior and enamel in such rough shape, I started to look for alternative options. A new tub? A plastic insert? I decided to put a pin in it while I dealt with larger issues surrounding my renovation.

More issues popped up - of course they did! My new experienced tiler, said he could work with the texture of the stripes tile but was concerned about the large scale of hex tiles sloping to the drain of the curb-less shower. Too many cuts and raw edges would make it difficult and unsafe. He asked if I could pick a different tile for the shower floor…

Oh boy, this was really throwing a wrench in my design plans. Another tile? I was going for cohesion and throwing another tile into the mix wasn’t sitting well. Off to Wacky’s flooring I went, to take a look at their selection for floor and wall tile. If I could keep my tile selections to 3 instead of 4 I just might be able to pull off the look I wanted.

I settled on a simple square matte white tile for the shower wall and floor and hoped that running it from the floor to the ceiling might make it look intentional. My tiler was relieved when I brought back a 2x2 square tile for him to work with. So the artisan white tiles were on the cutting room floor and we were back on track with my bathroom renovation.

Small square tiles used on the shower floor flow up the wall right to the ceiling.

With the floor under control, my attention turned to the vanity. I started looking for off the rack options that might work in the space. I loved the solid wood vanities in my previous home, but my plumbing was set with the sinks specifically placed 29 inches from each other in the middle, so drawer banks could be on either side. There was nothing that would work with the perimeters that were set, so the only option was custom. I drew out my vision for the vanity and worked with my carpenter on the build details.

Custom built vanity with oak plywood from robert bury, Awake stone from Dekton Handles from emtek

Completing the space a simple vanity cabinet designed by me and built custom by my carpenter.

We were able to pick up the furniture grade plywood I needed from Robert Bury, and Handy Harry started making the cuts and building the vanity. To finish off the cabinet we stained it with Nano defence (keeping the natural Oak look) and I selected the modern glass pull from Emtek.

While the vanity was being built, I selected my counter top. Wanting something unique with dramatic veining, I discovered the new Awake Stone from Dekton and wondered if it would be right for the room. With so much going on with the tile, floor, and vanity, was I overdoing it with the big bold stone pattern?

I decided to go with my gut instinct and just do it! I asked the manufacturer Living Stone to produce a chunky edge counter and a backsplash high enough to cover the plumbing and simplify the tile job. It worked! I loved the look! I think the Awake Stone was the exact amount of bold that I needed to really make this vanity pop!

After the vanity was complete and the countertops installed, the tilers came back to finish off the wall behind the mirrors with the textured Stripes Tile.

I hung the wood arched mirrors from Mercana that Lazy Boy in Halifax had ordered me, and all that was left before the big photo shoot was to find some sconces to go next to my mirrors and the right blind for the big window above the clawfoot tub.

The Talia Sconce from Kent was the perfect tone for the room.

I popped over to Kent to see what they might have in stock. I felt like I had a horse shoe around my neck when I found the Talia Sconce (only $109) hanging on the wall. It was just the right neutral colour palette with a touch of gold, perfect! But, ugh, they were out of stock and I needed them TODAY. The sales rep checked and another store had them in stock so I rushed over to snag two of the last ones - hooray!

While at Kent, I took a peek at the blinds available in store. There was a bamboo roll up shade of particular interest to me that came in 4 colour ways. I thought the white would make a lovely soft natural fibre for the bathroom window but the 60 Inch blind that was on the shelf was slightly large to be mounted to the the interior of the window. On the bright side, they were quite inexpensive (only $71.99) and after being quoted thousands of dollars for wooden shades like the windows on my main floor, I thought perhaps I could figure out a way to cut them to fit…they were wood after all.

As luck would have it, I did figure out a way to cut them. I used a pair of scissors to cut down the width, then used the chop saw to trim the wood binder at the top. I shortened them and secured the bottom ropes with a hot glue gun. After that, I glued a piece of sheer fabric liner onto the back. When it was time to install them, I ditched the hooks and staple gunned them right to the window trim. And there you have it, for under $100 coupled with a little elbow grease (and my DIY mom experience), I had the custom wooden blind look I wanted from the start.

The final look of my 1920 Clawfoot Tub under the large window with the wooden bamboo blind.

Last but not least I finally found a local business to refinish my Clawfoot Tub! Beautiful Baths came to my home, sanded down the interior and reglazed my tub for $1400. So worth it! If you ask me, they are true miracle workers!

My plumbers Worx Mechanical retro fitted the old plumbing to work in the tub and installed the rest of my beautiful Champagne bronze Dorval wall mounted faucets from Delta Faucet Canada. It was no longer a vision, it was a reality!

DIY MOM and designer from Halifax Nova Scotia Rebekah Higgs

DIY MOM and designer Rebekah Higgs stands barefoot in her completed bathroom space.

So my bathroom is complete, a neutral haven away from the choas of the day. Let me know what you think of my design choices in the comments below! Feel free to share and pin my photos and content if you love it!

xox

Rebekah

home decor, home design, 2021 trends, home decor trends, home design trends, Bedroom Decor, Bathroom decor, bathroom design

•How I Customized My Bathroom•

• Bathroom Design Tips •

DIY MOM-45.jpg

It’s all in the details and my celestial bathroom design has plenty of them, but can you spot them all before I point them out? Here are some tips and tricks you might want to consider if it’s time to revamp your bathroom space.


9_Lynwood_Dr_087.jpg
2.png
DIY MOM-31.jpg
3.png
 

Tackling the Issues

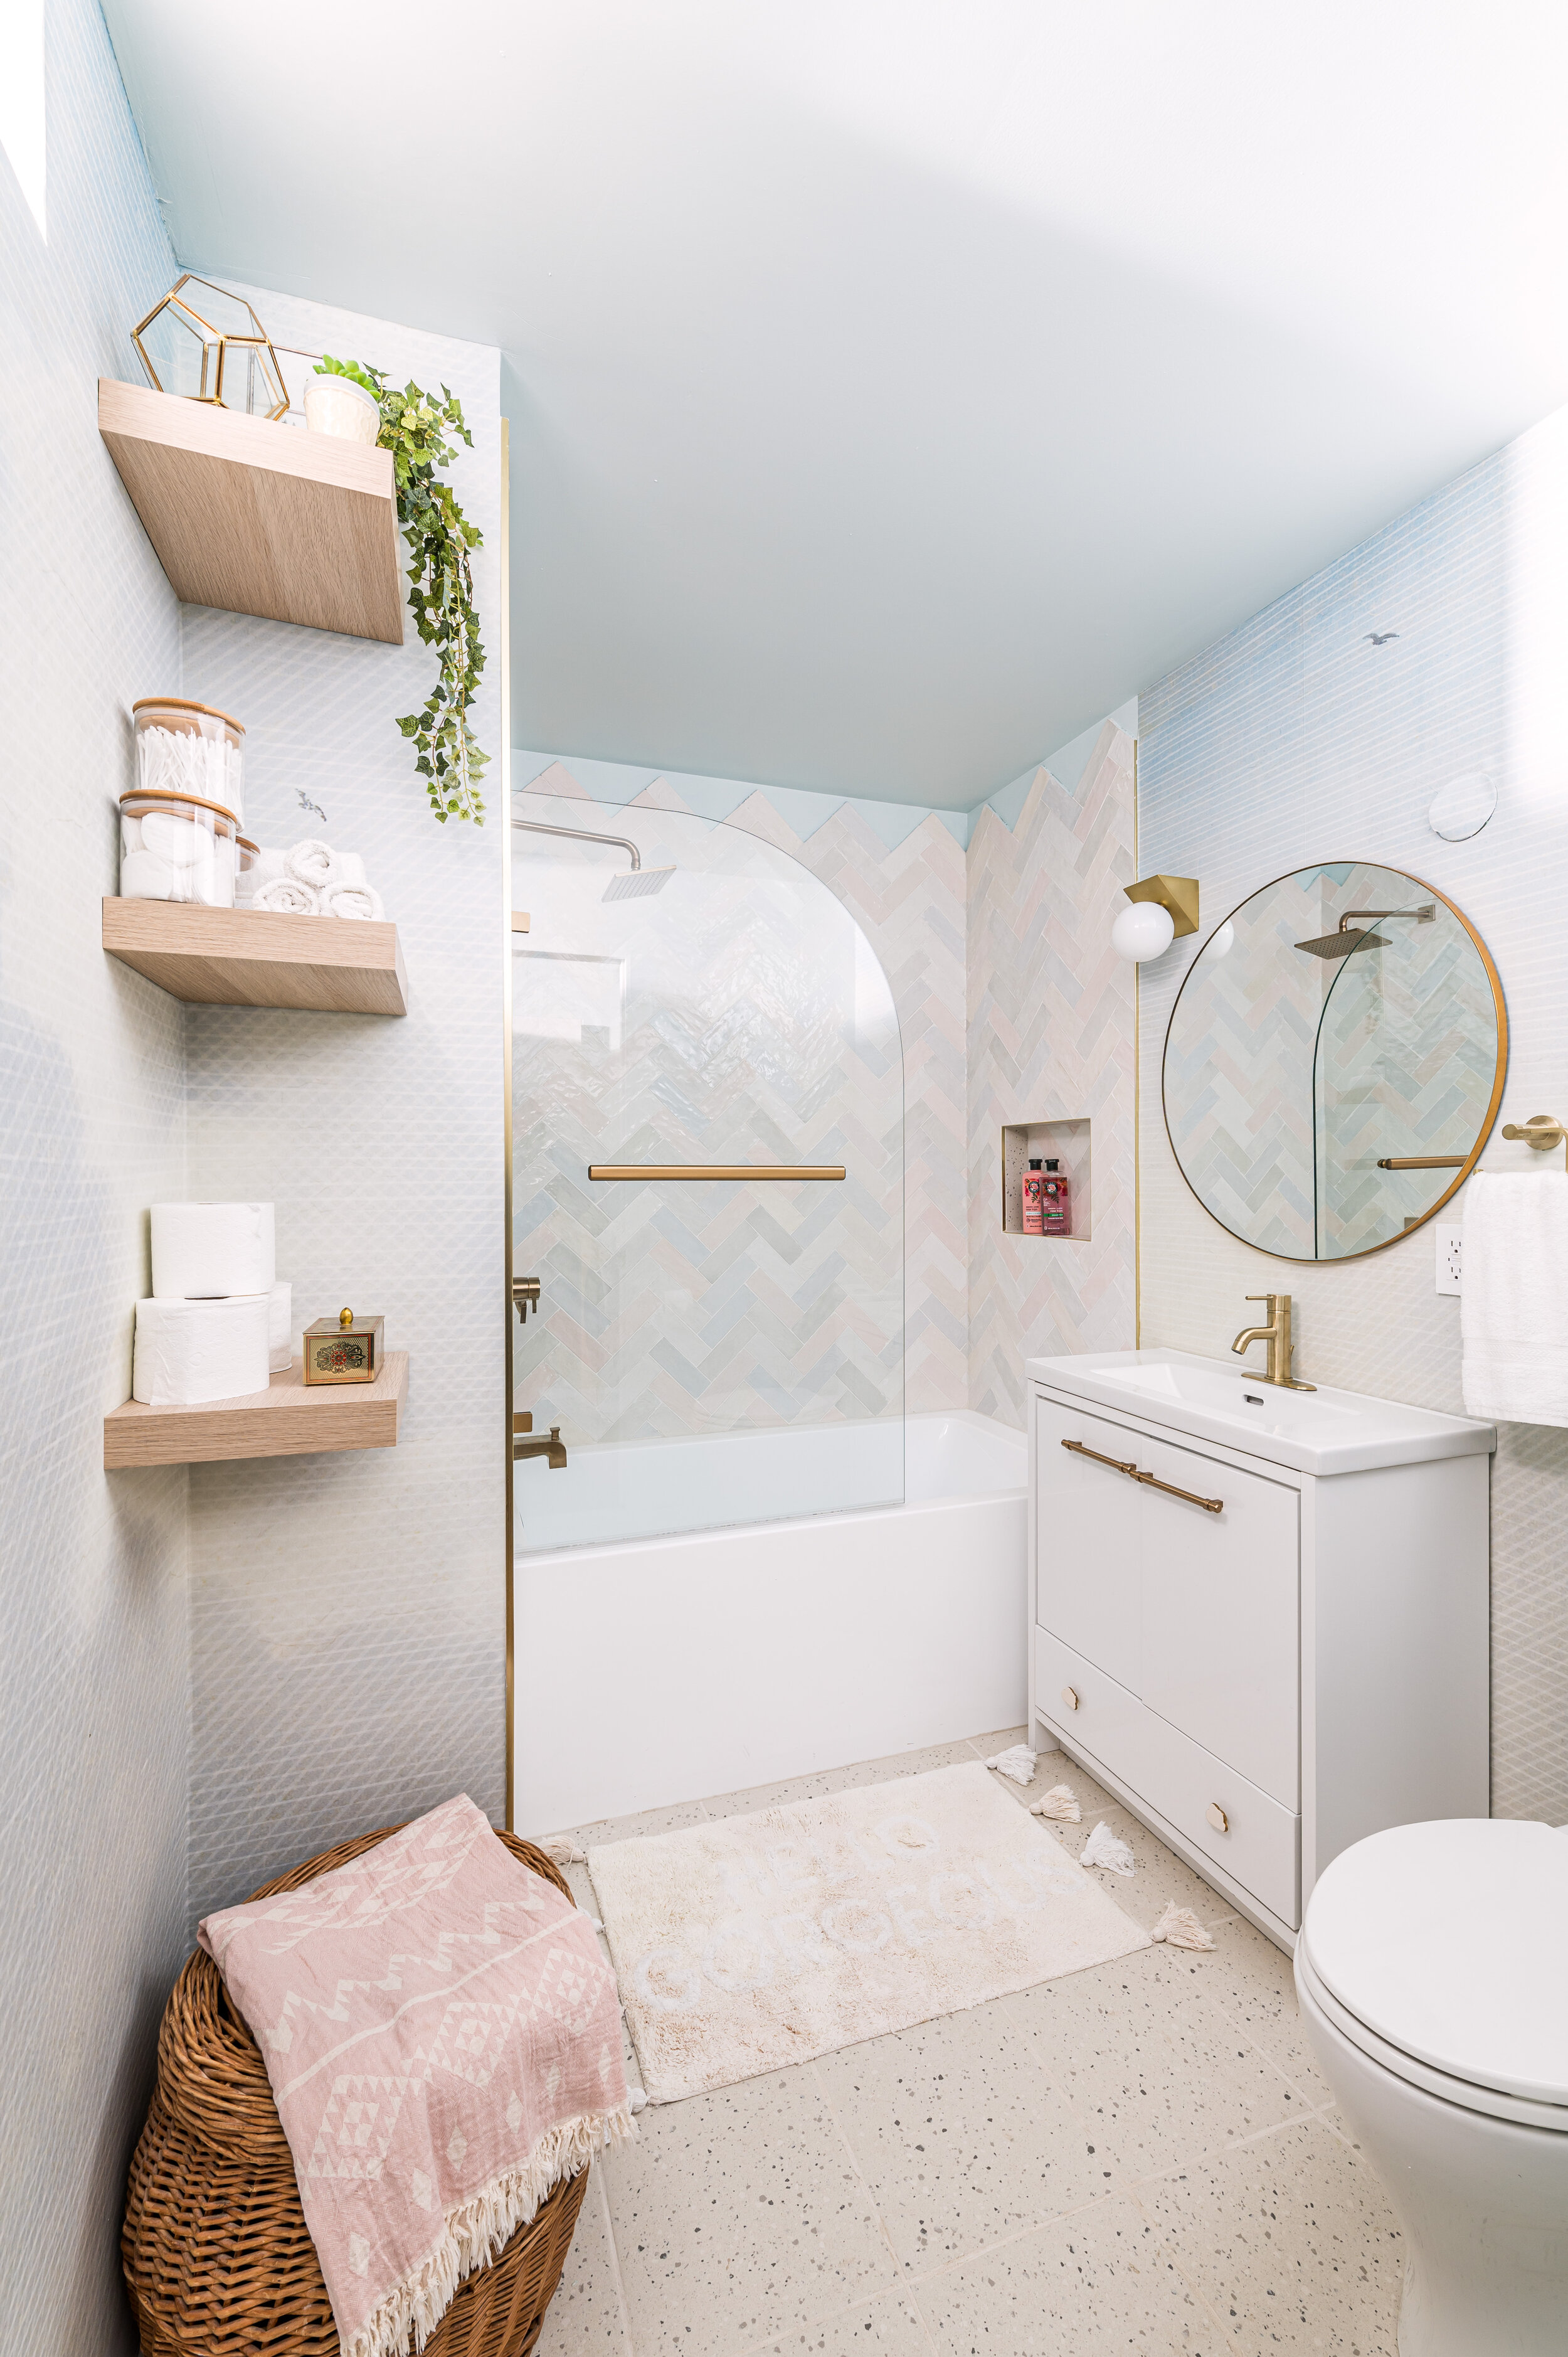
Living in a bungalow means that some spaces may be located in your home’s interior with no windows. To keep my reno on budget, we left all the existing exterior walls and windows as they were, but drastically changed the layout internally. This left me with a bathroom with no natural light. So what do you do when nature isn’t in the space? You bring nature in!


Succulents and Faux Plants

Succulents love the steam of the shower and faux plants don’t need natural light to thrive. This is a great way to give your guests the feeling of freshness when they are in a closed space!

DIY MOM-38.jpg
Untitled+design+%283%29.jpg

Piano Windows

No natural light? No problem. Installing piano windows into the interior walls of your home is a great way to harmoniously manipulate the light into those darker spaces. The face of my bungalow gets the most enviable light during the day, I figured it could spare a bit where needed! Flowing in from my mudroom and into my bathroom, even the smallest bit of natural light goes a long way.


Wallpaper

Maybe you haven’t thought about putting wallpaper in a bathroom since the 80s - but why not? This Cloud wallpaper from JF Fabrics is not only gorgeous but a truly special way to add a unique touch to any interior space. Why I chose this wallpaper? The quality is top-notch, so it will wipe-down easily and withstand the steam and sweat from the shower. And again because this bathroom is missing a window, this cloud wallpaper gives the illusion of airy lightness. The result is a room that feels light and crisp.

This Cloud wallpaper is the perfect match for my Riviera Melange tiles from Centura.

This Cloud wallpaper is the perfect match for my Riviera Melange tiles from Centura.

Trend Tip v3.png
mist morning  edit 1.png

Painted Ceilings

Painting the ceiling to blend into the wallpaper not only carries the eye upwards, but is a playful way to make the peaked tile at the top of the shower pop. I selected Misty Morning by Dulux Paints as the perfect combo of blue and teal for this heavenly space.

DIY MOM-43.jpg
 
4.png

Tile Selection

The entire bathroom inspiration started with the Centura Catalogue. I found this image and instantly knew that this is what I wanted to do with the soft and colourful La Riviera Melange Tile. The unfinished peaked top was a fun play on the mountains, but also gives an extra design moment in the space. Easy to tile and even easier on the eyes!

My Tile Inspiration came from the Centura Catalogue

My Tile Inspiration came from the Centura Catalogue


EASY DIY.png

Glass Option

In stead of shower rod and curtain, I opted for an arched glass shield from Vigo .

With no gold hardware options in stock, I grabbed the Rustoleum metal spray paint and gave it a shake. One tact coat, and two additional coats later, I have what I envisioned for this space. An architectural touch that lets the tile design shine through.

DIY MOM-34.jpg
Trend Tip v3.png

The initial layout for my bathroom had the toilet next to the tub. I saw an image of a sink next to the tub on instagram and thought… that is such a better looking photo, why didn’t I think of that? So I made a decision to swap the sink and toilet plumbing. When my original vanity selection arrived, I quickly realized the proportions were too large for the room. I needed a new vanity, and quick so I went to Home Depot in a panic on a Saturday night, hunting for the right vanity. Luckily This Glacier Bay vanity was available, the right size and super affordable at $249 right off the shelf.

DIY MOM-48.jpg
EASY DIY.png


The only issue with my off-the-rack vanity was that they hardware it came with was silver when all my accents in this bathroom are brass and gold. A simple search in the Home Depot hardware isle led me to a pleasant discovery. Cloud-shaped nobs!! They’re adorable for this kids’ bathroom and really tie the theme together! These gold Richelieu handles are available at Home Depot and fit the pre-drilled holes in the vanity perfectly, so swapping them was easy.

< The original hardware was silver. I was able to swap them out for a custom look without having to drill new holes.


Gold fixtures from Delta make this full bath feel luxurious.

DIY MOM-42.jpg

Round Mirror and Pop Culture Round Bulbs

1.png

The Aspyn Bath & Vanity from Mitzi are an affordable option with a modern twist. I enjoy the way the round mirrors and the round lights with aged brass touches work together to reflect this cohesive design.

The round ORYX mirror from Canadian brand, Renwil introduced the perfect touch of gold I was looking for!

DIY MOM-44.jpg

Now Go Get it Done - 2021!

xox DIY MOM xox


home decor, home design, 2021 trends, home decor trends, home design trends

• 2021 Home Decor Trends•

• 2021 Home Design Trends •

2021 trends.jpg

Design trends come and go but one thing always remains, our need for personalized functional style. Check out our list of what’s on its way out in 2021, and what’s making a grand entrance.


Grey’s Anatomy Is Out!
A combination of grey and beige, affectionately known as greige, has been designers color of choice for more than a decade. Celebrated for its ability to blend in while also providing a respite from boring builders white, this standard neutral has gone from being a chic, timeless color choice, to a humdrum basic. Bye bye greige, hello pastels!

Let Your True Colors Shine
This year is all about integrating pops of color for interest and vibrancy. Paneled walls in navy, seamless room transitions and curated wall murals, eclectic art collections and moody, layered fabrics all add relevance and charm. We can’t wait to see this trend come to life.

Untitled design (6).jpg

Nature Calls
2021 will continue to see the integration of home and environment. Lush, indoor gardens, natural wood cabinets and organic accents like rattan and wicker will continue to pave the way for ambient décor that takes its cue from Mother Nature herself.


A Nod to Mid Mod
This year, we’re channeling our inner Don Draper and propelling forward with sleek lines, curvy edged furniture and a classic, unassuming aesthetic for that coveted 1950’s vibe. We’ll see the continual quest for wood, metal, vinyl and glass with strong, geometric art and bold textiles taking center stage.

IMG_5696.JPG


Modern Scandinavian
There’s a reason we see this soft, minimalist style reemerge every year. We’re drawn to uncluttered environments with muted, pastel hues, warm textures and organic materials like wood and hemp. The hallmark of Nordic style is functional simplicity with an emphasis on comfort and innovation, and 2021 will be no exception. Watch this design trend soar with the rebirth of home offices and the need for integrated spaces 

The Office
Last year saw the fast and furious collision of personal and professional spaces, with more people setting up makeshift offices at home. This year will pave the way for distinct separation of home and work life, comprehensive storage solutions, meticulous organization and shelving options that are sleek and functional. The home office is here to stay so it’s time to step up your décor game and make this little corner functional and stylish.


The White House
White is white, right? Wrong. With a clear nod to cozy comfort, 2021 will see the rise of warm white tones and the exit of the stark, cool shades we leaned on in the past. We’re crushing on Linen Ruffle by Glidden, a soft, gentle off-white that adds depth without being overpowering. Pro tip: Try painting your trim and crown molding 1-2 shades darker for a warm contrast that adds just enough oomph.

exterior white.jpg

It’s All About You
Eclectic design will replace rustic and refined palettes. Shiplap wall features will make way for wallpaper and bold accent walls. We’ll step into brass hardware, crisp, modern lighting, linear, monochrome backsplash and tile work. The modern farmhouse vibe we’ve known and loved will start to dissipate and we’ll see the rise of majestic, personal styles, curated and unique to each of us. Who’s ready to own it?

Screen Shot 2021-02-10 at 1.33.55 PM.png


•Mood Boards•

2020-10-07 mood board - DIY MOM washrooms.jpg
2020-10-07 mood board- kitchen (1).jpg
2020-10-07 mood board- other rooms.jpg

Now Go Get it Done - 2021!

xox DIY MOM xox