living room decor

home decor, home design trends, Home Improvement, Home renovation, living room decor, exterior decor, exterior design, exterior

The girl who lives in the pink house.

pink house in halifax nova scotia by DIY MOM Rebekah Higgs

The front exterior of my pink dream house.

It’s no secret that pink, makes my heart sing. I’ve incorporated it in some capacity in every home I’ve ever owned. I suppose on some level, it’s the colour that most resonates with my overall disposition and outlook on life–rosy, harmonious, in perpetual search for inner peace.

Exterior Home Before

Although I had a clear idea of what I wanted to do with the interior of my new home, the exterior remained a mystery to me for quite some time.

I knew I wanted to highlight and celebrate the charming, covered porch and scalloped shakers and dormers. And since many of the hundred-year-old cedar shakes were nearing the end of their life span, I decided to look into a pre-painted cape cod wood siding option. 

Originally, my plan was to move forward with a soft white exterior pallet–a pleasant, creamy colour made popular by Pinterest and social media. I looked into various shades of white, cream, and black, but quickly realized that the classic craftsman style of the home could handle something a little more interesting.

exterior pink home, halifax nova scotia white classic posts and scalloped shingles

When my daughter’s grandmother was visiting and mentioned her deep-seated love for the colourful homes of Halifax, I knew that my new home was destined to be one of them! I began diving into my favourite shades of pink and finally landed on the same one I chose for the front door of my Lynwood property–Dulux Rose Petal. I should have known from the very beginning that my favourite colour would, once again, take centre stage. Lesson learned.

The original home came with a dark, fuchsia pink front door, equipped with an adorable letter pass through knocker. Although I’ve ordered a larger wood door with glass transom and sidelights, I still plan to incorporate the pink front door into my space. It’s too sweet to part with and it’s one of the reasons I fell in love with this character-filled home to begin with. I think it would make a punchy addition to my shed/ carriage house in the backyard, don’t you?

Rebekah Higgs DIY MOM walks into her pink house in Halifax Nova Scotia

Lifting the house 2 feet provided me with an opportunity to make the foundation stand out with beautiful stone work. After looking around for the perfect stone I was delighted to come across a Canadian company called CSI - All Things Stone reached out to them. Their team helped walk me through a number of different options and helped me select the product to meet the performance needs and design aesthetics for my home. The stone I selected is from Cultured Stone®, and it is the Echo Ridge® color in the Dressed Fieldstone style. Besides the look of the stone, what I really love about Cultured Stone® is that they have been around for nearly 60 years and truly are the pioneers of manufactured stone veneer.

Another great thing about Cultured Stone is its versatility. It can be used indoors and outdoors, so if you want to continue the look throughout your home or add another element to your fireplace or feature walls, it can be easily done! The grey tones in the stone perfectly compliment the shade of pink on my Cape Cod Siding. The stone veneer suites the age and craftsman style home and mimics the look of the original stone foundations of that era. 

Before we installed the stone, we prepped the exterior with DELTA®-DRY & LATH. The innovative 2 in 1 product combines the technology of the DELTA®-DRY rain screen with the fibreglass lath for a complete one step moisture control lath system. The DELTA®-DRY & LATH completely eliminates the need for metal lath, providing easier and safer handling for the installer, as metal lath sheets are tricky to handle and easily cut the installer, whereas the delta dry is a fibreglass lath that is on a light weight roll and can easily be installed in minutes. 

As a home owner on the east coast of Canada, I am so happy to have the peace of mind of tried and tested rain screen and lath that allows for proper drainage and wall ventilation.  With our up and down, wet and dry climate, it’s great to know my house is well protected!

exterior house number from modern house numbers

15 inch house number from Modern House Numbers

The oversized house numbers pictured above, came from Modern House Numbers. You can customize the size and font style on there website to suit your home. I went with 15 inch horizontal Matte Brass number in the Back Bay font.

I’ve also received quite a few questions about my “Rose Gold” or Copper gutters. These are imitation copper gutters from Gentek. They have a few options for that Copper look, I went for a more muted aged look. There is a significant cost saving when doing imitation copper instead of real copper, but I also like that these gutters will remain as they are without any need to maintain or polish them. A copper gutter is a unique way to add a 3 colour to your home, if you are looking for that historic look.

FRONT PORCH

Since I had never designed a covered front porch before, I found myself taking afternoon drives through old south end neighbourhoods for a better sense of how exterior spaces were finished. What did the posts look like? How were the rails and balusters and pillars finished? I wanted a comfortable spot to enjoy my morning coffee, while paying homage to the charming history of my little pink house. In the end, I decided to leave the sides of the porch covered in the original shingles and use a wooden rail system for the front view. Opening up the front allowed more light to come in through my front window, and my motto has always been, the more light, the better!

this pink house in halifax nova scotia was raised 2 feet to create a full height basement apartment

Dressed Fieldstone by Cultured Stone in Echo Ridge

Adding four steps to the front of the house meant the walk up would be quite long. To create symmetry, I decide to run the rail across the front, have the steps go both ways, and create ledges on either side to allow for plants. This allowed more of the beautiful stonework to shine through and provided a balanced exterior. I completed the look with perennial shrubs, rhododendrons, azaleas and hydrangeas from Kents Garden Centre, and hanging faux hibiscus baskets from Décors Véronneau on the other side of the deck. 

Front Porch After

Front Porch Before

Faux hanging plants are low maitenance stay in bloom all summer and don’t need to be watered!

Adding four steps to the front of the house meant the walk up would be quite long. To create symmetry, I decide to run the rail across the front, have the steps go both ways, and create ledges on either side to allow for plants. This allowed more of the beautiful stonework to shine through and provided a balanced exterior. I completed the look with perennial shrubs, rhododendrons, azaleas and hydrangeas from Kents Garden Centre, and hanging faux hibiscus baskets from Décors Véronneau on the other side of the deck. 

Pressure treated wood was cut in strips to skirt the deck in and cover the exterior heat pump units.

BACK YARD

These over sized french doors were salvaged and reused for my back steps to the garden.

With the house higher from the ground then it once was, my backyard feels sunken in and private. Eventually I would love to create a low deck or stone patio for hosting summer family gatherings. In the meantime, I used inexpensive pea gravel and small stepping stones to provide a pathway through the lawn.

Stepping stones and pea gravel were an inexpensive solution for now.

No one will ever know my hanging baskets and trellis are faux, with all the lush plants I have surrounding my gardens.

The original chain link fence also provided limited privacy so I was excited to discover expandable trellis from Décors Véronneau that I could zip tie to the fence for instant, year- round privacy. The faux trellis is lush and realistic, and make the whole space feel cozy and secluded. I think one of the best things about summer is being able to spend uninterrupted time with your loved ones, and although the backyard isn’t finished yet, I love the things I’ve put in place to help make the exterior space feel more comfortable. Being a DIYer means I’ve learned to live with, and even enjoy, most stages of the renovation process–including the periods of transition when things aren’t always perfect. Plus, string lights, cozy blankets, potted plants, and cute pups always make a backyard look and feel more like home. I plan to curl up back here with my daughter and enjoy every single second of summer in Halifax!

Chain Link fence covered in Faux Trellis from Decors Veronneau

Check out the Cultured Stone installation video below and let me know what you think of the final look of my pink craftsman home!

BEFORE & AFTER

Back of house before

After extensions and changes made to the exterior of my home.

Read more about my budget saving Renovation Tips here.

xox

Rebekah

Check out the full before and after video on my youtube channel!

home decor, home design trends, Home Improvement, Home renovation, living room decor

Make A Statement with Cultured Stone

Living Designer Rebekah Higgs, Halifax DIY MOM Cultured stone

Your fireplace is the natural centre point of your home, so why not make a statement by doing a floor to ceiling stone install?

Fireplace Before!

When I started my renovation on this 1922 craftsman style home, It was important to me to work within the look and design of this style of home while adding a layer of freshness and trend.

Before we lifted my home we removed the original exterior chimney to lighten the load. At this point I decided to remove the old fireplace entirely, replacing it with a larger grander Gas one. We were starting fresh with new framing for a new fireplace and that meant I needed to decide on what kind of masonry look I wanted to go with.

CSI - All Things Stone is my go to for all my stone and brick needs. Whether I am using it on my exterior or interior, they have an amazing selection of styles, textures and colors. I used the Echo Ridge Dressed Fieldstone by Cultured Stone on the exterior of this home, and while this product also works for interior spaces, I wanted to brighten up the main floor of my living space with something lighter.

diy mom rebekah higgs living room design

I immediately fell in love with the Handmade Brick style from Cultured Stone in the color Canvas. It paired beautifully with my builtins and wall color, but added just enough depth to pop out as its own statement.

Cultured stone hand made brick in canvas

The individual stones give you a warm hand made appearance with added texture and depth.

What’s unique about this product is it’s a faux thin brick that looks and feels just like natural brick. It can be installed virtually anywhere as it doesn't require additional foundation support. I find most people can be intimidated when working with individual stones, however having the ability to install one brick at a time allowed me to maintain the charm and character of real brick and achieve the overall look and feel that I wanted for my fireplace.

Handmade Brick by Cultured Stone in Canvas.

We were working with uneven walls, two permanently placed piano windows, an oversized gas fireplace and a transitional mantle surround. The questions was just how high we wanted to take the brick. I decided to install the brick to the ceiling, and was so pleased with the end result. This created a sense of height and grandiose in my main living area. This space truly is such a treat to walk into at the end of a long day!

My honest review? I would 100% recommend CSI- All Things Stone on your next project. I can’t wait to work with more of their products and I’m excited to recommend it to all my future clients.

reno, fireplace reno, fireplace, stone fireplace, hailfax ns, rebekah higgs, diymom

The living feel so light and bright now, and has a beautiful statement fireplace!

Now that you see the final results of my living room space, what do you think of my stone selection?

Drop me a comment below with your thoughts, and feel free to pin and share this blog if you love it!

xox

Rebekah


Check out the full before and after video on my youtube channel!

Home Improvement, home ideas, Home renovation, Inspiration, living room decor, Renovation

Timeless spaces with La-Z-Boy

On the top of my renovation requirements: Having a cozy and comfortable living room space, to both host in and veg out on the couch.

Living room design by Rebekah Higgs DIY MOM Halifax Nova Scotia Canada

La-Z-Boy Coronado couch product number 610-685 colour B166302

Chair and a half 655-685 colour C161332

When a guest walks into my home, I want them to feel totally at ease, welcome and able to relax. When I set out on a new design journey I always prioritize this. This old home needed a major facelift and a renovation like this is not for the faint of heart. I made the decision to open up my main floor and create a large open concept living area. This would brighten up the home allowing the light to travel more freely and create a great space for hosting events, gatherings and dinner parties, which I love to do!

However open concept spaces do come with some challenges, and I needed to create various spaces within the open layout for cozy corners, nesting and intimate conversations. A new home with a new foot print also meant that I needed new living room furniture that would work with the new square footage.

I had limited space within the allotted living room area to work with. My home is 27 feet wide and the visual centre of the space would be a large gas fireplace, with hand pressed canvas bricks and a classic mantle. All in all I was allowing for the living room furniture to take up approximately 11x14 feet of the main floor area.

I’ve always had the best luck finding living room furniture I love at La-Z-Boy. La-Z-Boy is not just your grandfather’s recliner. They have a huge selection of all varieties of furniture, and you can’t beat the longevity and quality of these pieces.

My initial thought, when designing the room was a 3 seater couch with two chairs on either side of the coffee table facing toward the fireplace. But no matter how hard I tried this design was not working… it was feeling forced and tight. I was thrilled when the design team at La-Z-Boy recommended I go with two of the Coronado chair & a half on either side of my coffee table, rather then being stuck with my initial vision of two and two.

The design team at La-Z-Boy Halifax was also able to show me a 3D rendering of what my space would look like with the Coronado Chairs and Sofa. This was extremely helpful and put my mind at ease. When I was able to look at a visual rendering of the room how it would flow, and the walking space for entering and exciting the living room, I knew going in this direction was the right decision.

So my decision was made, I would go with a 3 seater couch and two chair & a half from the Coronado line.

Next up, it was time to select my fabrics. All La-Z-Boy furniture is customized and made to order. As someone who loves pink and has many blush pink home accents, I loved the idea of using the pink velour fabric (B166302) on one of the pieces. I also found a lovely neutral fabric with small colour speckles (C161332) in it that suited the space, my decor style and was dog friendly! As you can see from the photos it’s impossible to keep my pup off these super cozy seats. With the big fireplace and the armchairs, this room is by far her favourite place to hang out!

I was able to play around in the software with the La-Z-Boy designer with various fabric selections until I made my final decision, opting for the couch to be pink and the two chair & a half in the natural tones. Their design services are free, you can get the room of your dreams and have fun doing it! Book a virtual, home or in store consult today through this link!

Soft pastel tones and neutrals sit beautifully in this home. Keep scrolling to the bottom of this blog to see all the before pictures. You won’t believe how much brighter it feels in our home!

Coronado Sofa and Chairs from LAZBOY Halifax

Because La-Z-Boy also has tons of home decor items to shop from, I was also able to order my beautiful layered Surya rugs (AML2326, JS2) , side tables (68523) and this gorgeous hexagon coffee table (69542) from Mercana. If you want to get the look, call and book an appointment or head over to La-Z-Boy Halifax and get them to show you what DIY MOM has!

The room is a perfect combination of high design and comfort. The whole family loves this room, and we love our LAZBOY furniture. The quality, comfort, customizability and endless options are a designers dream come true. I love how timeless and classic this room feels.

Check out the before pictures to get a scope of how I brought this home back to life.

The previous space did not have that cozy welcoming feeling. The furniture and layout makes a huge difference in how the room feels.

Now it’s your turn to let me know what you think! Drop a comment in below with your thoughts on my living room transformation!

xo

Rebekah

Boho Home, Bedroom Decor, DIY project, home, home blog, home decor, home ideas, Kids activities, kids art, kids crafts, living room decor, mom blog, Mom hacks, mommy blog, sewing project, sewing tutorial, tutorial

• DIY: Fabric Pumpkin Decor •

How To Craft The Perfect Cinderella Pumpkin;

On a Cinderella Budget.

IMG_2120 EDIT.jpg

Are you in quick crunch for some last minute seasonal decor?

Here is something better than a Pumpkin Spice Latte to quench your seasonal cravings, no carving necessary. Cinderella Style Fabric Pumpkins are a super easy and fun DIY!  “Pump-n-Spice” up any space with these adorably cozy cushions. Luckily you can make these Cinderella style pumpkins on a Cinderella style budget!

batch_pumpkin+1IMG_8738.jpg

• SUPPLIES •

These cushy pumpkins can be made from any spare fabric that you may have laying around the house. Whether it be from a previous project or simply an old sweater… lovingly repurposing clothing is a great way to give it a whole new life! — Quite magical indeed Cinderelly. Now go gather the supplies!

  • FABRIC

  • SCISSORS

  • COTTON BATTING

  • NEEDLE & THREAD

  • GLUE GUN

  • POT LID (or something circular to trace)


• STEPS •

  1. Trace & Cut A Circle From Your Fabric:

    You can do this using a pot lid, like the true innovateure herself. The bigger you cut the circle, the larger your pumpkin will be. Have fun creating multiple sizes and shapes for some variation in your decor.

  2. Sew A “Slip Stitch” Around The Circumference Of The Circle:

    Keep about a 1/4” away from the edge— that way you don’t risk ripping the gathered thread through the fabric. Pro Tip: You can keep your thread attached to the spool to ensure that you never run out of thread until finished.

  3. Stuff Your Pumpkin:

    Now that you’ve got your slip stitch in place, it’s time to stuff that pumpkin with cotton batting. If you find yourself short, there are plenty of alternatives that you can use! News paper, rice or repurpose an old stuffed animal. Note: If you are aiming for the cinderella style, less stuffing is best to achieve their flatter silhouette.

  4. Cinch Your Citrouille (Pumpkin):

    With your pumpkin now stuffed, cinch the two loose threads together by pulling them tightly and creating a gathered hole. Note: DO NOT tie off or rip off your threads yet! You’ll need them for the next step.

  5. Create The Cinderella Style:

    Hold your pumpkin in one hand with the hole facing upward. With the attached needle and thread in the other hand, sew through the centre of the pumpkin then wrap the thread around to create segments. Continue to puncture through the centre to create that Cinderella style. When you have achieved your desired shape, tie off that thread or sew a knot in the fabric to finish.
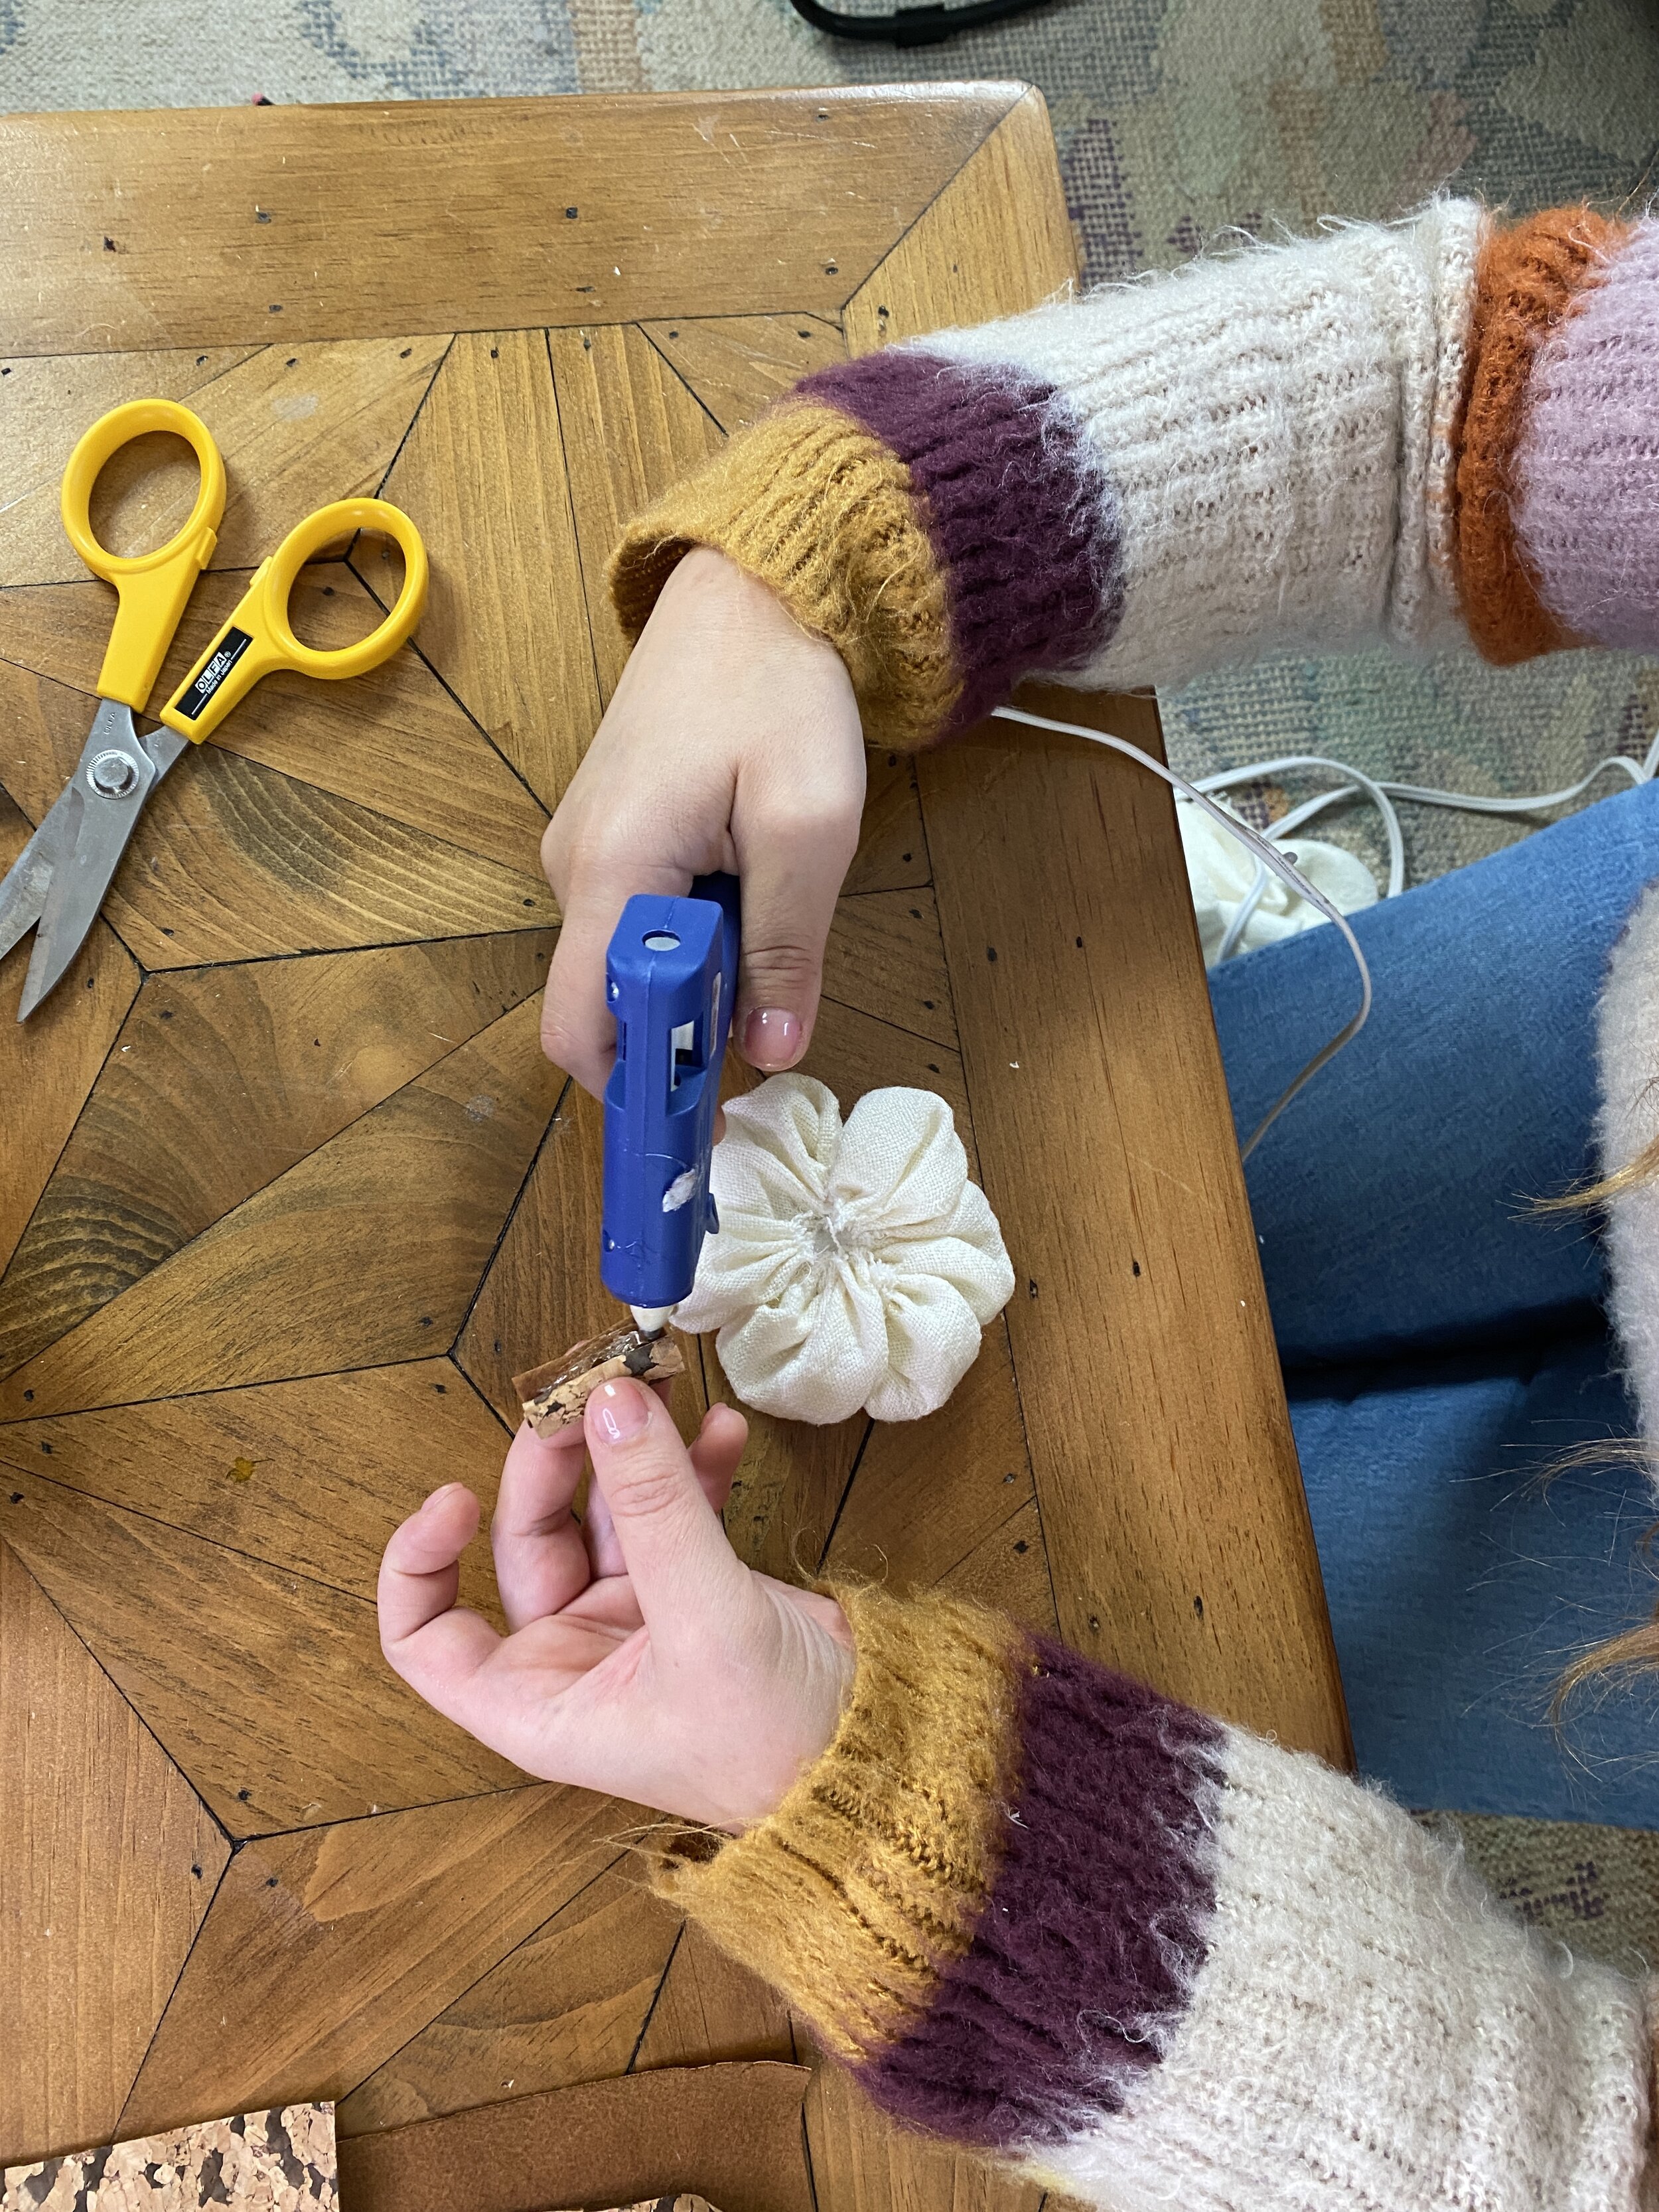
  6. Stylish Stems:

    To top off your perfect pumpkin, it’s time to get creative with the stem! I opted for some leftover cork fabric that I had, which I then cut into strips, rolled then glue to the top using the hot glue gun. Note: You can use anything to create the stems— Pipe cleaners, twine, twigs, rubber bands! Get crafty & get creating this Autumn.

Trace a circle then cut.

Trace a circle then cut.

“Slip Stitch” around the circumference fo your circle, stuff your pumpkin then pull both threads together to cinch.

“Slip Stitch” around the circumference fo your circle, stuff your pumpkin then pull both threads together to cinch.

Get that stuff’n in.

Get that stuff’n in.

Cinch it like Cinderella’s corset

Cinch it like Cinderella’s corset

Sew through the centre of the pumpkin and wrap it back around to create segments. Repeat until you’ve achieved your desired shape.

Sew through the centre of the pumpkin and wrap it back around to create segments. Repeat until you’ve achieved your desired shape.

Decorate your pumpkin as you see fit! Get Creative with the stem.

Decorate your pumpkin as you see fit! Get Creative with the stem.


Now that you’ve got the Bippity Boppity Boo of it all, you can make enough pumpkins to fill an entire patch! (Granted, such a project would be much easier if you did happen to have a joyous army of furry critters to assist you…) Never the less, It’s time to head to the Fall Ball!


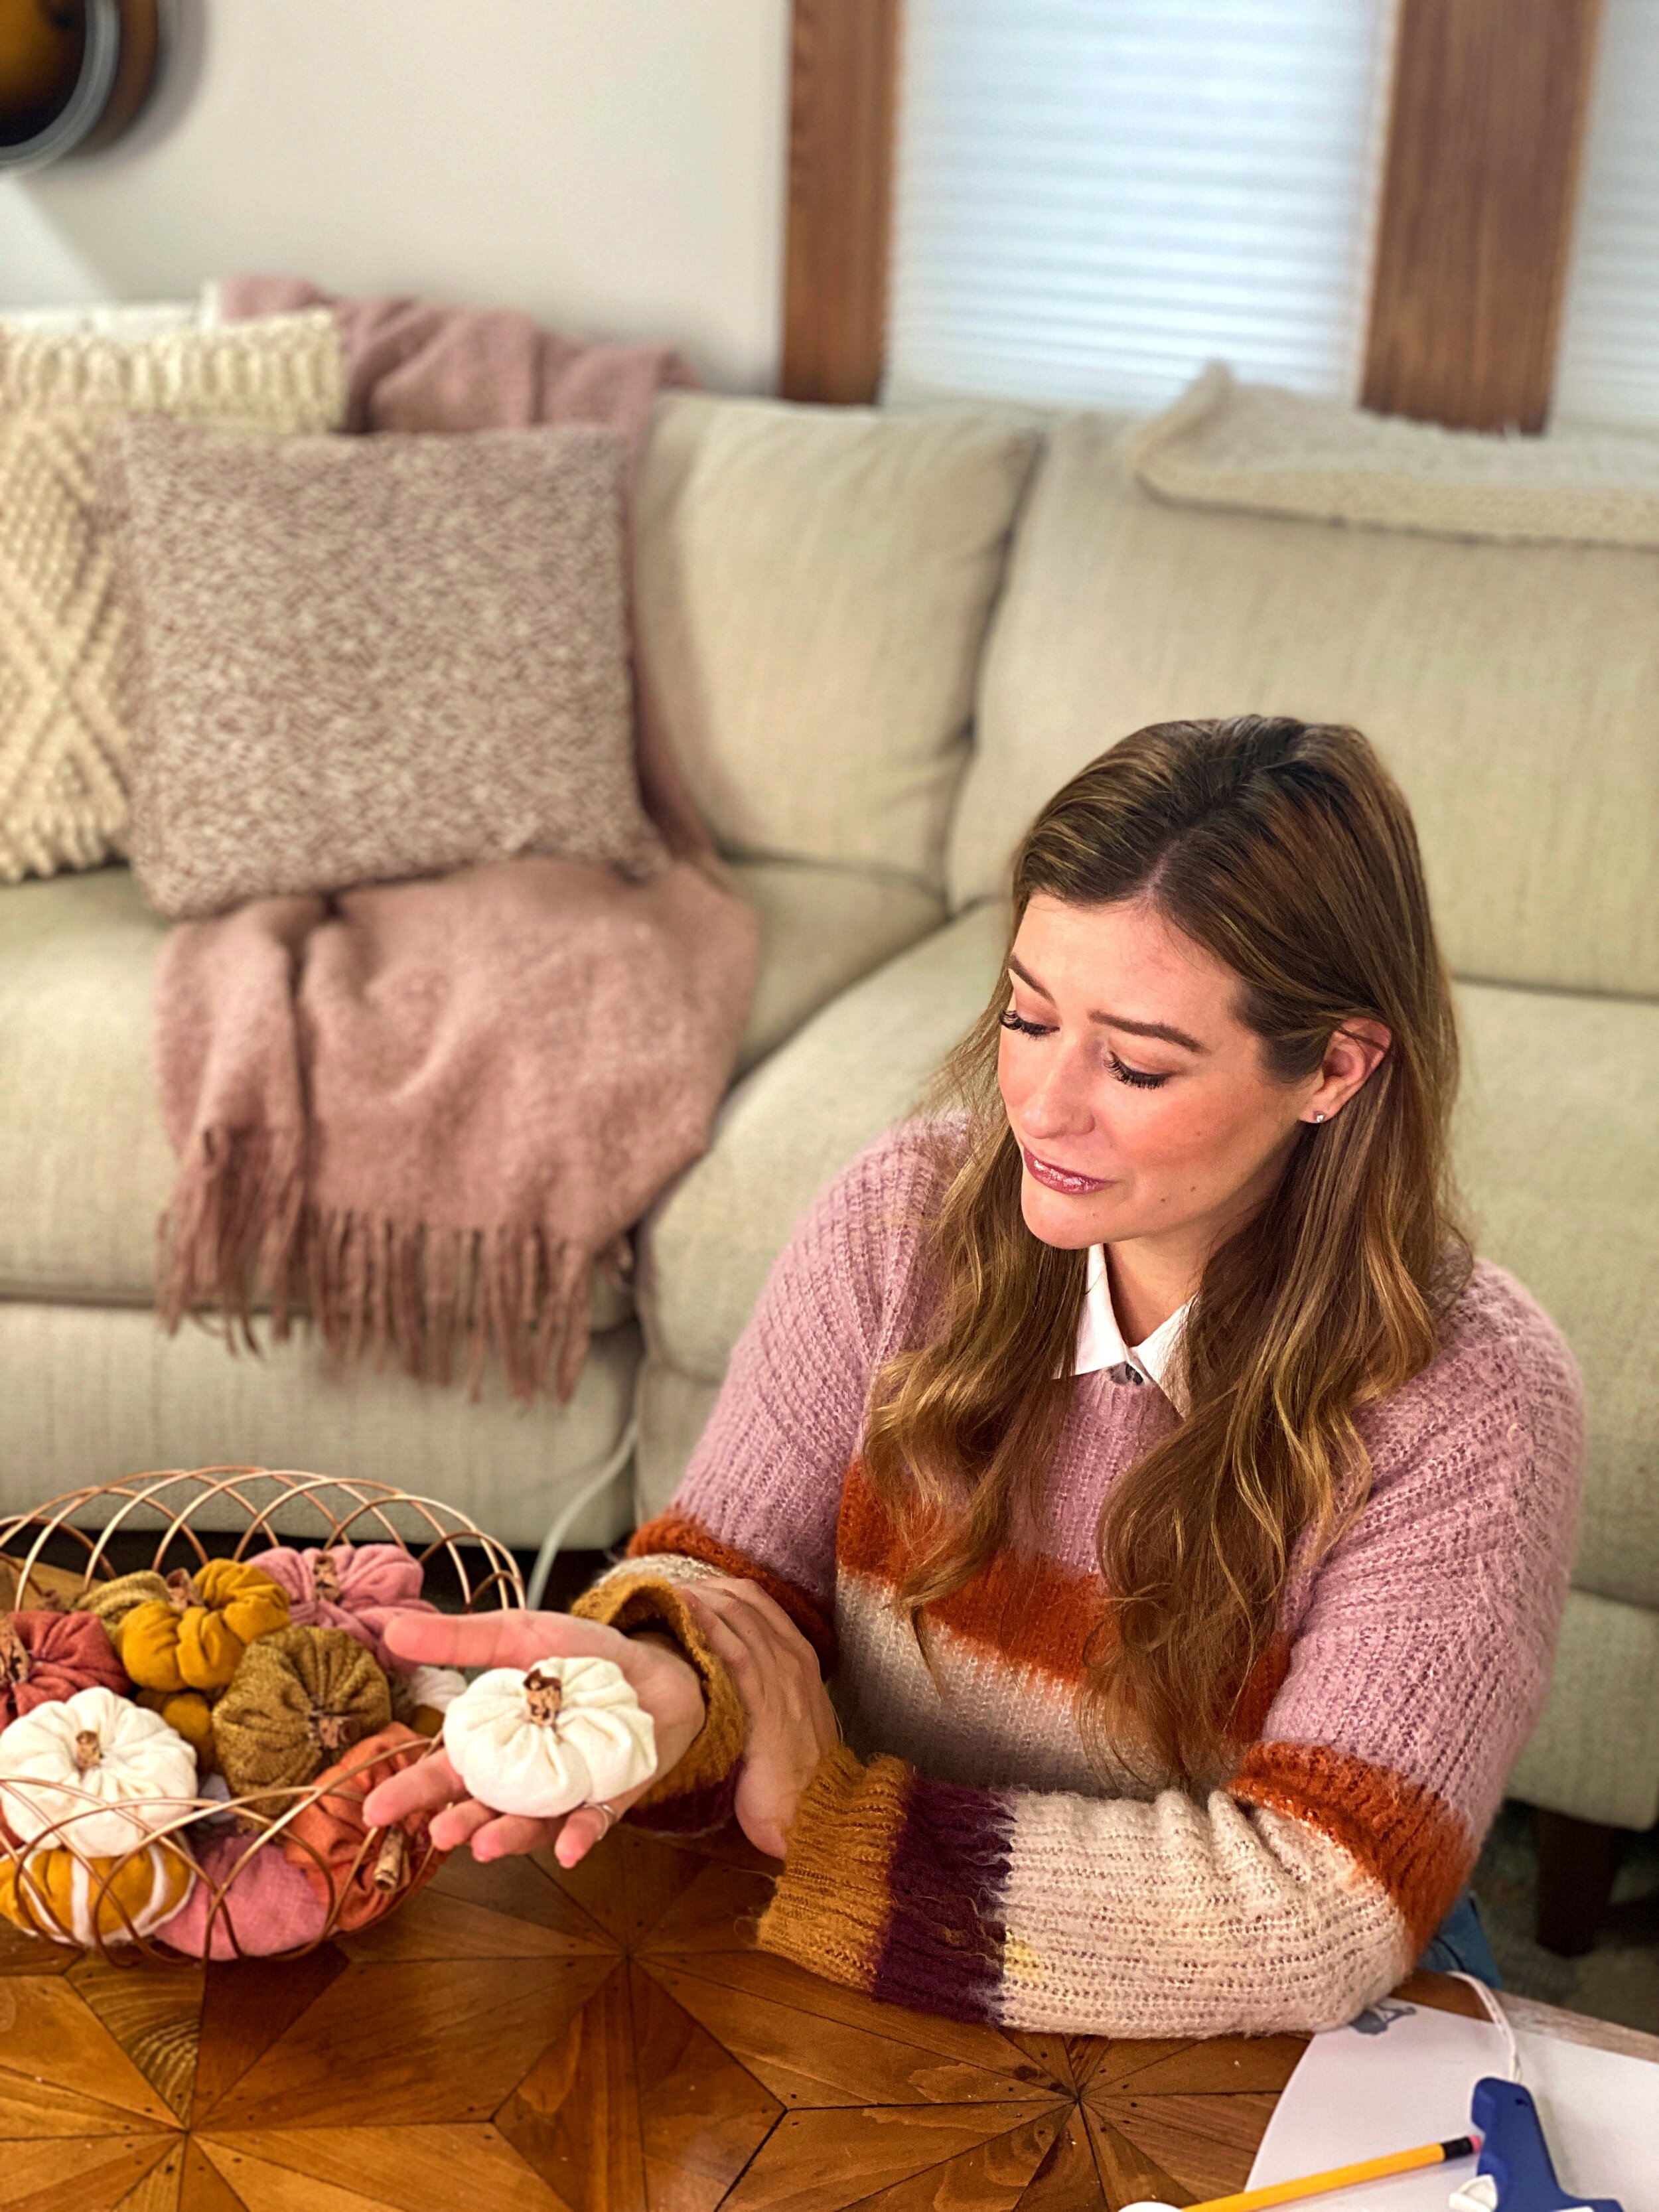
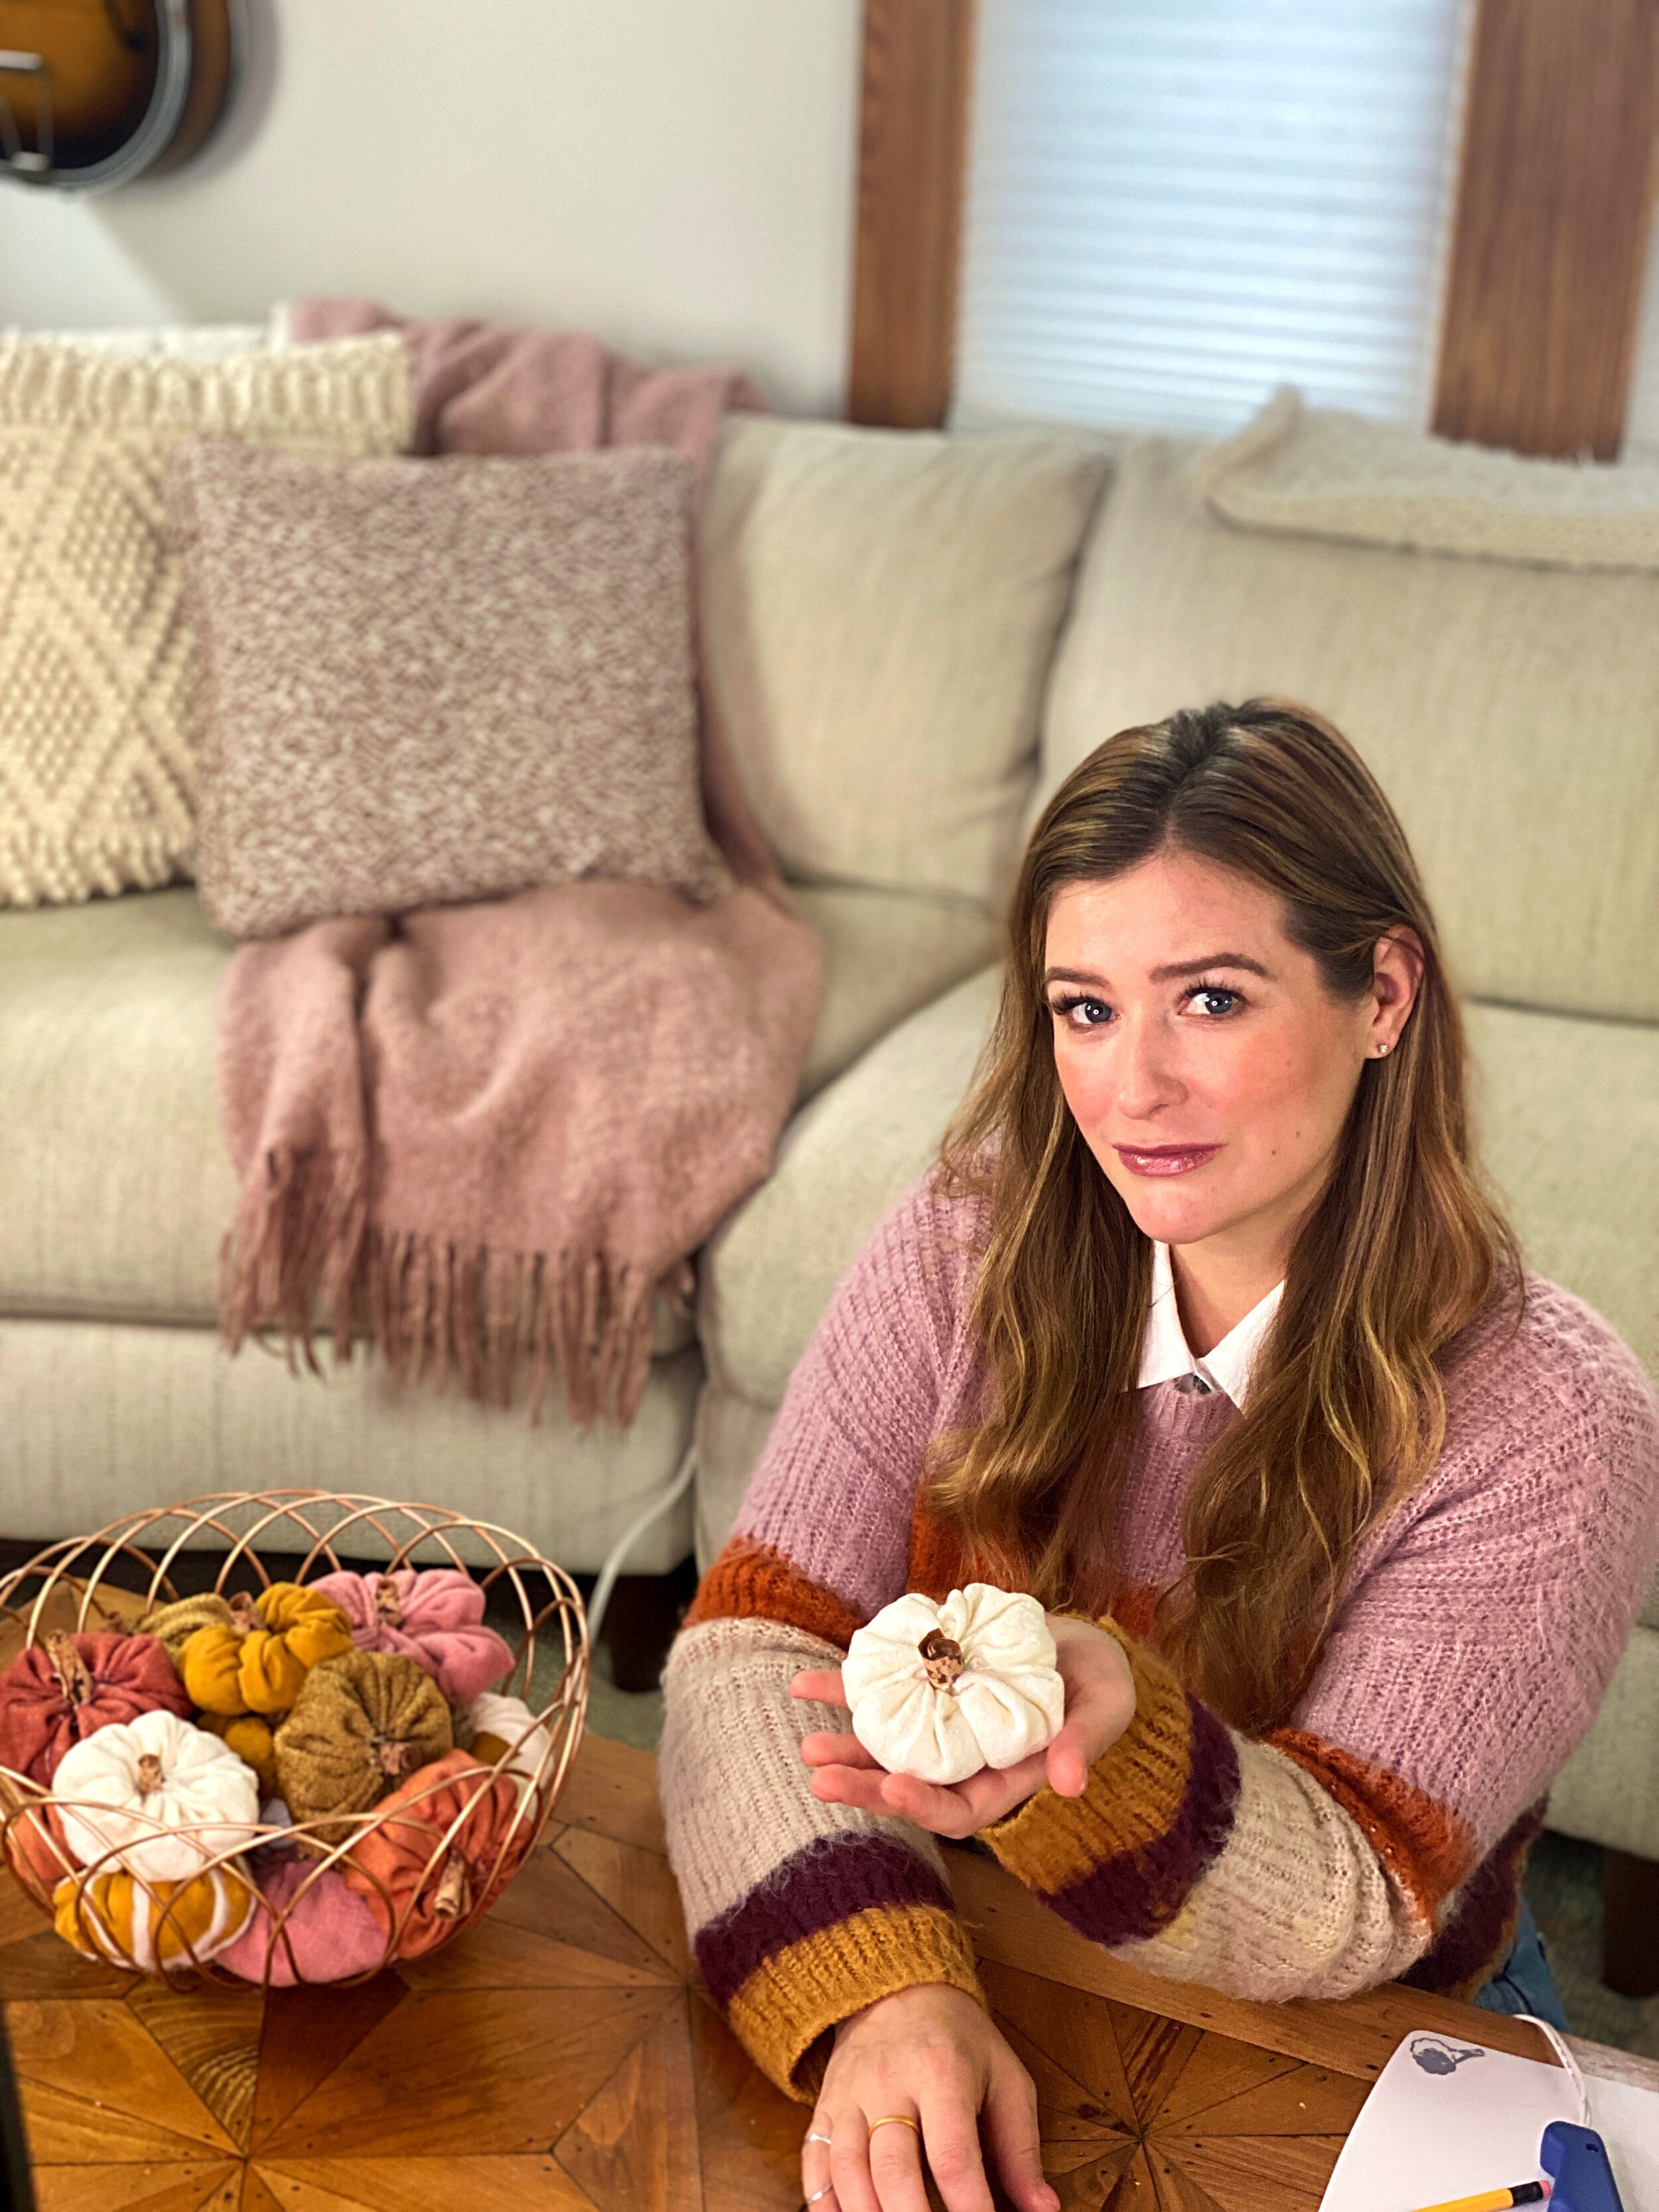
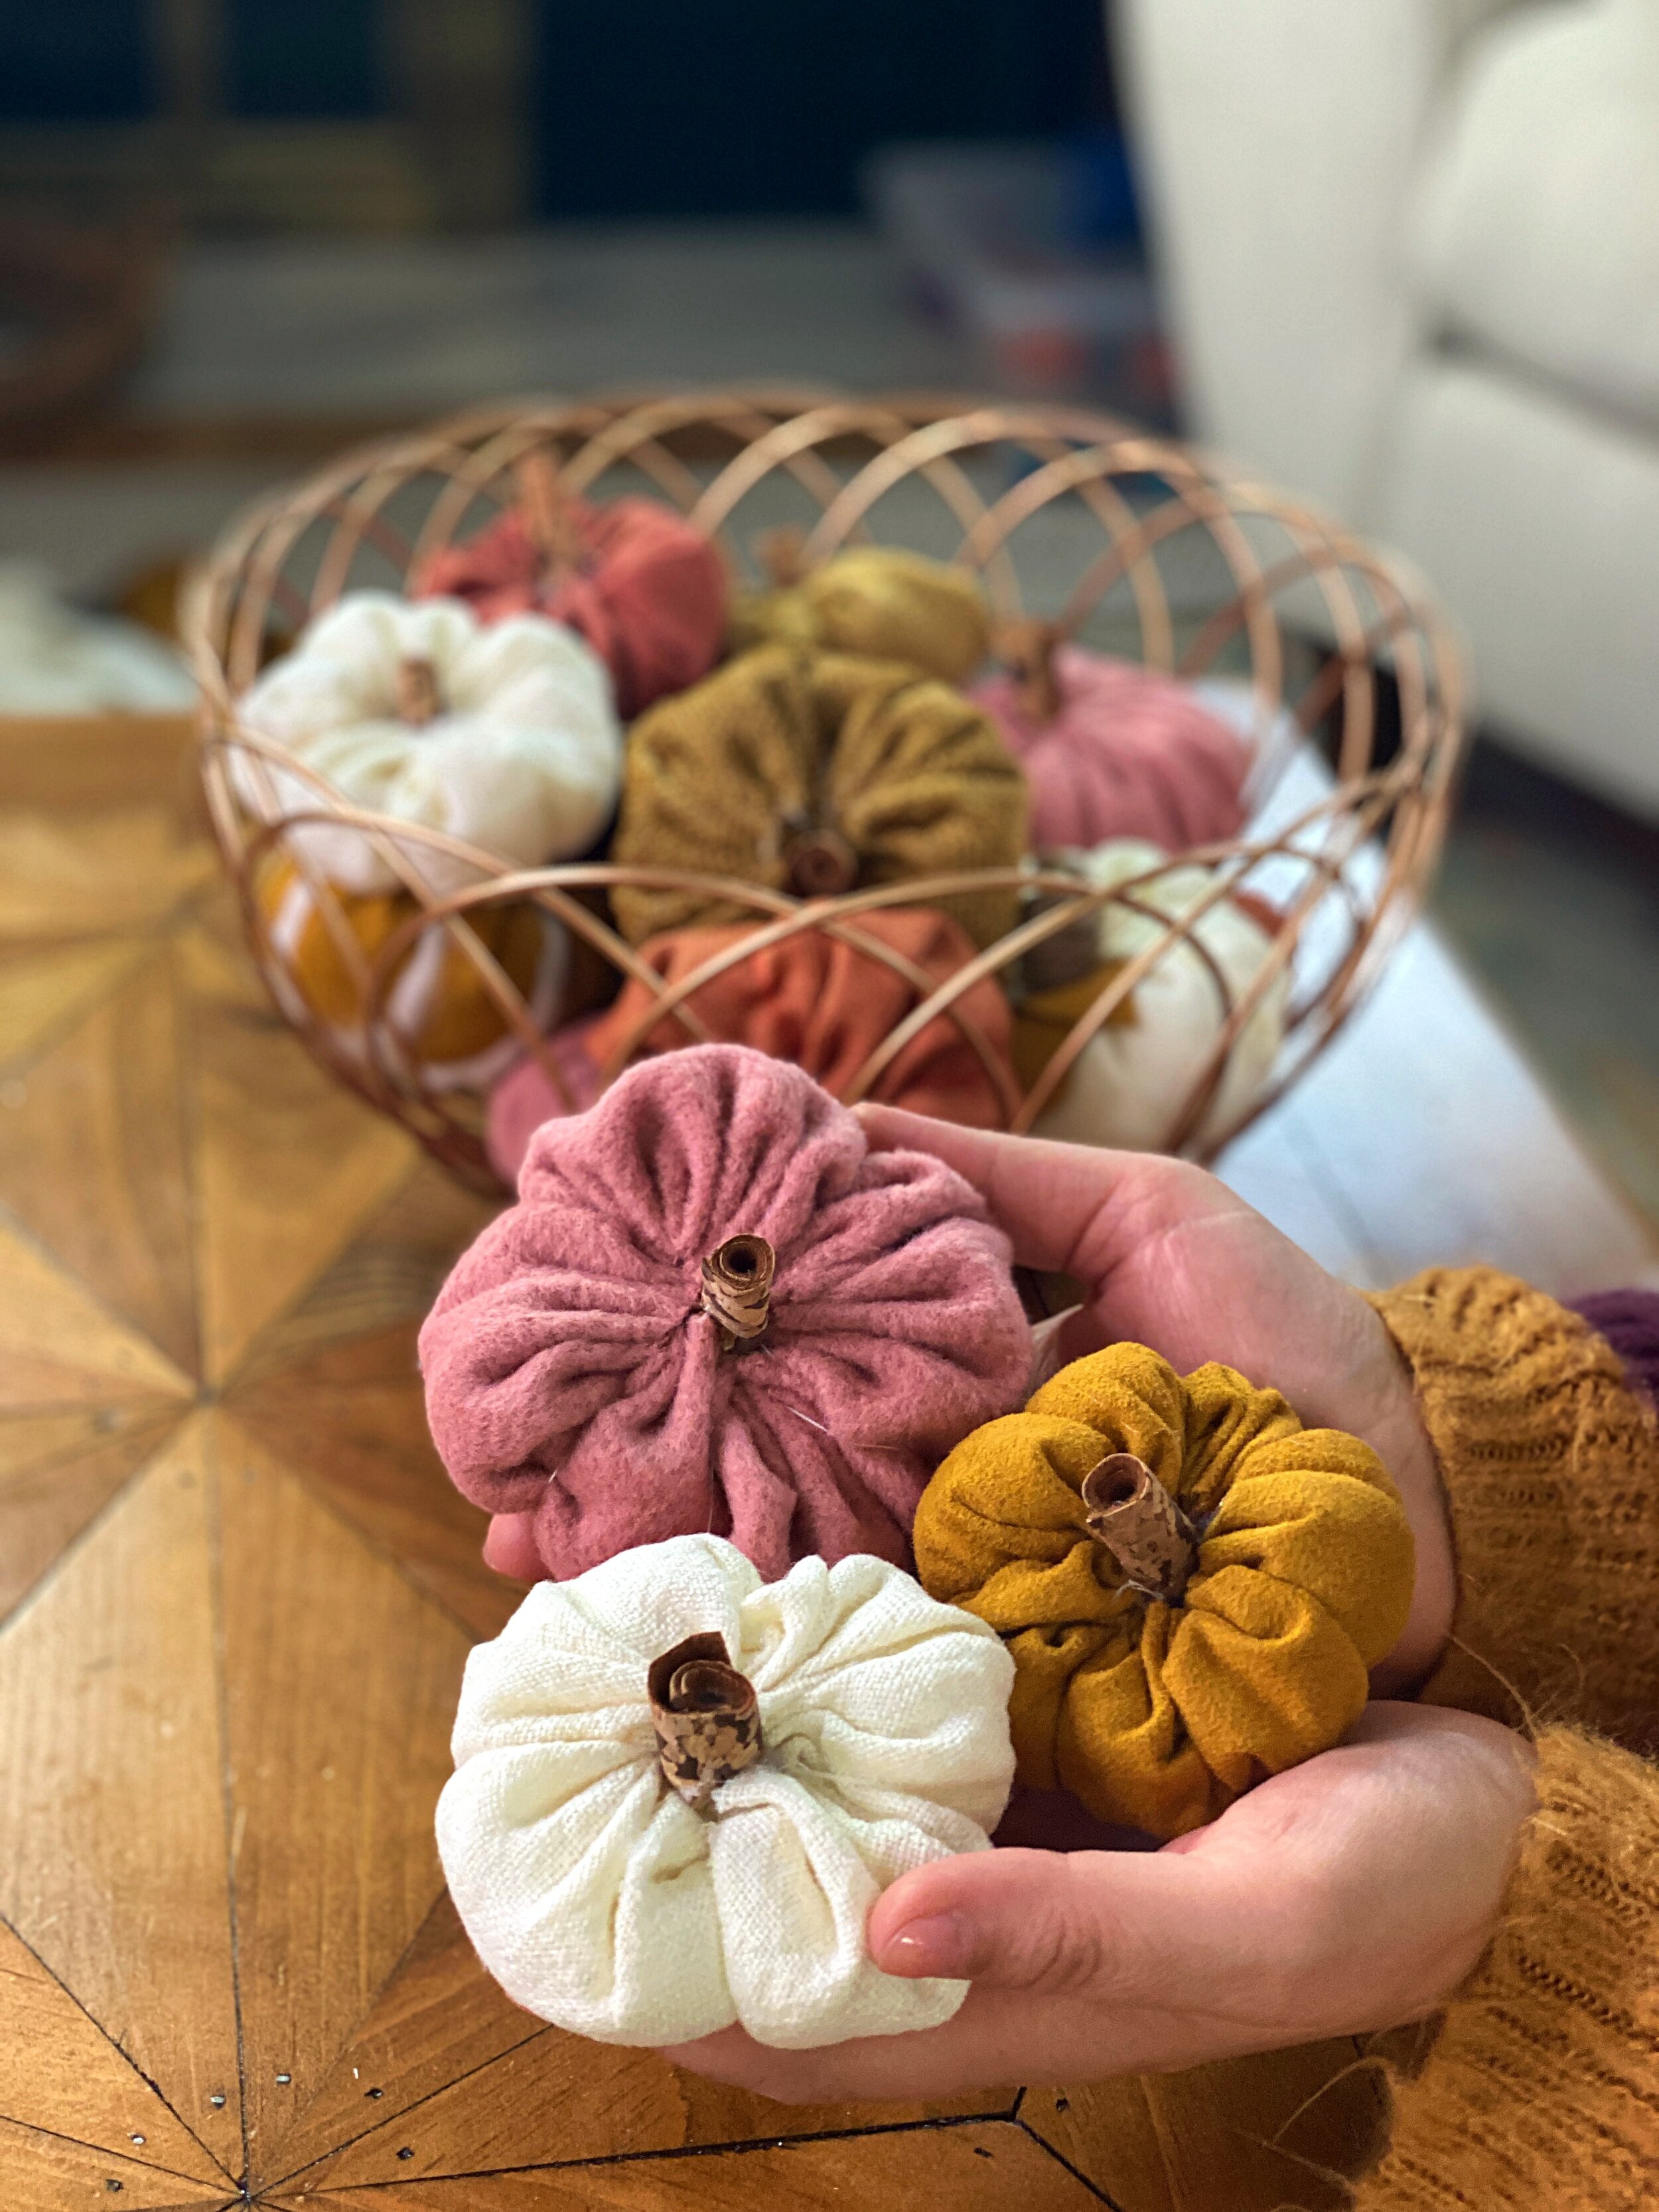
• Styling Your Creations •

Now that you’re knee deep in your custom made pumpkin patch, what do you do with them all?

Styling your pumpkins and working them into your home decor is half of the fun! This DIY craft is truly versatile, especially if you play it smart with your fabric choices. Sticking with neutrals will allow you to place your pumpkins in any space and give an overall “oomph” to your autumnal ambiance. If you chose to work with bolder & brighter patterns, you are sure to have some spirited standout pieces that will really transform a space!

String together your pumpkins with twine or yarn to create a garland. These garlands are perfect for hanging in windows, doorways and make an excellent focal point for your fireplace (then use the spares to really bulk up the mantle.)

Toss all your pumpkins into a complimentary dish and stick them on your dining room table for an exciting centrepiece. Sprawl differing sizes and styles along the table for a graphic effect.

No matter which way you style these adorable little pumpkins they are sure the please <3

IMG_2135 EDIT.jpg

Boho Home, home decor, Bedroom Decor, living room decor, sewing project, sewing tutorial, mommy blog, Mom hacks, mom blog

• POM POMS + MORE •

Making your own pillows is super easy (even for a newbie sewer like me) and it’s a fun way to keep yourself occupied during this time where we are all required to physically distancing and keep to ourselves.

While scrolling through instagram I noticed many home decor influencers had lovely round pillows with pom pom’s on them. I thought they were so cute and fun but checking out the online price of them (upwards of $150 a pillow) I decided to take a crack at making some myself.