rebekah higgs

Bathroom decor, bathroom cleaning, bathroom design, bathroom hacks, Boho Home, home decor trends, home design, home design trends, home ideas, Home Improvement, home life, Home renovation, Inspiration, mom blog, mom blogger, Renovation, Smart Home

A Tale of Texture and Tone in Your Ensuite Bathroom

DIY MOM Rebekah Higgs Ensuite blog Halifax

Everyone always wants to know how much a bathroom renovation will cost…

Well the answer is not as simple or clear as one would hope for.

A bathroom renovation costs anywhere from 10 to 100 thousand dollars, much of which depends on the finishes you select. It’s also why it’s so important to build a footprint for each project so you know exactly where your money is going. Take flooring for example, if you prefer large stone marble walls and floors in lue of ceramic ones, you best get ready to pay more!

Clawfoot Tub Before

Lucky for me, my bathroom ensuite was part of a larger renovation, that included an extension on our old craftsman style home, so I was able to start fresh. The space was an empty canvas ready for me to paint on the plumbing and layout.

During the initial demo we removed the original 1920 clawfoot tub. I’d heard stories of how cozy these tubs were and thought including it in my design was a wonderful way of acknowledging the era of the home.

Other elements I envisioned for my new ensuite bathroom was a double sink vanity, a curb-less shower and a canopy shower head with an extendable hand tap (to make cleaning the claw foot tub easier). I’d also always wanted a bidet toilet and lucked out finding a deluxe model from American Standard, the Advance Clean SpaLet 100 Bidet, which included a heated seat, dryer and multi functioning water levels.

I fell in love the with idea of french doors opening up into the bathroom and sourced two beautiful solid white oak doors from Metrie that fit the space perfectly. In my mind it was clear, the double french doors would open to reveal the old clawfoot tub under a large window centred in the room. What a statement!

american Standard Advance clean spa let toilet

American Standard Advance Clean Spa Let Toilet is a dream come true!

A simple glass partition separates the toilet from the curb-less shower.

Custom vanity by DIY MOM Rebekah Higgs Metrie White Oak french doors

Oak french doors from Metrie swing open to reveal the ensuite.

With my wish list, and the floor plan parameters in place, I started designing a mood board and selecting my tiles. Finding a floor tile was more challenging than I thought, so I ended up taking the lime hex tiles provided by Elegant Flooring, originally intended for my basement bathroom, and moved them upstairs to the ensuite. Next, I fell in love with a textured tile called “Stripes” from Wow tile, and wanted them to be a feature in the room from floor to ceiling and behind the vanity. These tiles were special order, and would take months to arrive so I ordered them early into my renovation journey.

Once I had the physical tiles in hand I quickly realized their texture created concern, perhaps the plumbing finishes wouldn’t fit around them, a less experienced tiler took one look at them and said… I don’t think so.

Champagne bronze rain shower head from Delta Faucet.

In order to skirt around the issue, I decided to pick a wall tile for the shower (artisan white from Centura ) a classic tile I used in my last renovation) . This tile is flat and blends in with nicely enough that I could move forward with the bathroom renovation. Everything was coming together beautifully, all my Delta Faucet fixtures in champagne bronze that I had selected had arrived and the plumbers were well on their way rouging in the shower, toilet and sinks.

Custom double sink Vanity built with furniture grade oak plywood.

The interior of the clawfoot tub was in rough shape!

Then our next issue arose…. where to get the clawfoot tub refinished. I called around, asked my social media audience for leads, but kept striking out. Refinishing this tub was starting to be a real pain. With the tub interior and enamel in such rough shape, I started to look for alternative options. A new tub? A plastic insert? I decided to put a pin in it while I dealt with larger issues surrounding my renovation.

More issues popped up - of course they did! My new experienced tiler, said he could work with the texture of the stripes tile but was concerned about the large scale of hex tiles sloping to the drain of the curb-less shower. Too many cuts and raw edges would make it difficult and unsafe. He asked if I could pick a different tile for the shower floor…

Oh boy, this was really throwing a wrench in my design plans. Another tile? I was going for cohesion and throwing another tile into the mix wasn’t sitting well. Off to Wacky’s flooring I went, to take a look at their selection for floor and wall tile. If I could keep my tile selections to 3 instead of 4 I just might be able to pull off the look I wanted.

I settled on a simple square matte white tile for the shower wall and floor and hoped that running it from the floor to the ceiling might make it look intentional. My tiler was relieved when I brought back a 2x2 square tile for him to work with. So the artisan white tiles were on the cutting room floor and we were back on track with my bathroom renovation.

Small square tiles used on the shower floor flow up the wall right to the ceiling.

With the floor under control, my attention turned to the vanity. I started looking for off the rack options that might work in the space. I loved the solid wood vanities in my previous home, but my plumbing was set with the sinks specifically placed 29 inches from each other in the middle, so drawer banks could be on either side. There was nothing that would work with the perimeters that were set, so the only option was custom. I drew out my vision for the vanity and worked with my carpenter on the build details.

Custom built vanity with oak plywood from robert bury, Awake stone from Dekton Handles from emtek

Completing the space a simple vanity cabinet designed by me and built custom by my carpenter.

We were able to pick up the furniture grade plywood I needed from Robert Bury, and Handy Harry started making the cuts and building the vanity. To finish off the cabinet we stained it with Nano defence (keeping the natural Oak look) and I selected the modern glass pull from Emtek.

While the vanity was being built, I selected my counter top. Wanting something unique with dramatic veining, I discovered the new Awake Stone from Dekton and wondered if it would be right for the room. With so much going on with the tile, floor, and vanity, was I overdoing it with the big bold stone pattern?

I decided to go with my gut instinct and just do it! I asked the manufacturer Living Stone to produce a chunky edge counter and a backsplash high enough to cover the plumbing and simplify the tile job. It worked! I loved the look! I think the Awake Stone was the exact amount of bold that I needed to really make this vanity pop!

After the vanity was complete and the countertops installed, the tilers came back to finish off the wall behind the mirrors with the textured Stripes Tile.

I hung the wood arched mirrors from Mercana that Lazy Boy in Halifax had ordered me, and all that was left before the big photo shoot was to find some sconces to go next to my mirrors and the right blind for the big window above the clawfoot tub.

The Talia Sconce from Kent was the perfect tone for the room.

I popped over to Kent to see what they might have in stock. I felt like I had a horse shoe around my neck when I found the Talia Sconce (only $109) hanging on the wall. It was just the right neutral colour palette with a touch of gold, perfect! But, ugh, they were out of stock and I needed them TODAY. The sales rep checked and another store had them in stock so I rushed over to snag two of the last ones - hooray!

While at Kent, I took a peek at the blinds available in store. There was a bamboo roll up shade of particular interest to me that came in 4 colour ways. I thought the white would make a lovely soft natural fibre for the bathroom window but the 60 Inch blind that was on the shelf was slightly large to be mounted to the the interior of the window. On the bright side, they were quite inexpensive (only $71.99) and after being quoted thousands of dollars for wooden shades like the windows on my main floor, I thought perhaps I could figure out a way to cut them to fit…they were wood after all.

As luck would have it, I did figure out a way to cut them. I used a pair of scissors to cut down the width, then used the chop saw to trim the wood binder at the top. I shortened them and secured the bottom ropes with a hot glue gun. After that, I glued a piece of sheer fabric liner onto the back. When it was time to install them, I ditched the hooks and staple gunned them right to the window trim. And there you have it, for under $100 coupled with a little elbow grease (and my DIY mom experience), I had the custom wooden blind look I wanted from the start.

The final look of my 1920 Clawfoot Tub under the large window with the wooden bamboo blind.

Last but not least I finally found a local business to refinish my Clawfoot Tub! Beautiful Baths came to my home, sanded down the interior and reglazed my tub for $1400. So worth it! If you ask me, they are true miracle workers!

My plumbers Worx Mechanical retro fitted the old plumbing to work in the tub and installed the rest of my beautiful Champagne bronze Dorval wall mounted faucets from Delta Faucet Canada. It was no longer a vision, it was a reality!

DIY MOM and designer from Halifax Nova Scotia Rebekah Higgs

DIY MOM and designer Rebekah Higgs stands barefoot in her completed bathroom space.

So my bathroom is complete, a neutral haven away from the choas of the day. Let me know what you think of my design choices in the comments below! Feel free to share and pin my photos and content if you love it!

xox

Rebekah

Bedroom, Bedroom Decor, atrium

A Bedroom Suite Dreams Are Made Of

How I brought this principle bedroom suite to life with carefully curated furniture, lighting and home accents.

DIY MOM Rebekah Higgs principal bedroom suite in halifax nova scotia

Now on my third major personal home renovation, I have gotten to know what I love and prefer when it comes to my principle bedroom. I wanted this space in my craftsman style home, built in 1922, to feel like a glamorous hotel room. A quiet and tranquil space to get away from the busyness of life and renovations. Anyone who has an active imagination will empathize with me when I say how challenging it can be to turn off my mind truly experience the rest and relaxation my brain needs at night.

With this in mind, I started my mood boards for my bedroom early in this homes renovation journey.

The first thing I selected was the wall mural I wanted to use in my bedroom. The paper I found called Opulence, became the theme for my entire home. I large scale print, that is measured and custom printed for you exact space is what separates a wall mural from the usual wallpaper. This wallpaper comes in 5 colour ways, and despite my usual inclination for pink, I opted for the more neutral option in marble, knowing this would be a splendid back drop for the rest of my room.

You can see in the photo to the right that the wallpaper frames the dramatic Oak double doors and original trim into my ensuite bathroom perfectly. With such a spectacular wall print, minimal art is needed to fill the space. The marble and gold is echoed elsewhere in the rooms design.

Next I was on to my lighting selections. I’ve partnered with Eurofase on previous projects and have long loved the quality and designs they offer.

I was drawn to the lustrous collection of delicate, gold metal chains in the Bloomfield Chandelier. I had never seen anything like it, and with the extra high ceiling space this home gifted with me post extension, I thought there was no better way to wow my audience than with this transitional piece. The Eurofase website describes this light as a cascading waterfall, and with the lights on I have to agree. It’s a visual stunner!

Matching chandelier and pendent from the Bloomfield collection at Eurofase.

When it came to my bedroom furniture I really lucked out by being able to source the perfect pieces locally! The Atrium in Highfield park Dartmouth Nova Scotia, is a one stop shop for all your furniture needs. With 3 amazing stores all in one location I was able to find the exact bed frame, nightstand, art and benches I needed to complete my bedroom. Everything I needed was in stock and ready to be delivered directly to my home. With furniture delays and shipping challenges I have faced over the last few years, this was such a breath of fresh air. It’s also worth the mention that the Atrium is the largest furniture retailer in Atlantic Canada and a family owned and operated business.

So off i went to the atrium to pick out my bedroom furniture and instantly I fell in love with the upholstered Sawyer King Bed on the floor in Gallery 1. The Stitched flanged slipcover over muslin upholstered footboard/side rails was the perfect anchor for my bedroom room. I love its simplicity, elegance and stature. This is a timeless piece and exactly the comfort one wants when crawling into bed at the end of a long day.

I recommend a trip to Gallery 1 if only to browse their jaw dropping selection of hand picked beautiful decor and furniture.

Sawyer slip cover king bed from Gallery 1 furniture, Abiola Artwork from World Wide Furniture.

Finding the perfect night stand for this room was a slight challenge. I was working with a very specific room dimension and window height. The floor plan of my 100 year old home gave me just the right amount of space to fit a king bed with windows on either side. When I stumbled on the Freslowe nightstand in the Ashley Furniture showroom, I breathed a sigh of relief. It was the exact size and style I was looking for, plus the warm wood tone complimented the slip cover bed perfectly! I also love the unique display shelf with night light feature and the built in plugs in the back. It’s such a great find.

Freslowe Nightstand works perfectly with the Sawyer King Bed.

As a bonus I was able to get the Abiola Wall Art for above the bedframe and the adorable Dakmore bench from World Wide Furniture. Also located in the Atrium. They truly have options for all looks and design aesthetics- traditional, transitional and modern, at all price points. Plus they offer no interest and no payment financing options. Trust me,  when you are at the end of your renovation budget like I am, this makes all the difference.

Dakmore bench can work in any space in your home.


Pressed for time and wanting my bedroom to feel complete. I quickly made these no sew valences to cover my inexpensive room darkening roller shades from Kent Building Supplies.

With some white linen from the local fabric store I carefully folded and ironed the pleats into place, using a fabric tape to secure the seams, I slowly ironed the glue into place and then staple gunned the completed valence to the underside of my window trim. Each curtain took me around 40 minutes to fabricate and instal.

The room darkening roller shades were cut to size at Kent Building Supplies and easy to instal myself.

So that wraps up my bedroom blog and the details behind this principle room. What do you think? Do you love this room as much as I do? Leave a comment below with your thoughts and questions on my bedroom design choices.

I hope you were able to catch my segment with CTV Atlantic, but in case you missed it, I am sharing it here!

With Love.

Rebekah

camping, boler, boler camper, camping tips

5 Camping Tips for Non Campers

As someone who is late to the camping game - my family didn’t camp together when we were kids, I’m not much of the roughing it type! On our first journey out with the camper my daughter said to me… “I don’t know about this camping thing mom, I’m more of an indoor girl.” I had to chuckle at the comment from my then 8 year old daughter. But as many of us turned to camping as covid kept us close to home, this 1973 Boler camper came into our life and transformed the way we felt about the great outdoors.

So as a reformed non camper, I’ve discovered how bringing a little luxury along to the campground can make an outdoor excursion much more pleasant. Keep Reading for my 5 Camping Tips for Non Campers!

home decor, mom hacks, mom blog, mom blogger, bathroom cleaning, bathroom hacks

•It’s cool to be clean. Germ eliminating fixtures and other bathroom hacks•

IT’S COOL TO BE CLEAN

These Germ Eliminating Fixtures and Hacks are about to change your entire bathroom experience.

rebekah higgs diy mom pink bathroom american standard

This blog was written in partnership with American Standard. All opinions are my own.


There is nothing quite like the feeling of a clean and tidy house! When my home is put together and sparkling from corner to corner, I feel relaxed and ready to tackle whatever comes my way (except spilled milk!). I love getting Lennon involved in chores whenever I can because it’s a great way to teach responsibility and make her feel like she’s an important contributor in caring for our home. It’s me + you kid! 


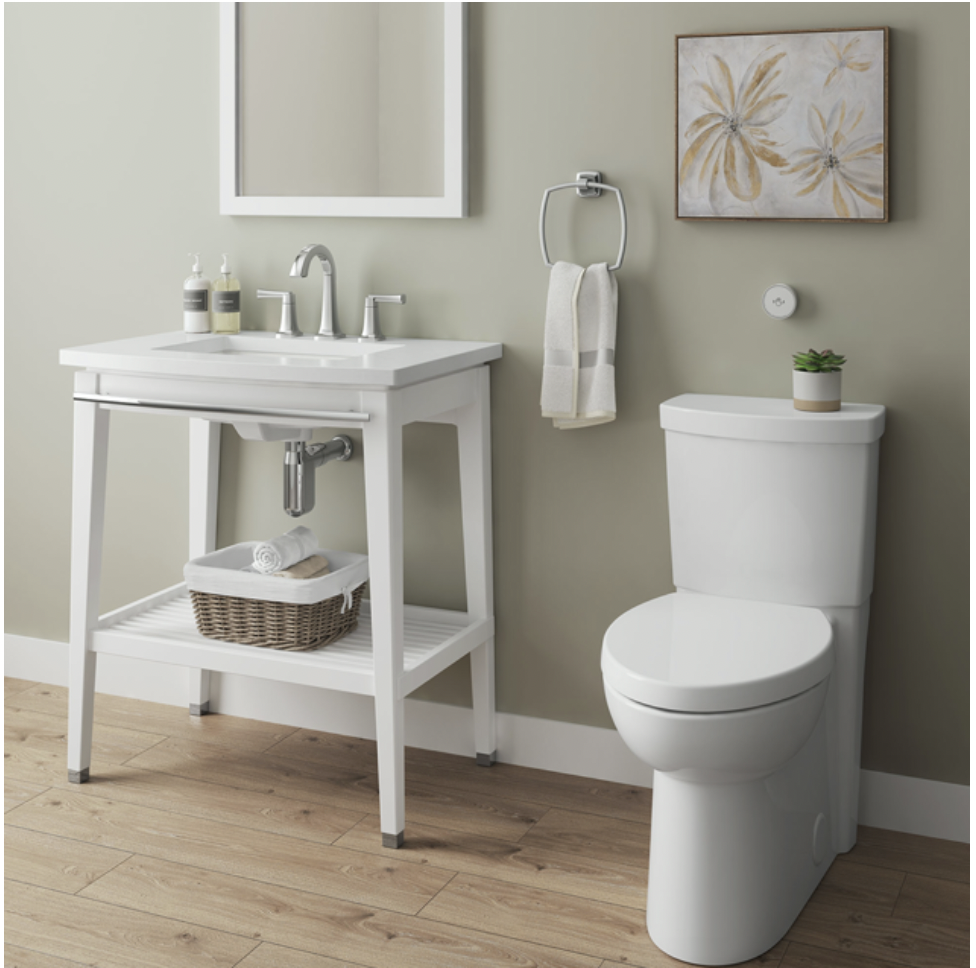
That’s one of the reasons why I love my American Standard sink and accessories. The company produces high-performing fixtures, stylish faucets and sinks, and other wellness products for the bath and kitchen. And, since I’ve been on a cleaning kick lately, their touchless product offerings and clean technology make my life a whole lot easier and my home a whole lot more sanitary! Check out these tried and true cleaning hacks that will save you time, simplify your life, and instantly boost your mood. 


Hack #1

Clean In Every Corner

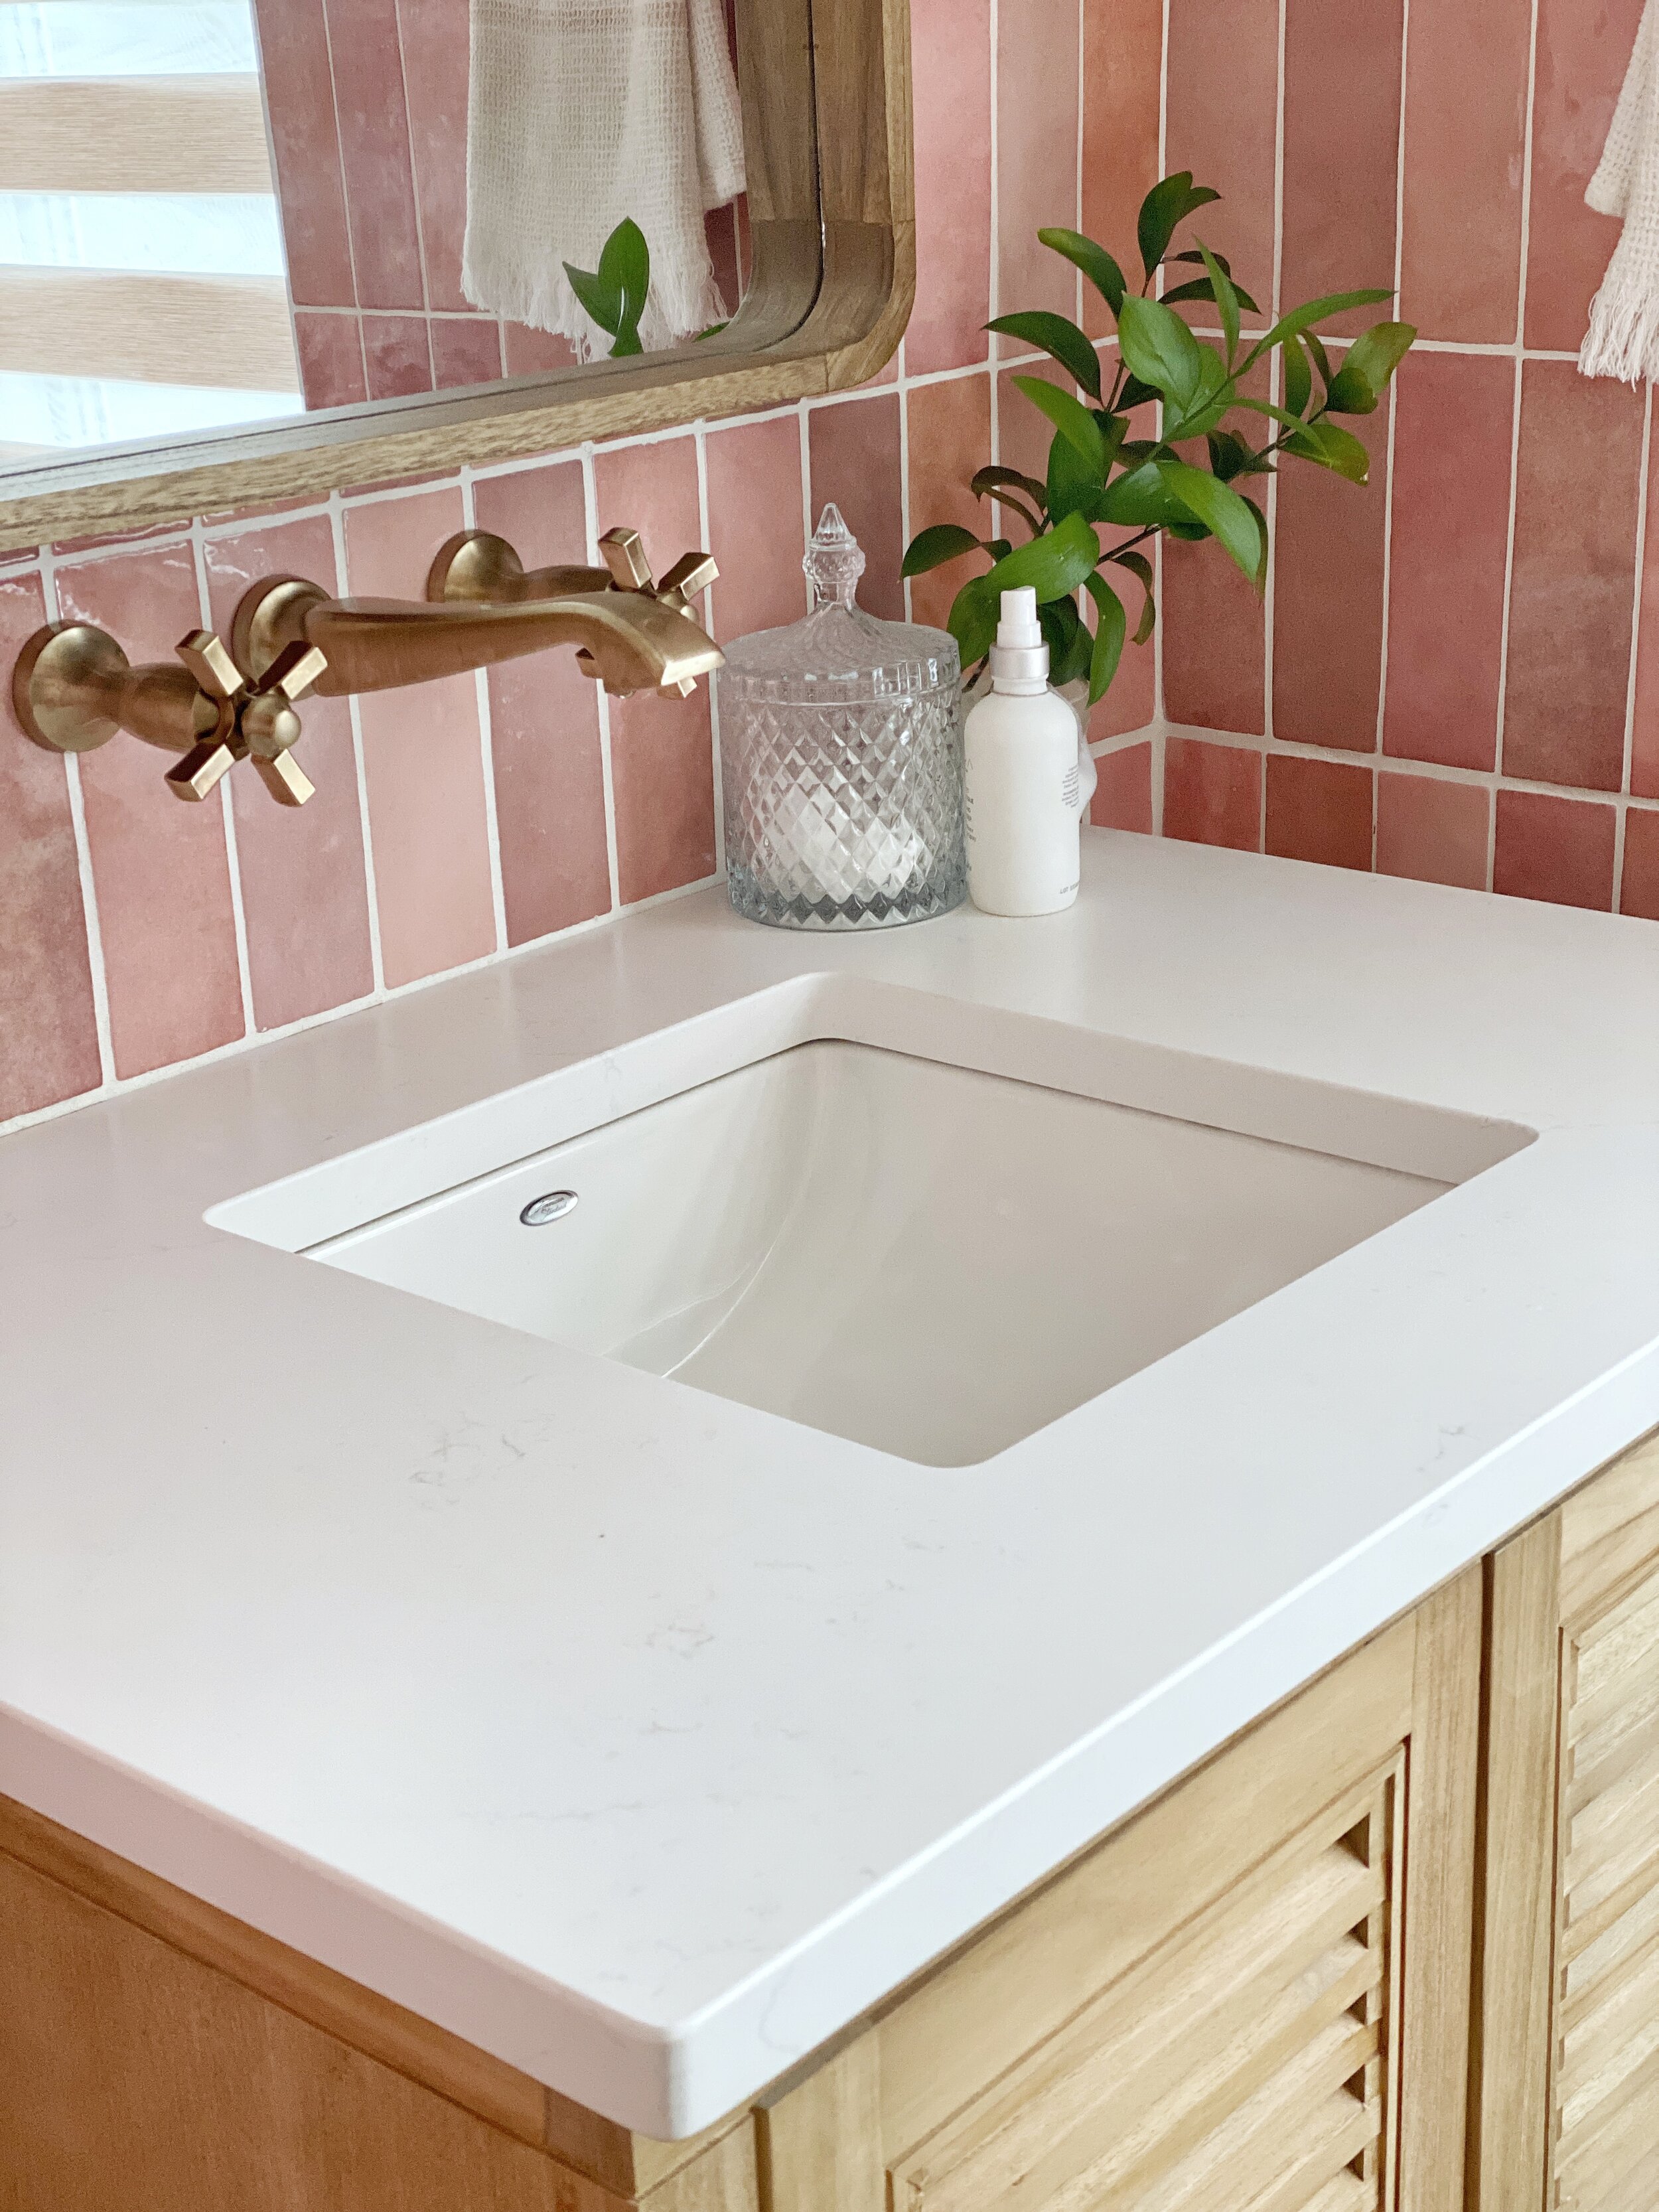
If you struggle with cleaning the nooks and crannies around your bathroom and kitchen, you’re not alone. These hard-to-reach crevices can be incredibly frustrating, especially for die-hard cleaning aficionados like us. I’ve come up with an easy hack that will make those tricky areas sparkle faster than you can say “clean as a whistle!”. Wrap a soft cloth around the end of a butter knife to clean the gunk around faucets, vents and other small fixtures. The knife is small enough to get into those tiny corners, and the cloth prevents scratches. They’re the perfect deep cleaning duo in my humble opinion. American Standard sink and accessories

Studio Carre Undercounter Sink

Studio Carre Undercounter Sink

Hack #2

Pearly White Surfaces

The power of a soft-bristled toothbrush goes beyond healthy gums and teeth. Wet the bristles with a mixture of baking soda and water and gently brush over the shower and wall grout. Leave it on for 10 minutes, rinse and voila! Gleaming tiles every time! 

DIY MOM-9.jpg
pink bathroom DIY MOM american standard

Hack #3

When Life Gives You Lemons….

If you hate water spots on your chrome faucets as much as I do, I’ve got you! Cut a lemon in half, rub it all over your faucet, rinse and buff with a soft cloth. Easy, peasy and done in a flash. 

Beale Pull-Down Kitchen Faucet

Beale Pull-Down Kitchen Faucet

Hack #4

Let The Fixtures Clean For You

If there’s one job I hate, it’s scrubbing toilets and I know I’m not alone on this one! The American Standard Everclean surface makes cleaning toilets a cinch!The double-coated surface inhibits the growth of stain and odour-causing bacteria, mold and mildew on the surface, and that means less backbreaking work for this mama! It's like a self-cleaning oven for your bathroom!

Studio Touchless Toilet

Studio Touchless Toilet

Hack #5

Keep Your Hands Out Of It!

My American Standard Studio Carré Undercounter Sink was made for me– someone who loves clean, contemporary lines, but not the maintenance as the EverClean Surface and Technology makes it super easy to keep clean! American Standard understands that dirt and build-up happen, which is why they’ve created the double-coated surface to inhibit the growth of stain and odour-causing bacteria, mold and mildew on the surface. The smooth, mirror-like surface stays cleaner longer, even after years of use, making my life a whole lot easier. I use some vinegar, warm water and buff it with a soft cloth to make it sparkle and that’s as much work that’s required from me. Heaven.

Beale Pull-Down Kitchen Faucet

Beale Pull-Down Kitchen Faucet

I’ve also become obsessed with American Standard’s Beale Pull-Down Touchless Kitchen Faucet, which features a Selectronic hands-free technology sensor so you can stop and start the water with a simple wave of the hand. The pull-down faucet spray head will also help you reach all regions of your sink with ease, while the sleek and contemporary design is sure to complement any home design perfectly.

Hack #6

Even Your Mirrors Love a Clean Shave

If you have a can of shaving cream lying around, you can kiss foggy, dirty mirrors goodbye- for a couple of weeks anyway! Simply pump some foamy shaving cream onto a soft cloth or paper towel to stop your mirrors from fogging up when you’re in the shower. Who doesn't love a clean reflection?

Studio Carré Undercounter Sink

Studio Carré Undercounter Sink

Looking to incorporate clean technology into your home? Visit americanstandard.ca/clean to learn more!

Your turn to come clean! If you have cleaning any hacks I should know about, share them in the comments Spill it!

xox DIY MOM xox