Everyone always wants to know how much a bathroom renovation will cost…
Well the answer is not as simple or clear as one would hope for.
A bathroom renovation costs anywhere from 10 to 100 thousand dollars, much of which depends on the finishes you select. It’s also why it’s so important to build a footprint for each project so you know exactly where your money is going. Take flooring for example, if you prefer large stone marble walls and floors in lue of ceramic ones, you best get ready to pay more!
Clawfoot Tub Before
Lucky for me, my bathroom ensuite was part of a larger renovation, that included an extension on our old craftsman style home, so I was able to start fresh. The space was an empty canvas ready for me to paint on the plumbing and layout.
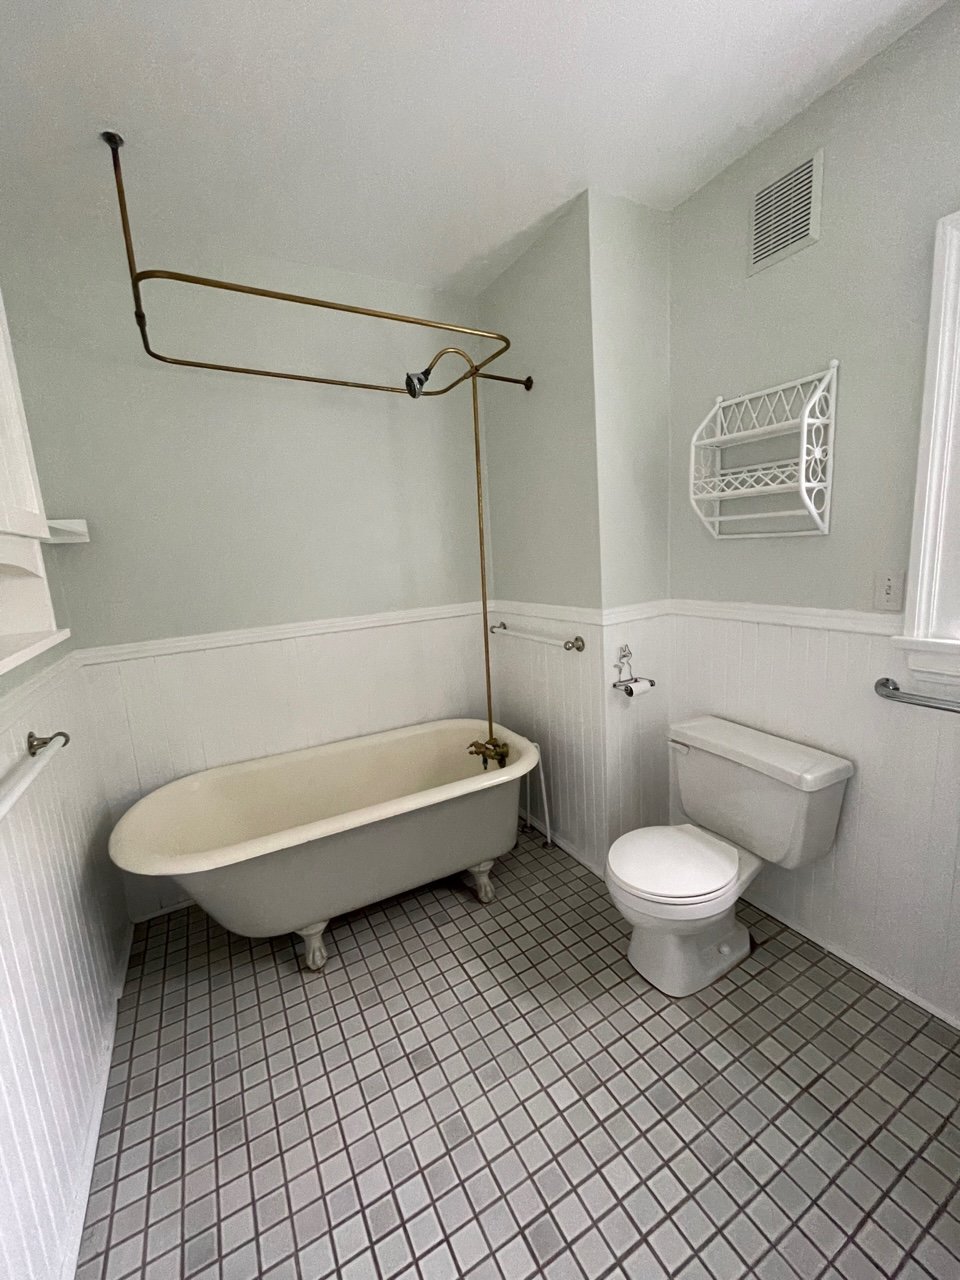
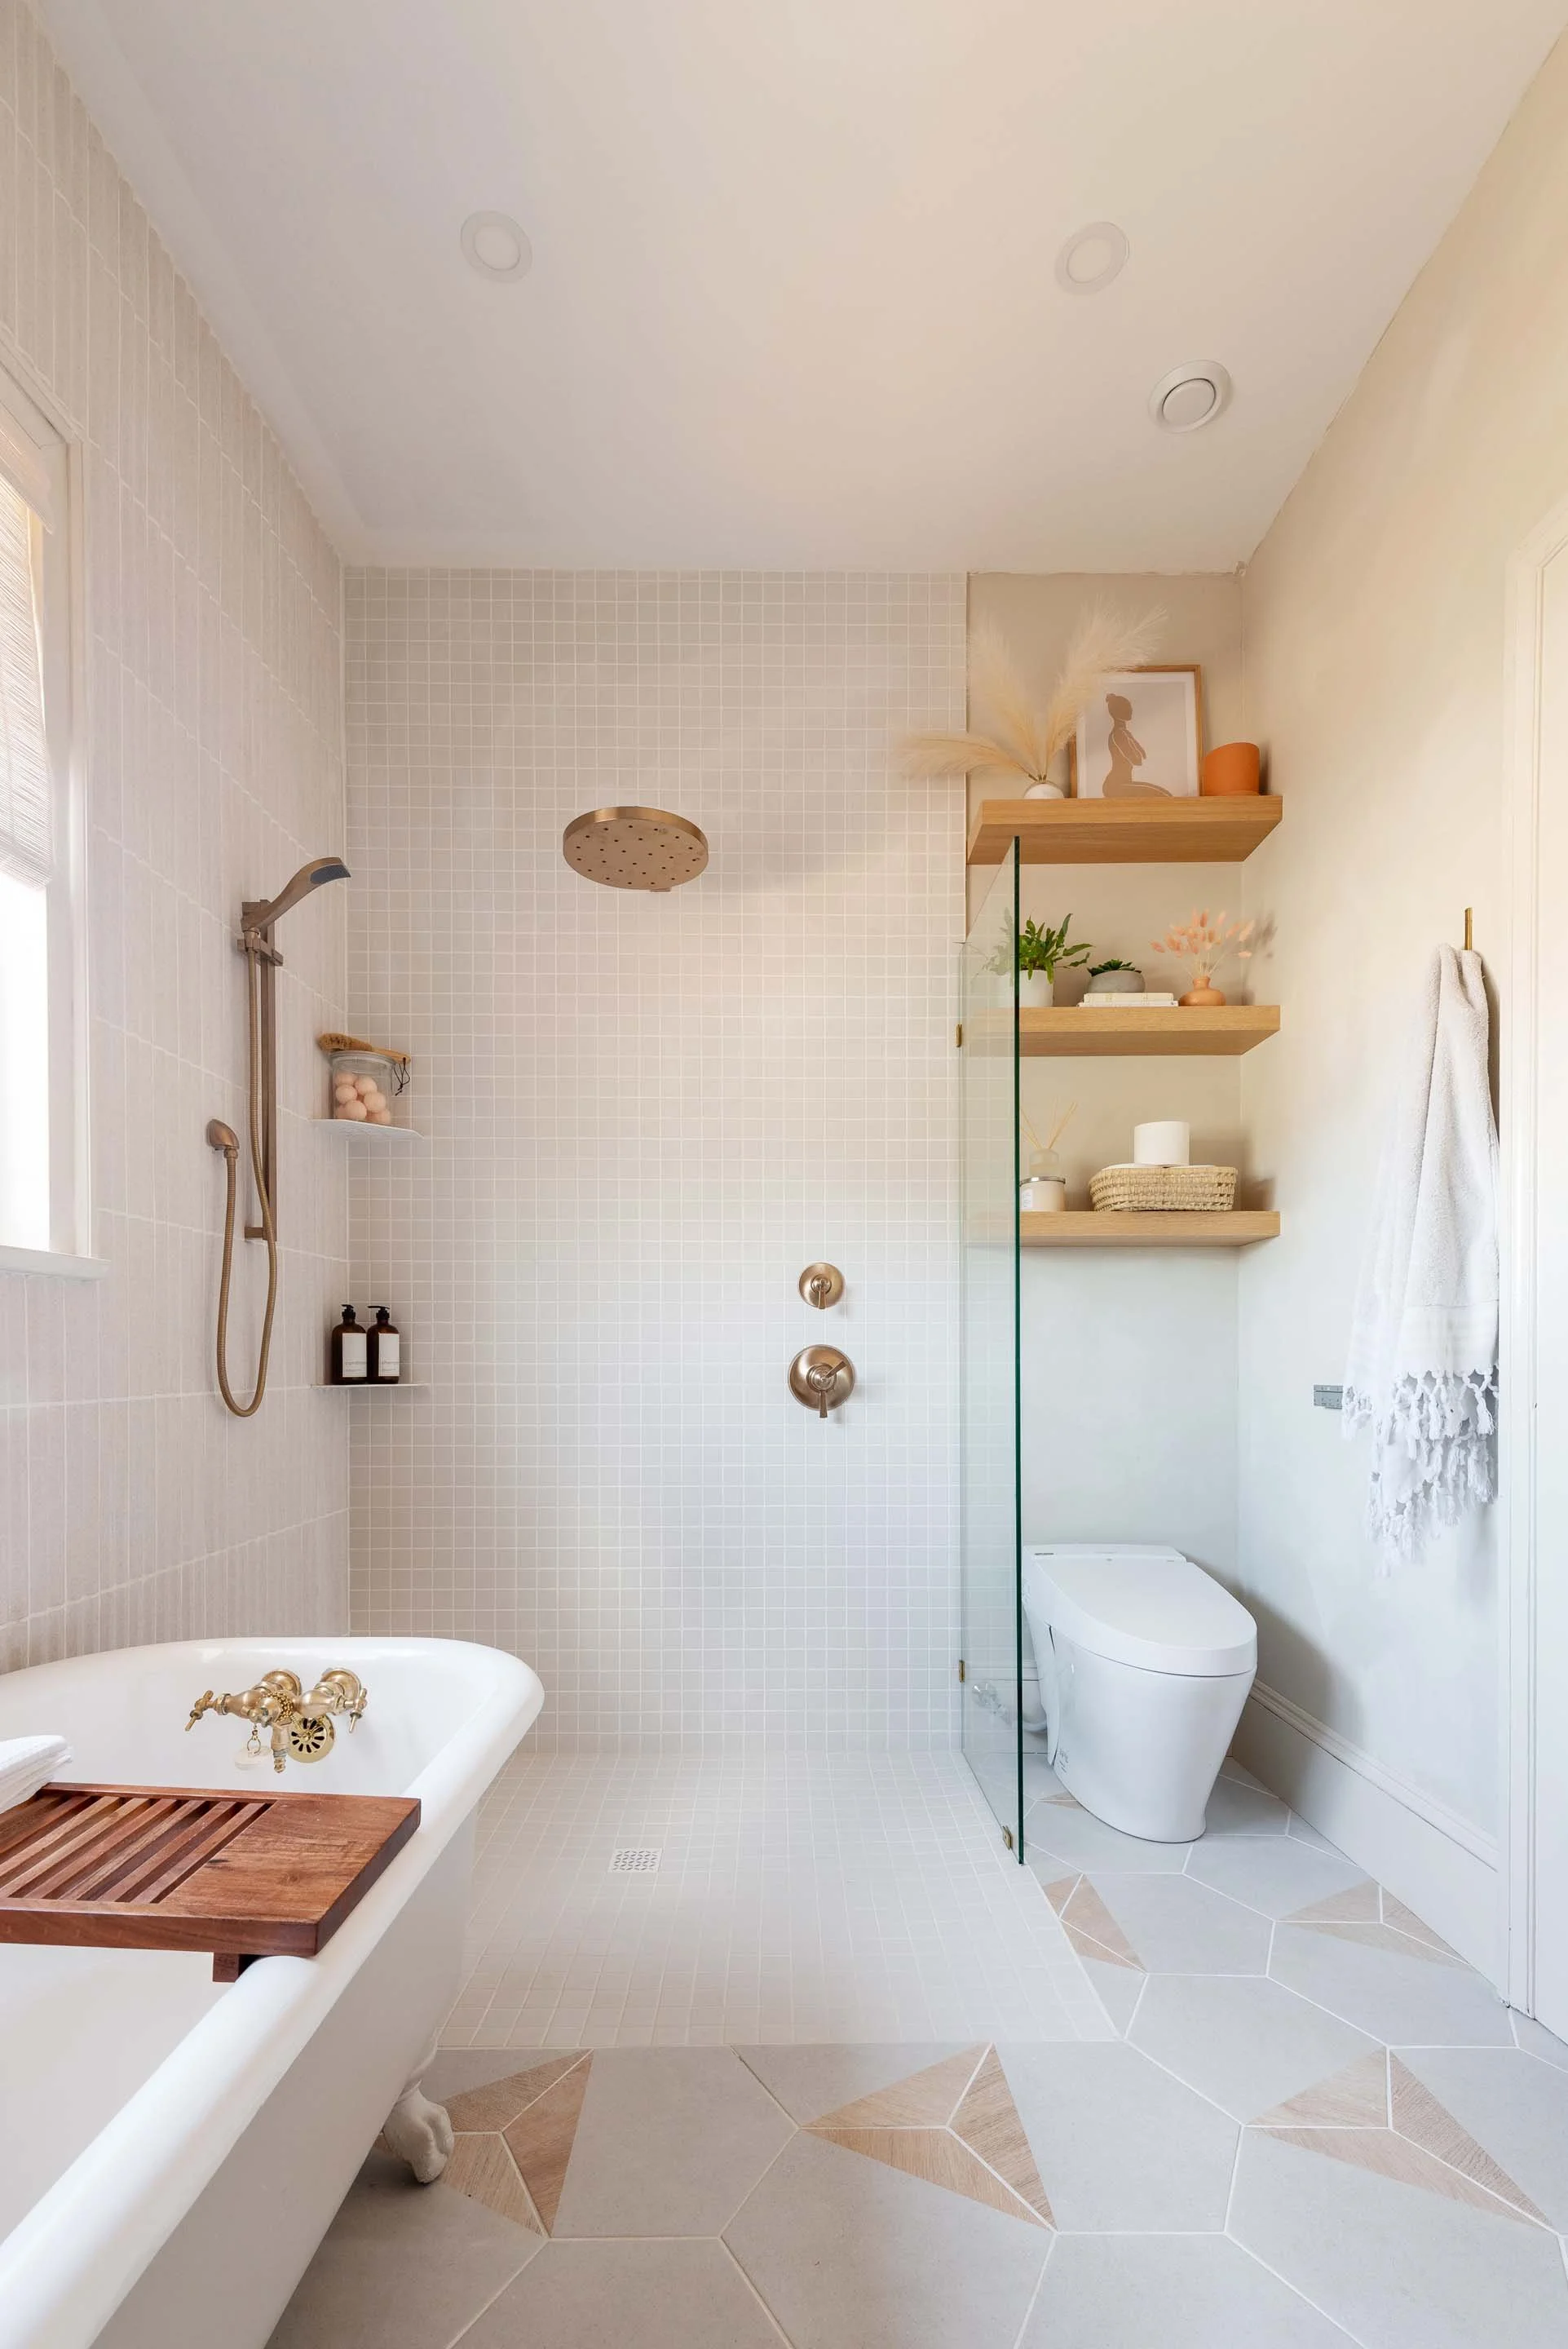
During the initial demo we removed the original 1920 clawfoot tub. I’d heard stories of how cozy these tubs were and thought including it in my design was a wonderful way of acknowledging the era of the home.
Other elements I envisioned for my new ensuite bathroom was a double sink vanity, a curb-less shower and a canopy shower head with an extendable hand tap (to make cleaning the claw foot tub easier). I’d also always wanted a bidet toilet and lucked out finding a deluxe model from American Standard, the Advance Clean SpaLet 100 Bidet, which included a heated seat, dryer and multi functioning water levels.
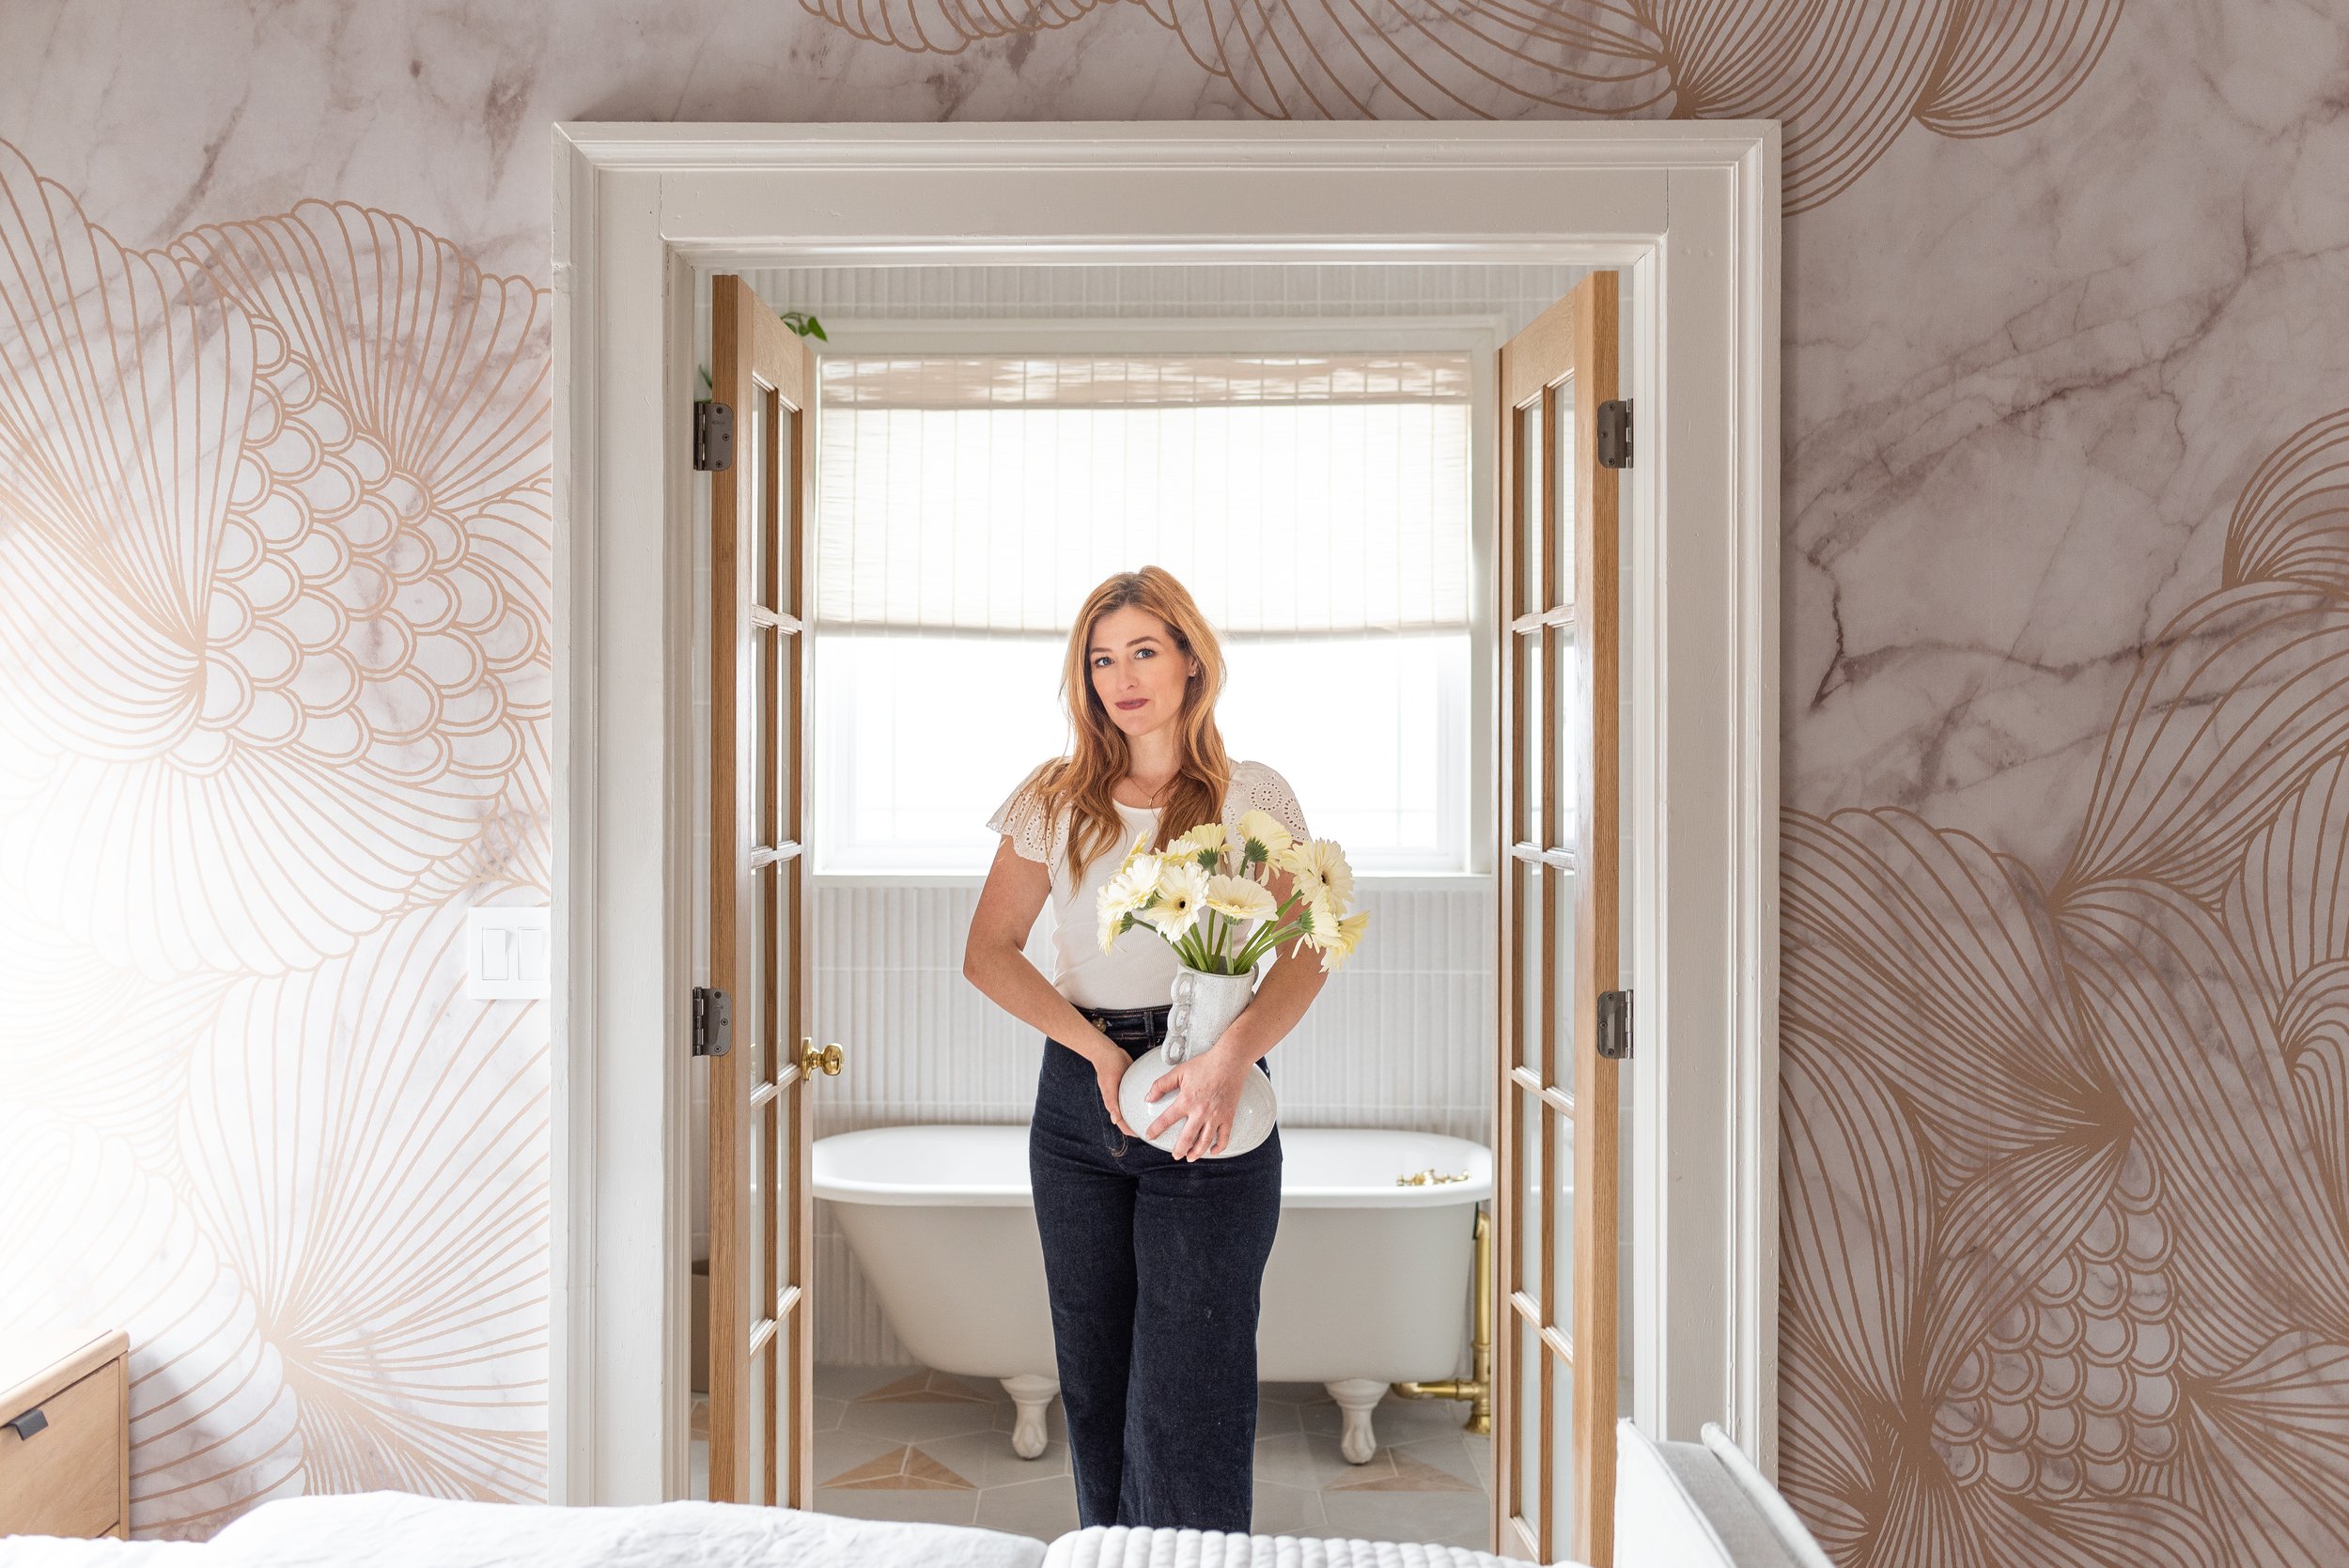
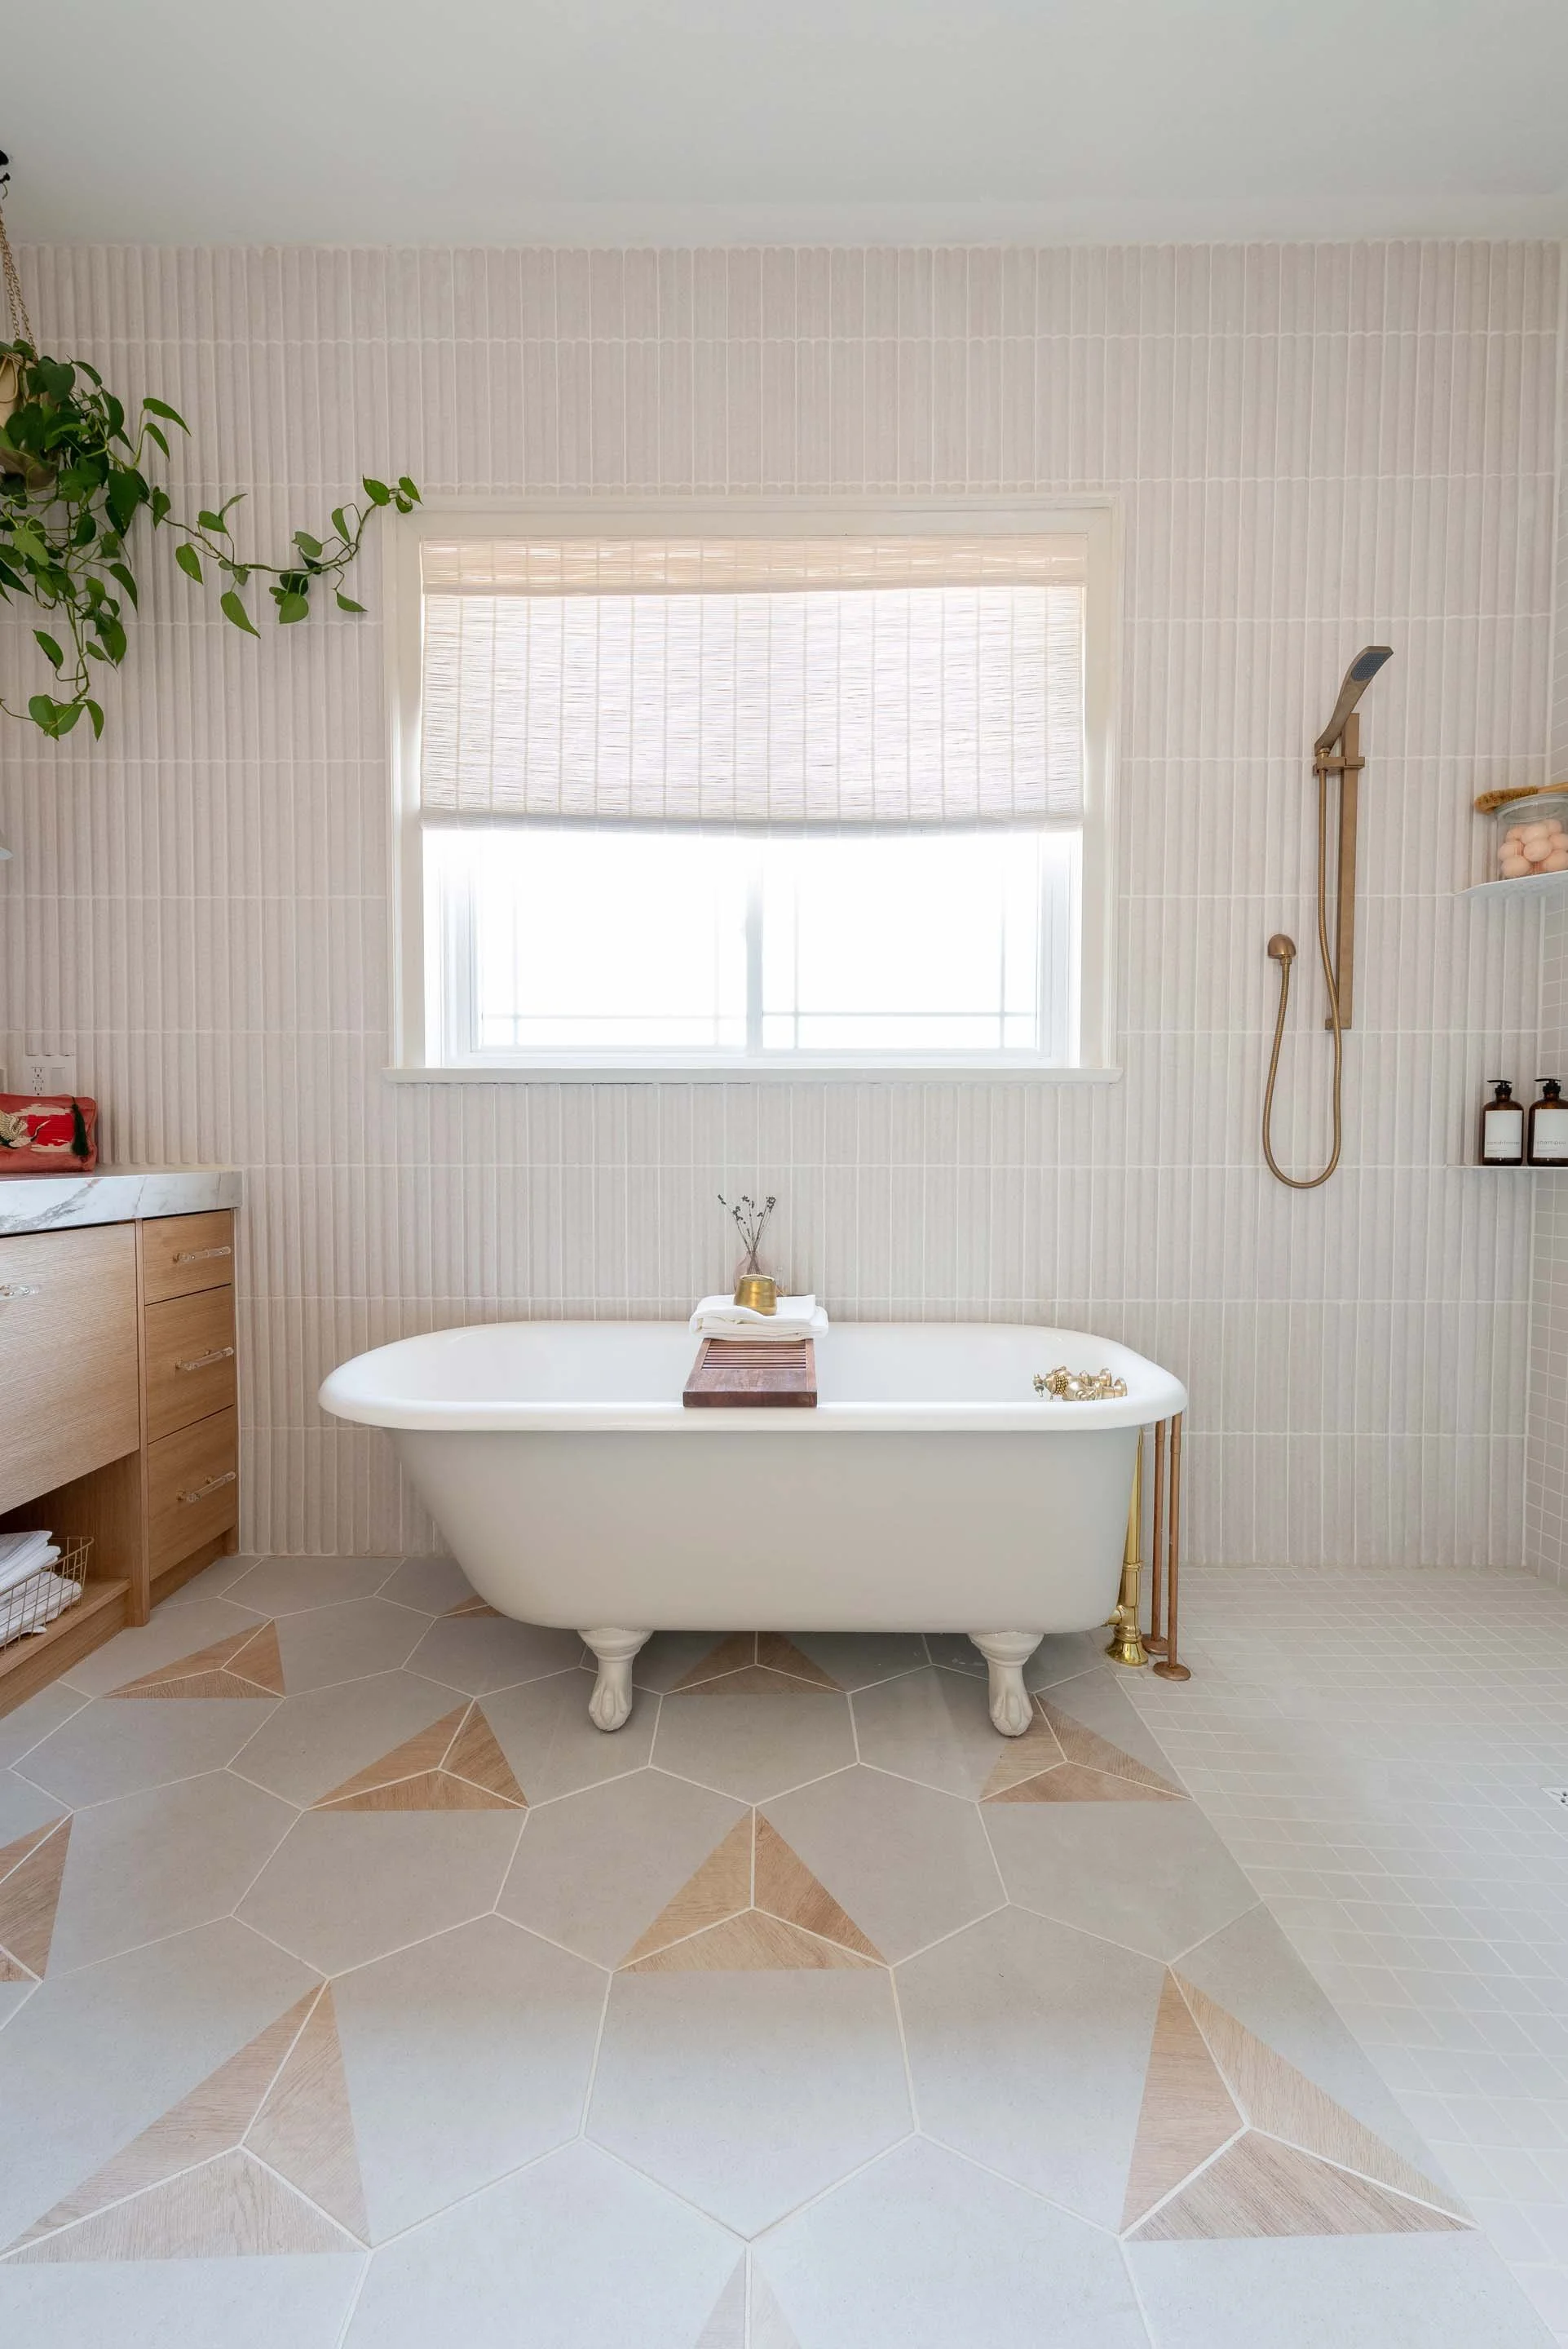
I fell in love the with idea of french doors opening up into the bathroom and sourced two beautiful solid white oak doors from Metrie that fit the space perfectly. In my mind it was clear, the double french doors would open to reveal the old clawfoot tub under a large window centred in the room. What a statement!
American Standard Advance Clean Spa Let Toilet is a dream come true!
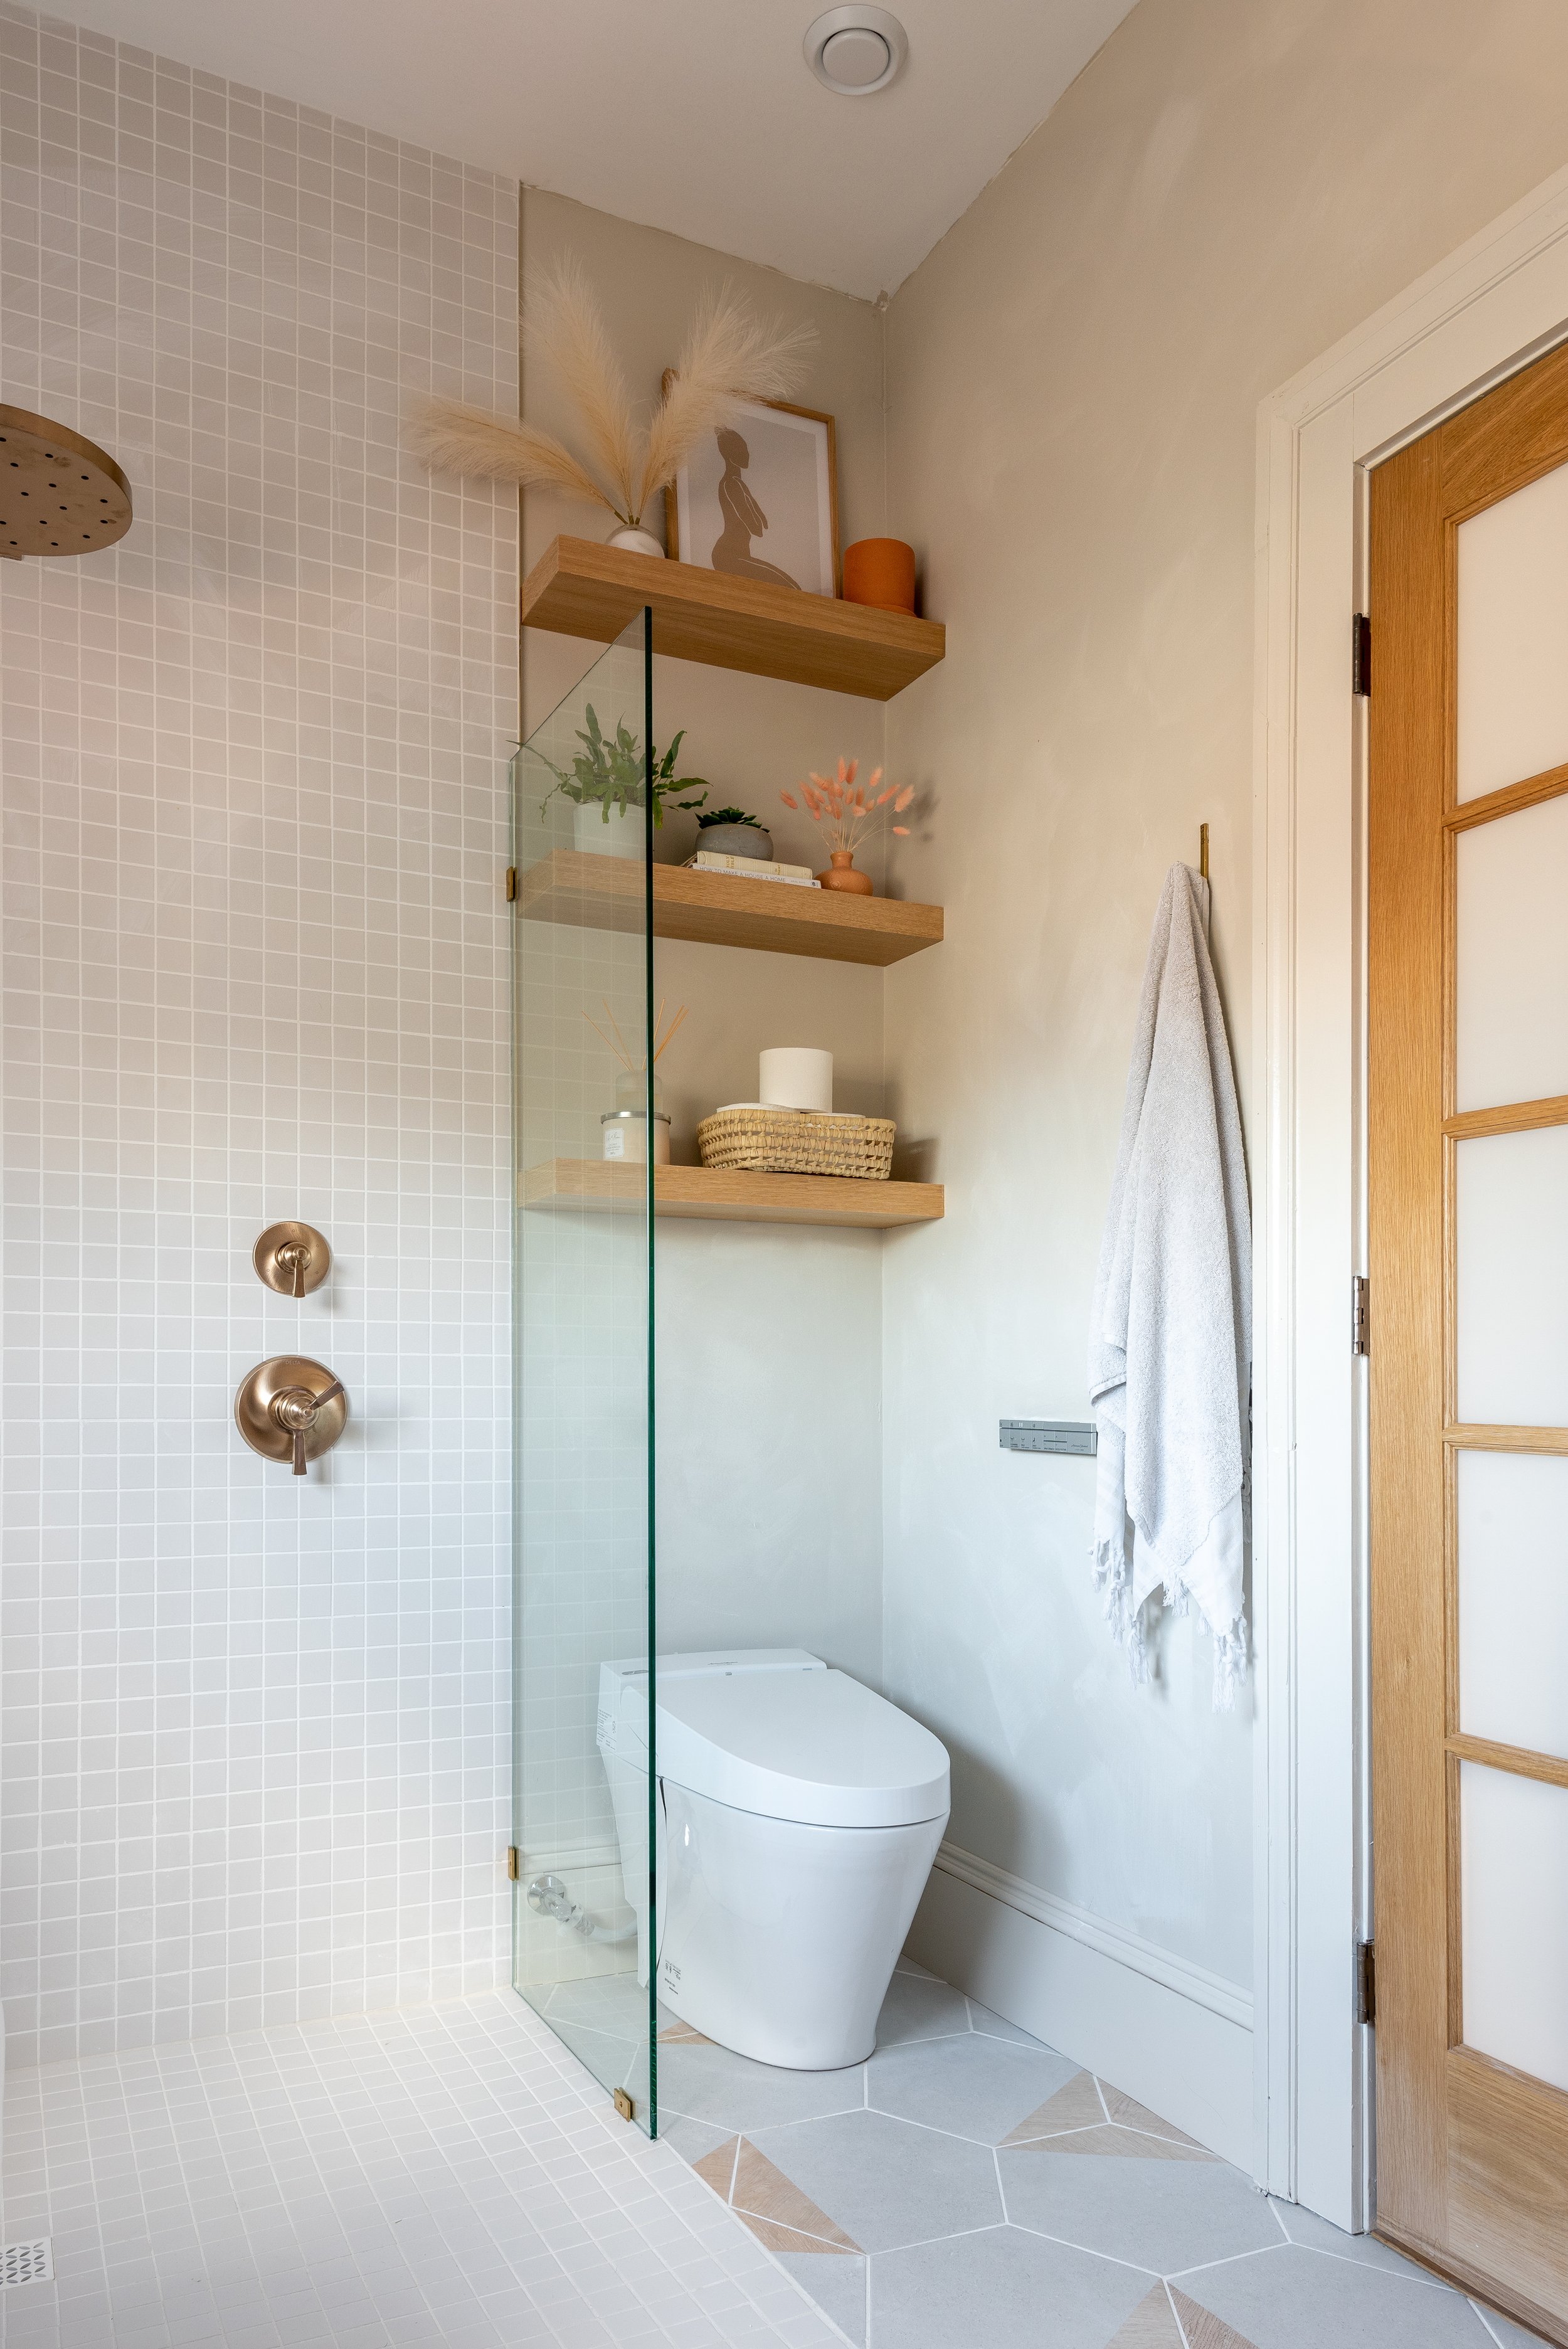
A simple glass partition separates the toilet from the curb-less shower.
Oak french doors from Metrie swing open to reveal the ensuite.
With my wish list, and the floor plan parameters in place, I started designing a mood board and selecting my tiles. Finding a floor tile was more challenging than I thought, so I ended up taking the lime hex tiles provided by Elegant Flooring, originally intended for my basement bathroom, and moved them upstairs to the ensuite. Next, I fell in love with a textured tile called “Stripes” from Wow tile, and wanted them to be a feature in the room from floor to ceiling and behind the vanity. These tiles were special order, and would take months to arrive so I ordered them early into my renovation journey.
Once I had the physical tiles in hand I quickly realized their texture created concern, perhaps the plumbing finishes wouldn’t fit around them, a less experienced tiler took one look at them and said… I don’t think so.
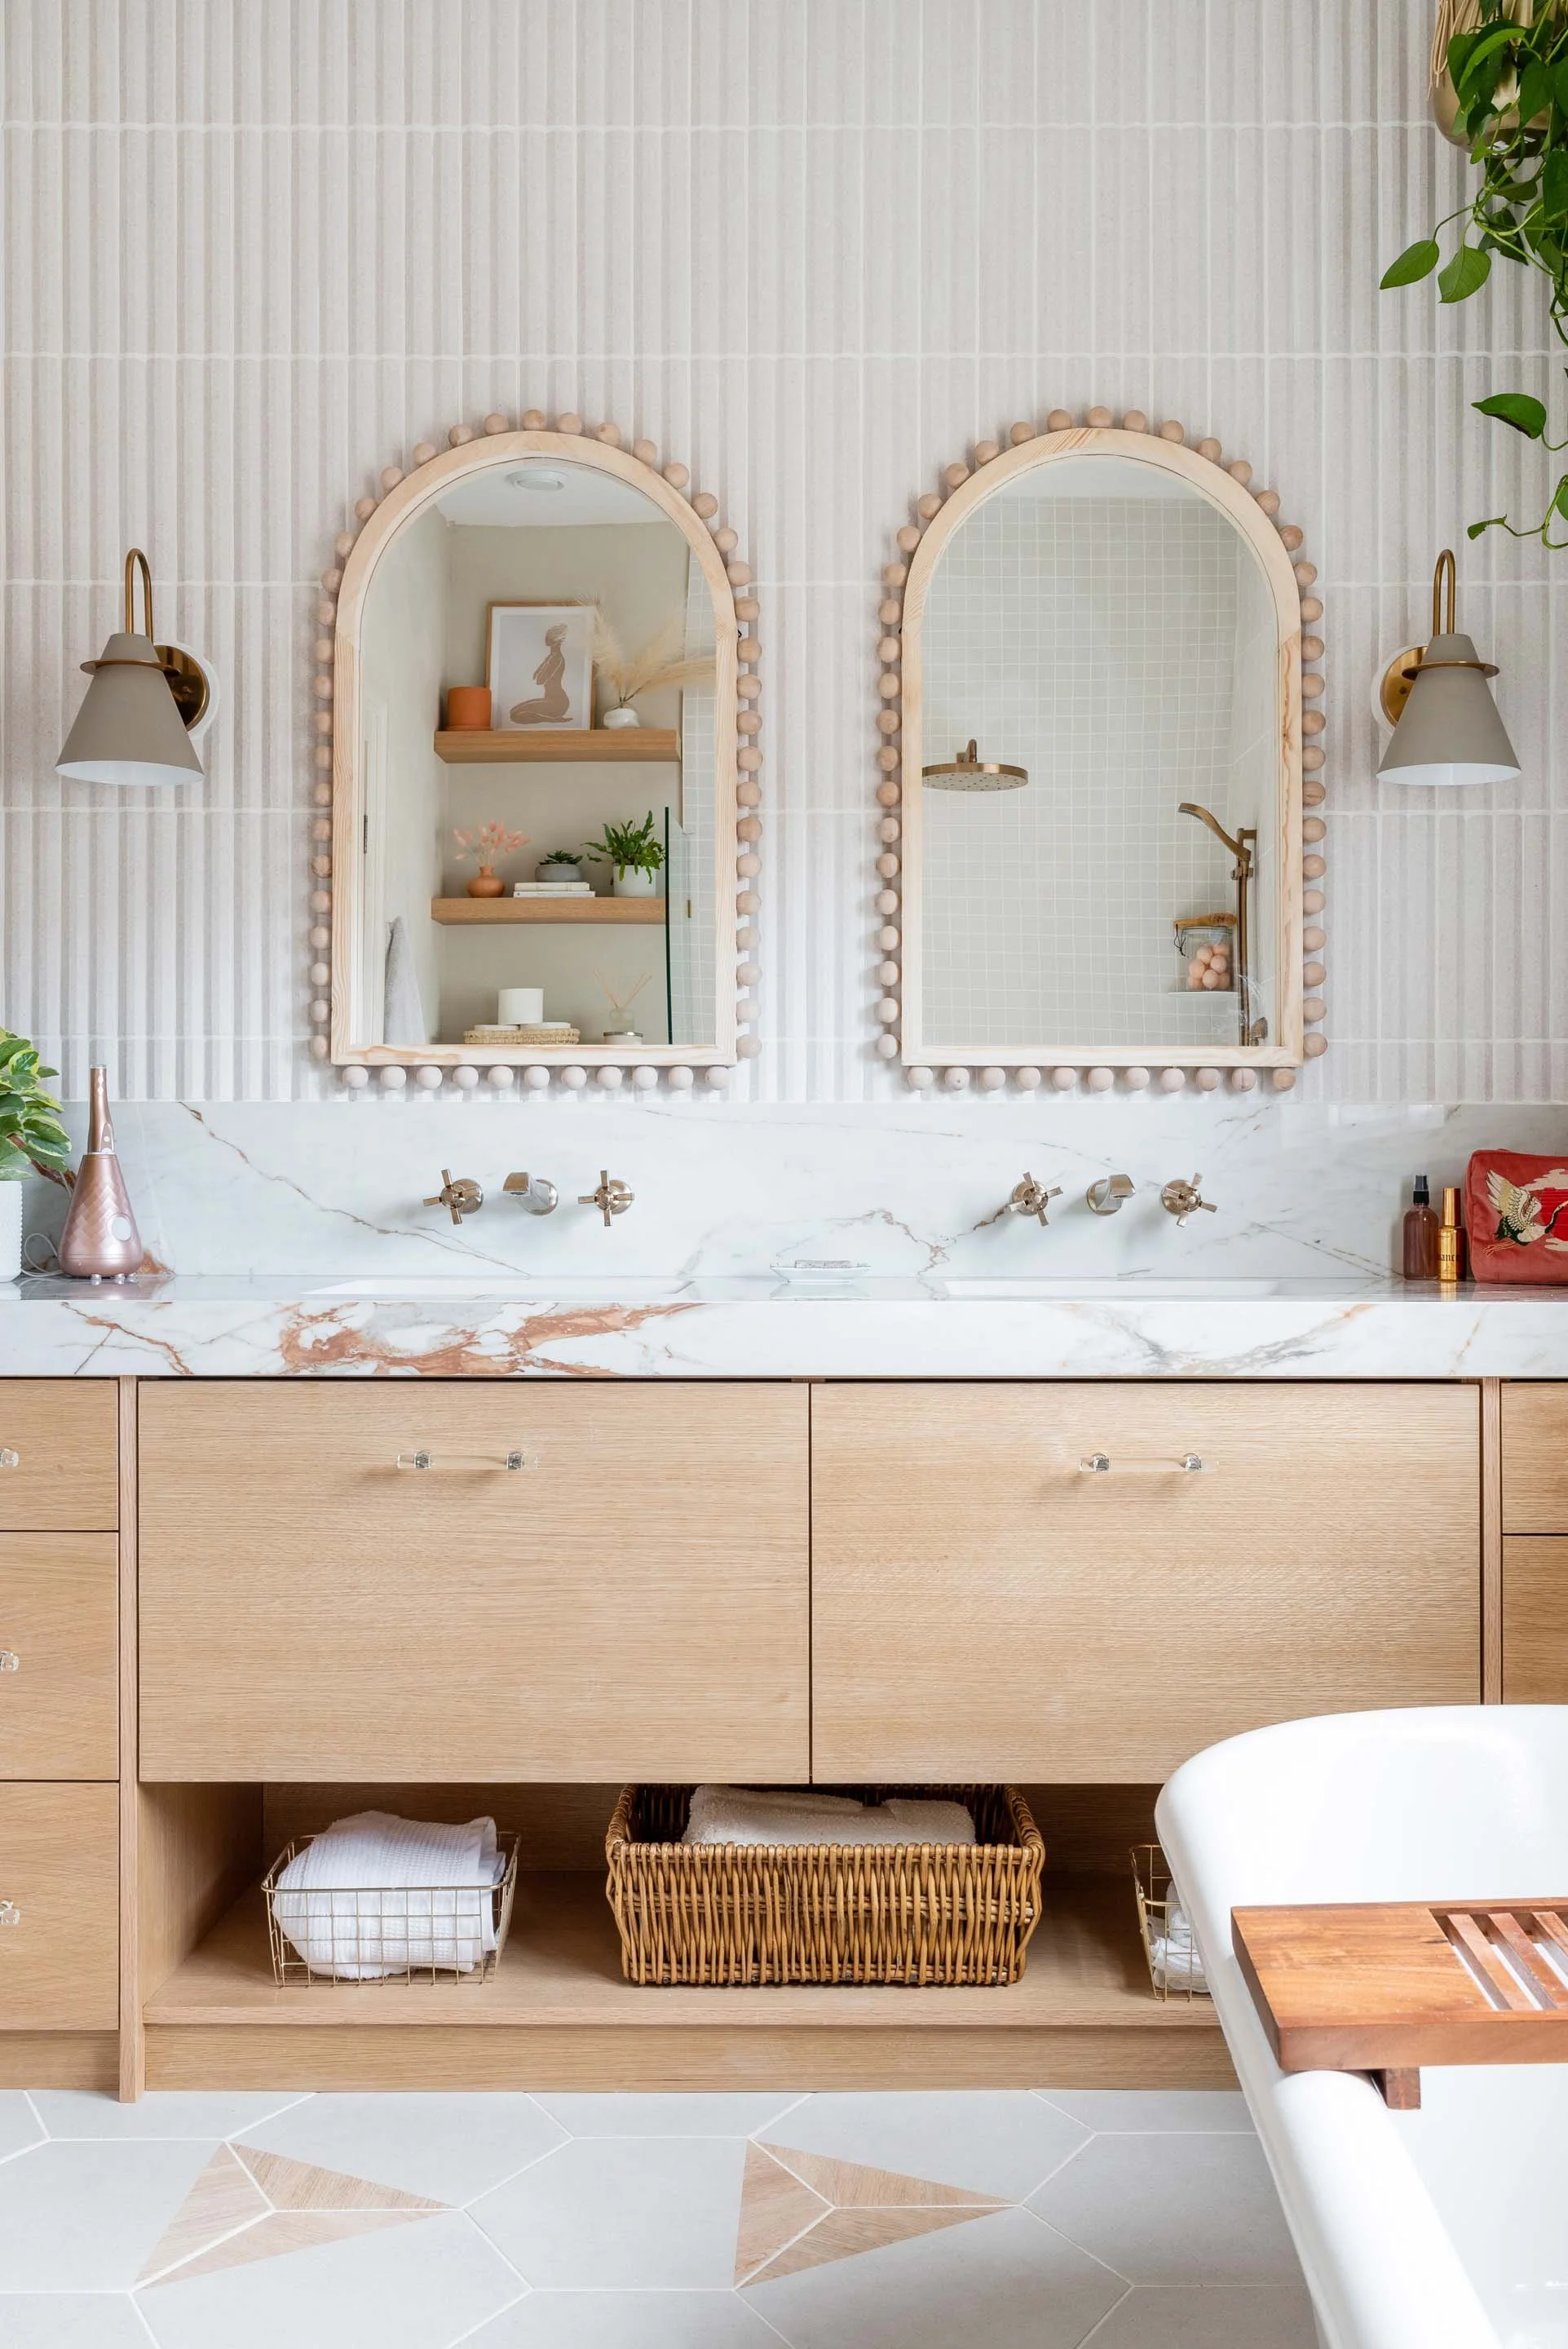
Champagne bronze rain shower head from Delta Faucet.
In order to skirt around the issue, I decided to pick a wall tile for the shower (artisan white from Centura ) a classic tile I used in my last renovation) . This tile is flat and blends in with nicely enough that I could move forward with the bathroom renovation. Everything was coming together beautifully, all my Delta Faucet fixtures in champagne bronze that I had selected had arrived and the plumbers were well on their way rouging in the shower, toilet and sinks.
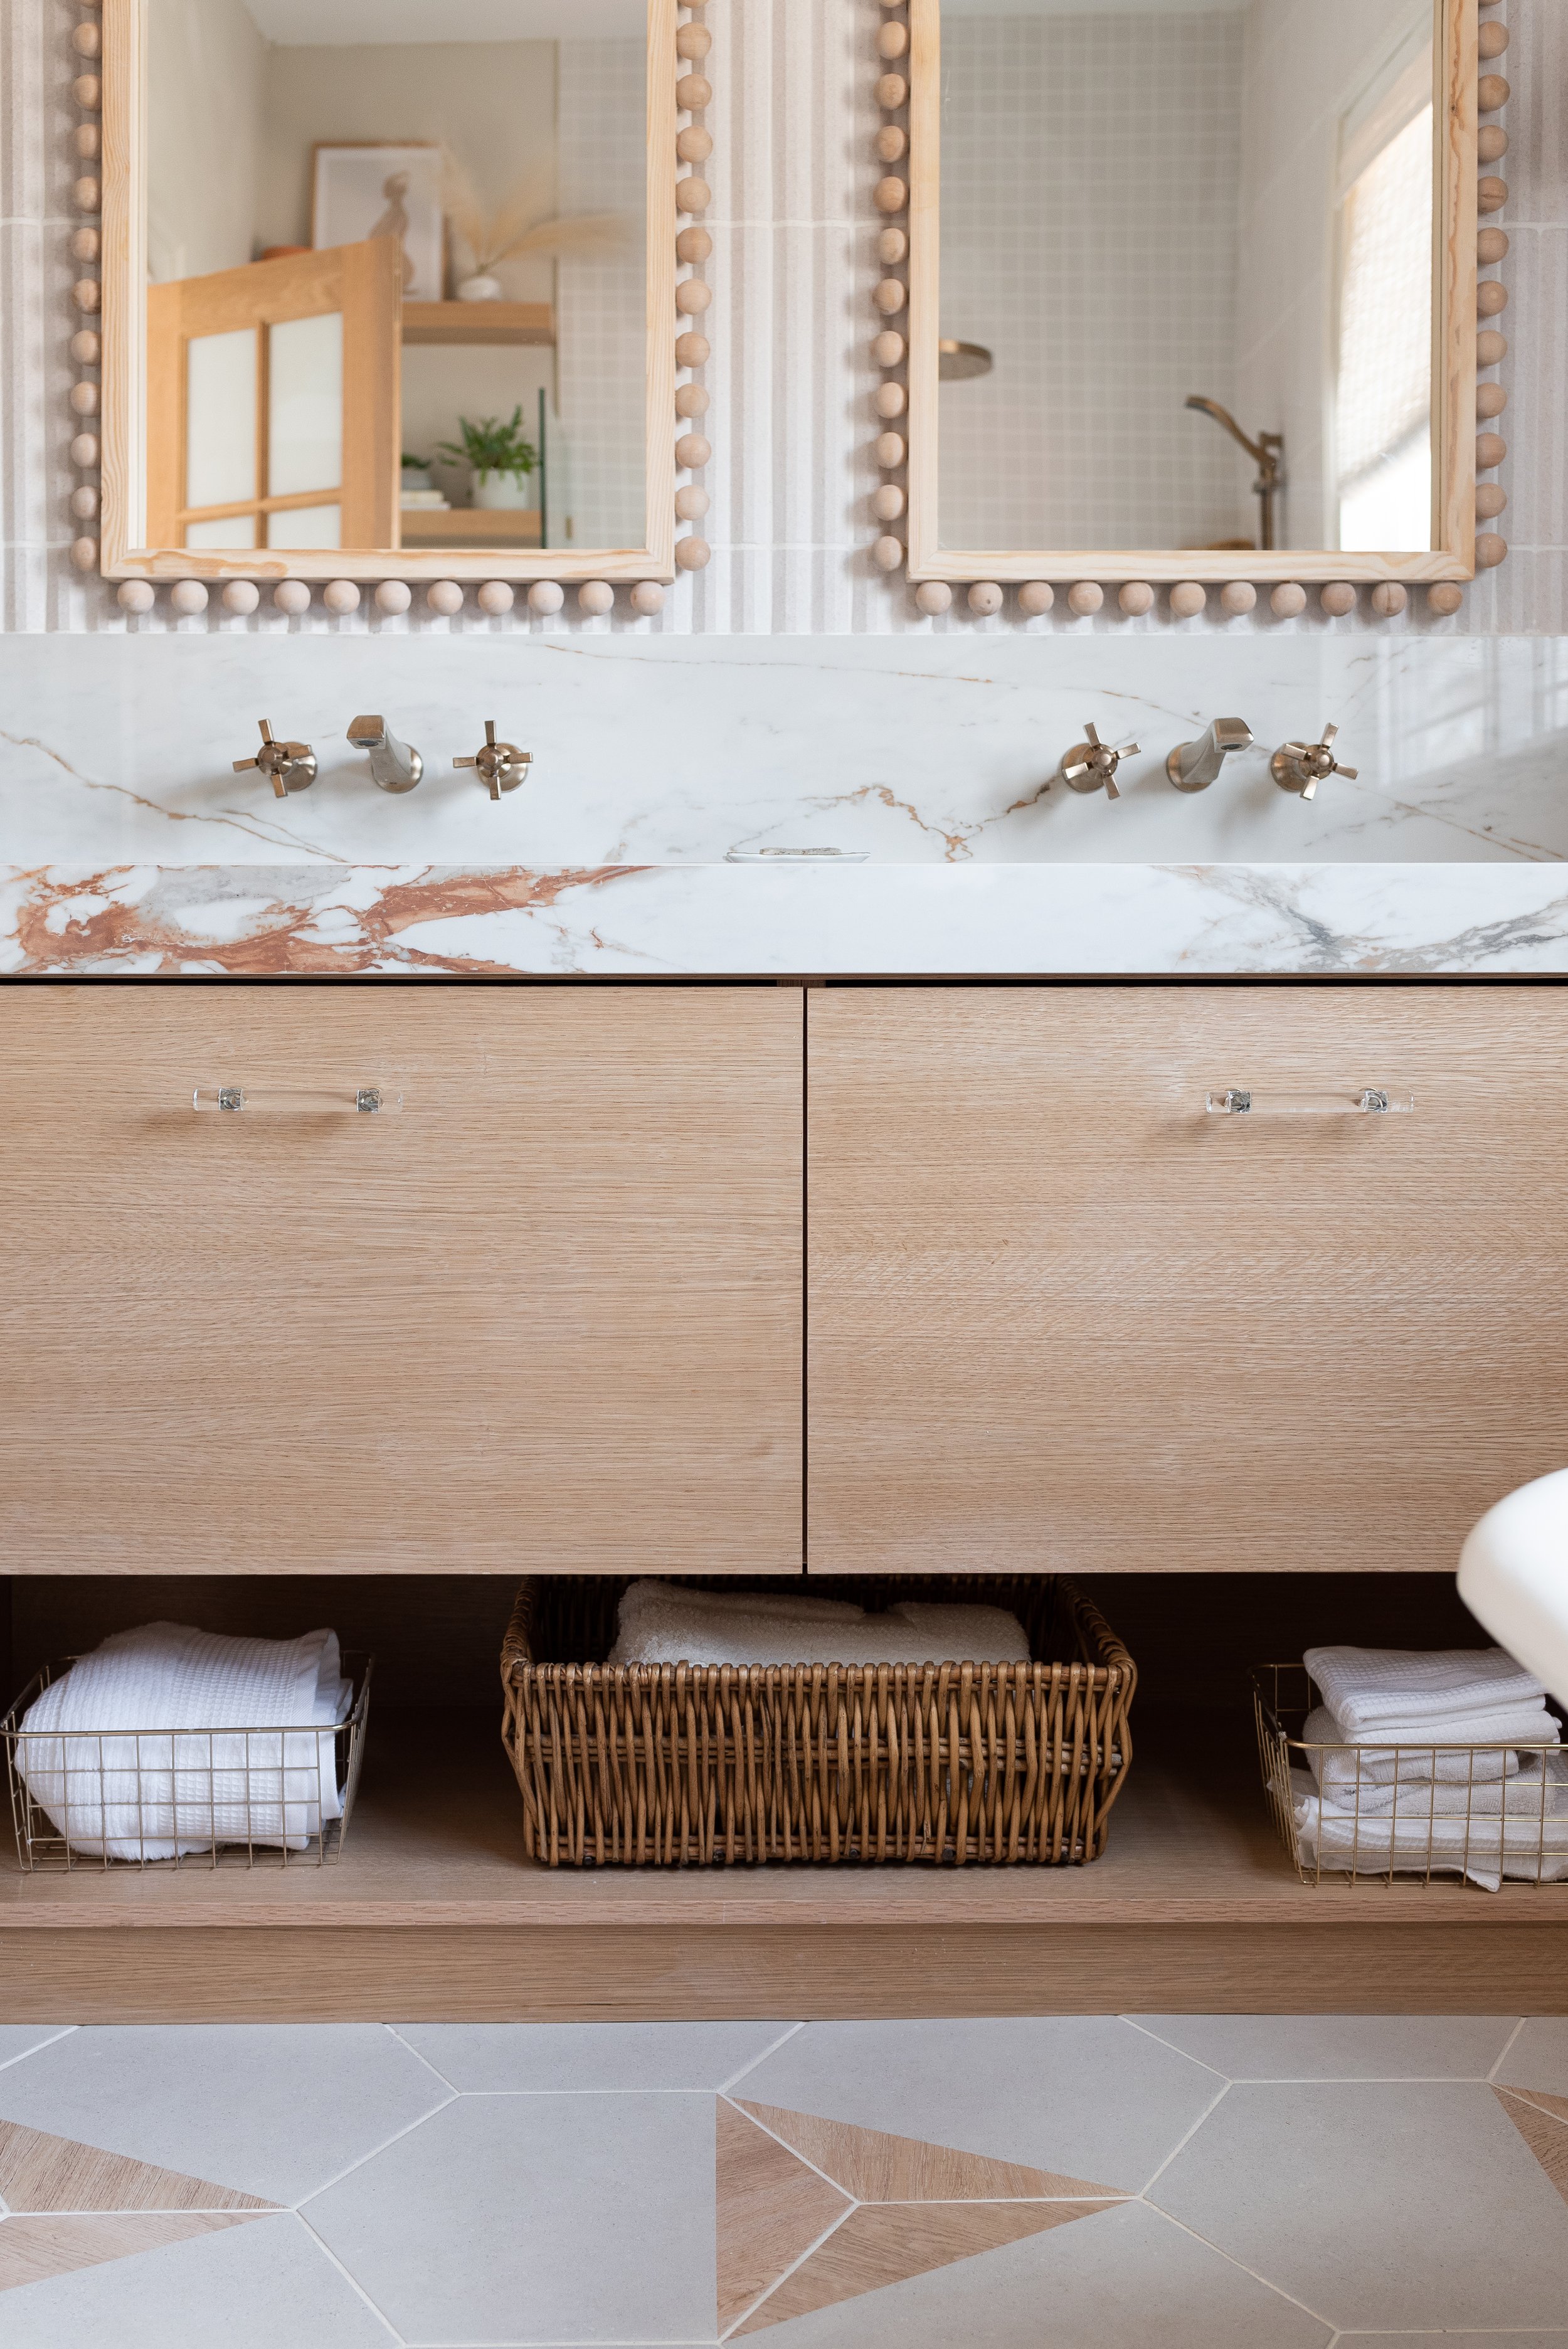
Custom double sink Vanity built with furniture grade oak plywood.
The interior of the clawfoot tub was in rough shape!
Then our next issue arose…. where to get the clawfoot tub refinished. I called around, asked my social media audience for leads, but kept striking out. Refinishing this tub was starting to be a real pain. With the tub interior and enamel in such rough shape, I started to look for alternative options. A new tub? A plastic insert? I decided to put a pin in it while I dealt with larger issues surrounding my renovation.
More issues popped up - of course they did! My new experienced tiler, said he could work with the texture of the stripes tile but was concerned about the large scale of hex tiles sloping to the drain of the curb-less shower. Too many cuts and raw edges would make it difficult and unsafe. He asked if I could pick a different tile for the shower floor…
Oh boy, this was really throwing a wrench in my design plans. Another tile? I was going for cohesion and throwing another tile into the mix wasn’t sitting well. Off to Wacky’s flooring I went, to take a look at their selection for floor and wall tile. If I could keep my tile selections to 3 instead of 4 I just might be able to pull off the look I wanted.
I settled on a simple square matte white tile for the shower wall and floor and hoped that running it from the floor to the ceiling might make it look intentional. My tiler was relieved when I brought back a 2x2 square tile for him to work with. So the artisan white tiles were on the cutting room floor and we were back on track with my bathroom renovation.
Small square tiles used on the shower floor flow up the wall right to the ceiling.
With the floor under control, my attention turned to the vanity. I started looking for off the rack options that might work in the space. I loved the solid wood vanities in my previous home, but my plumbing was set with the sinks specifically placed 29 inches from each other in the middle, so drawer banks could be on either side. There was nothing that would work with the perimeters that were set, so the only option was custom. I drew out my vision for the vanity and worked with my carpenter on the build details.
Completing the space a simple vanity cabinet designed by me and built custom by my carpenter.
We were able to pick up the furniture grade plywood I needed from Robert Bury, and Handy Harry started making the cuts and building the vanity. To finish off the cabinet we stained it with Nano defence (keeping the natural Oak look) and I selected the modern glass pull from Emtek.
While the vanity was being built, I selected my counter top. Wanting something unique with dramatic veining, I discovered the new Awake Stone from Dekton and wondered if it would be right for the room. With so much going on with the tile, floor, and vanity, was I overdoing it with the big bold stone pattern?
I decided to go with my gut instinct and just do it! I asked the manufacturer Living Stone to produce a chunky edge counter and a backsplash high enough to cover the plumbing and simplify the tile job. It worked! I loved the look! I think the Awake Stone was the exact amount of bold that I needed to really make this vanity pop!
After the vanity was complete and the countertops installed, the tilers came back to finish off the wall behind the mirrors with the textured Stripes Tile.
I hung the wood arched mirrors from Mercana that Lazy Boy in Halifax had ordered me, and all that was left before the big photo shoot was to find some sconces to go next to my mirrors and the right blind for the big window above the clawfoot tub.
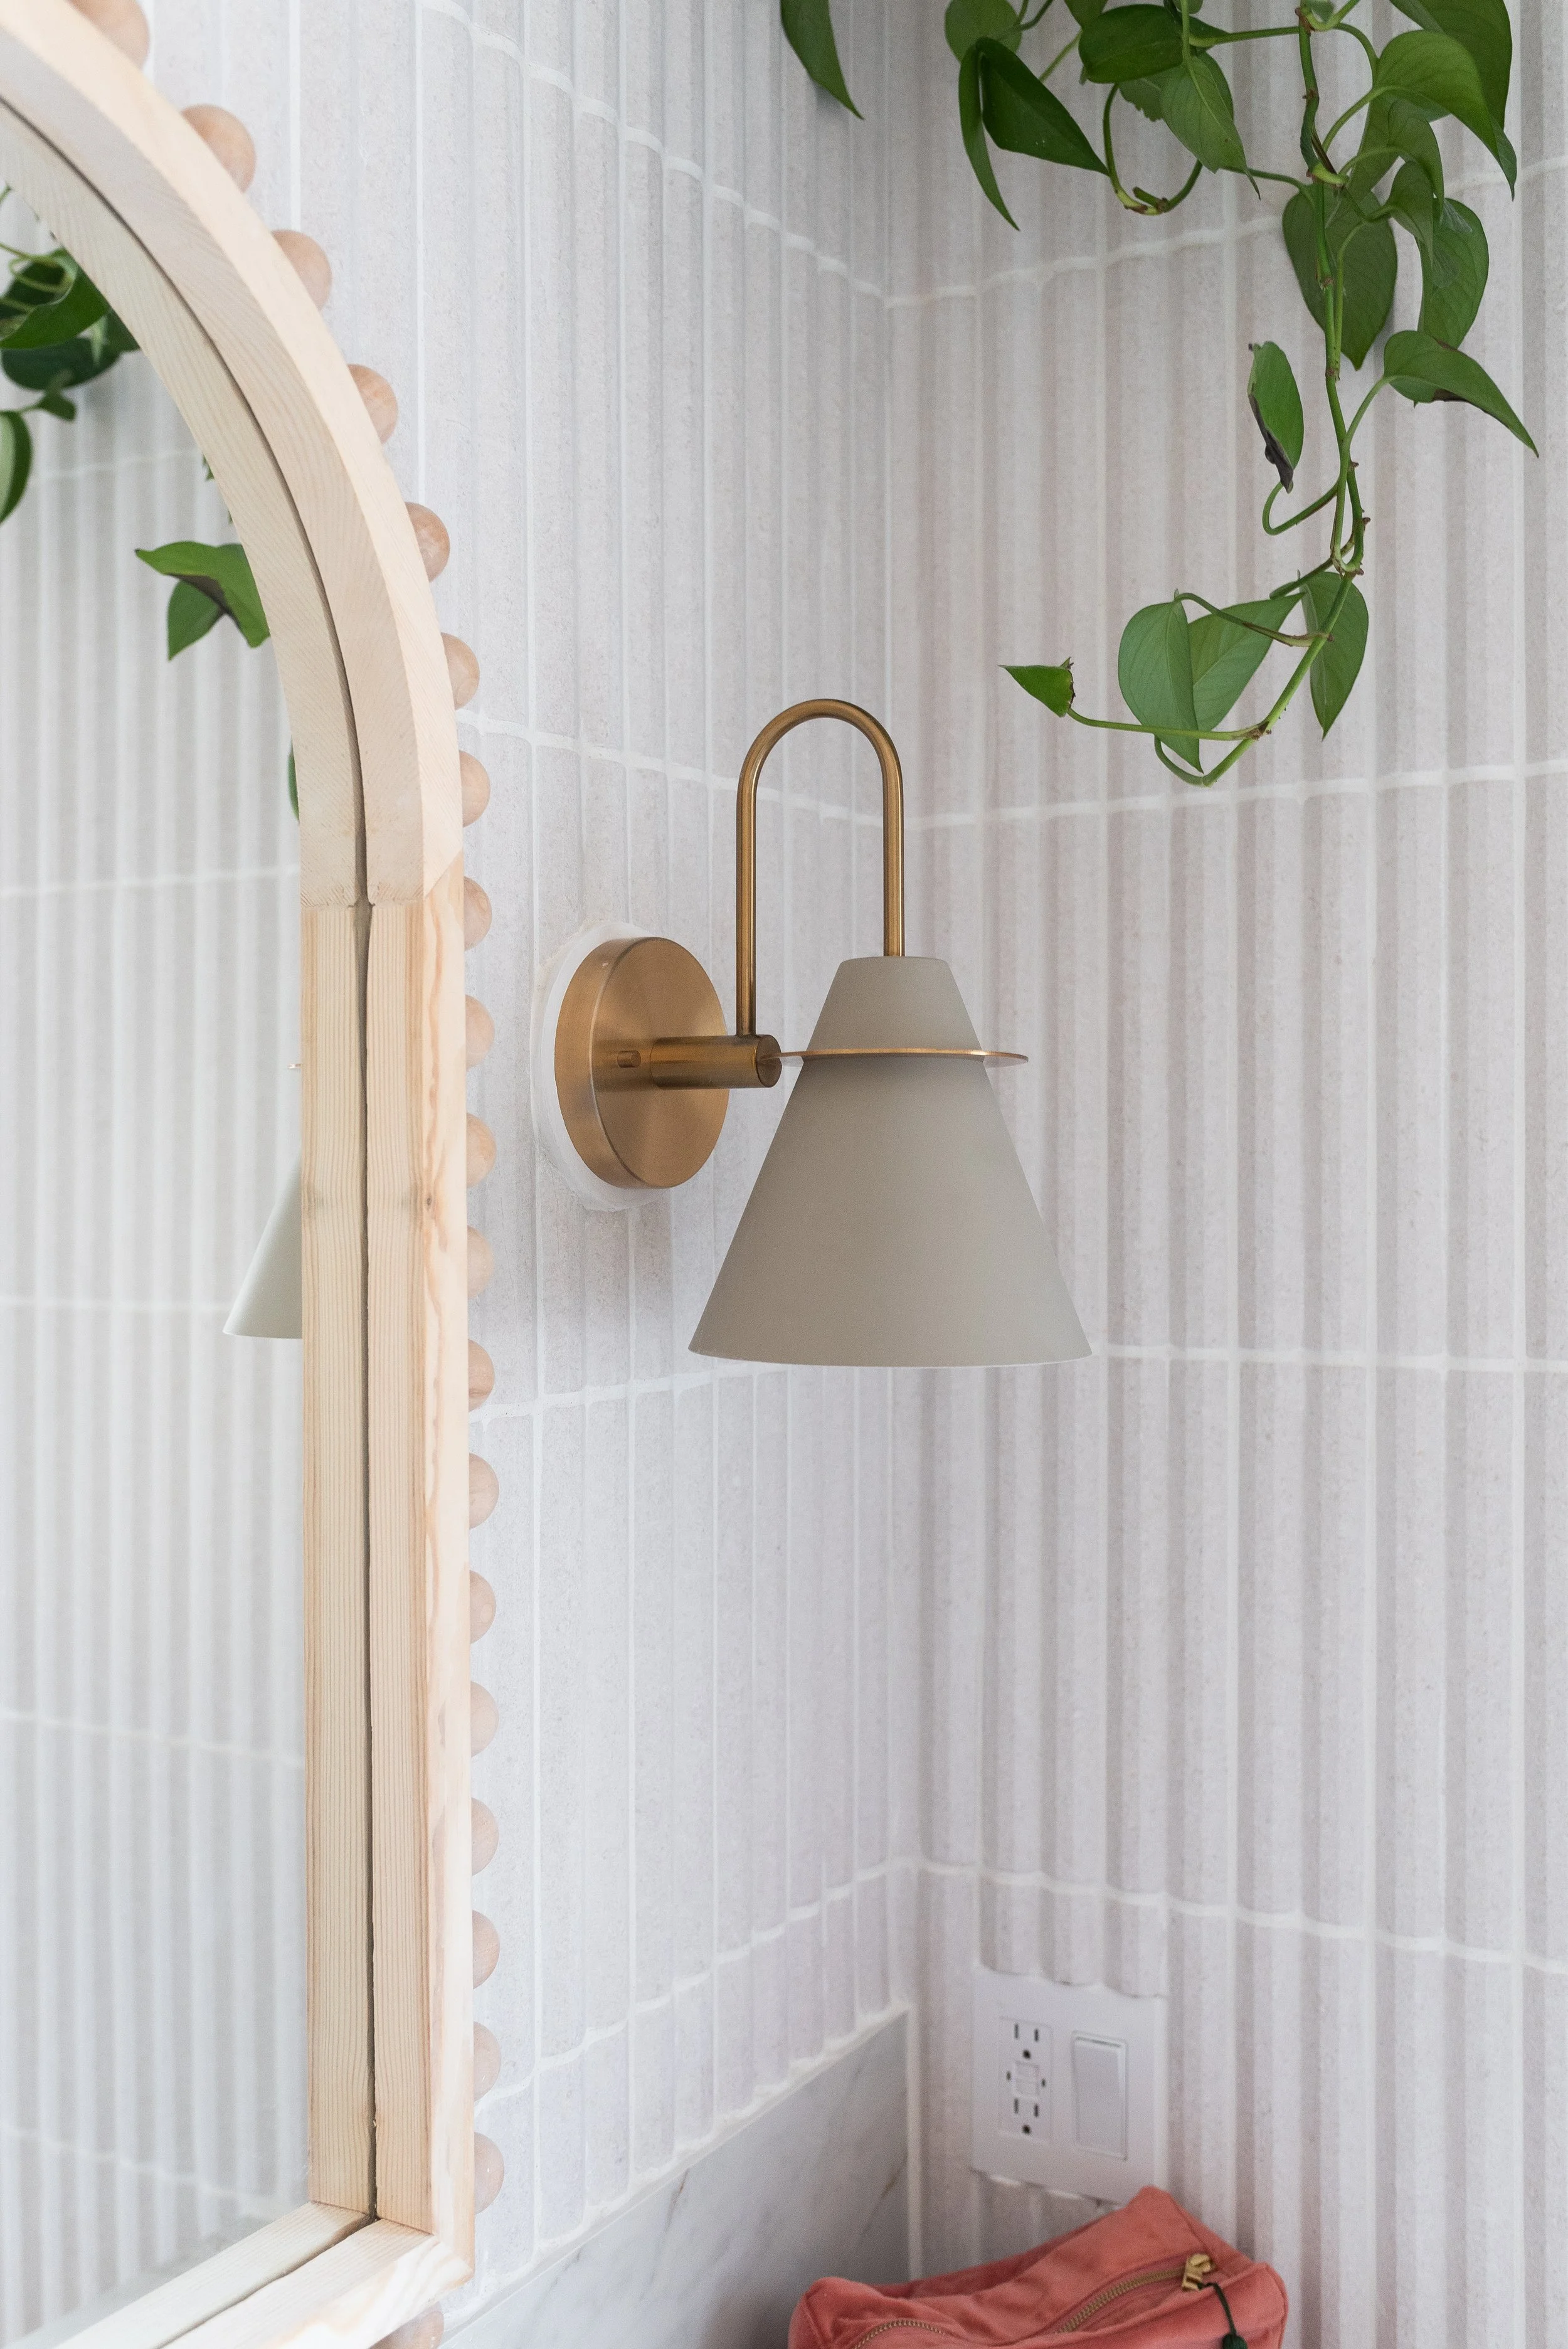
The Talia Sconce from Kent was the perfect tone for the room.
I popped over to Kent to see what they might have in stock. I felt like I had a horse shoe around my neck when I found the Talia Sconce (only $109) hanging on the wall. It was just the right neutral colour palette with a touch of gold, perfect! But, ugh, they were out of stock and I needed them TODAY. The sales rep checked and another store had them in stock so I rushed over to snag two of the last ones - hooray!
While at Kent, I took a peek at the blinds available in store. There was a bamboo roll up shade of particular interest to me that came in 4 colour ways. I thought the white would make a lovely soft natural fibre for the bathroom window but the 60 Inch blind that was on the shelf was slightly large to be mounted to the the interior of the window. On the bright side, they were quite inexpensive (only $71.99) and after being quoted thousands of dollars for wooden shades like the windows on my main floor, I thought perhaps I could figure out a way to cut them to fit…they were wood after all.
As luck would have it, I did figure out a way to cut them. I used a pair of scissors to cut down the width, then used the chop saw to trim the wood binder at the top. I shortened them and secured the bottom ropes with a hot glue gun. After that, I glued a piece of sheer fabric liner onto the back. When it was time to install them, I ditched the hooks and staple gunned them right to the window trim. And there you have it, for under $100 coupled with a little elbow grease (and my DIY mom experience), I had the custom wooden blind look I wanted from the start.
The final look of my 1920 Clawfoot Tub under the large window with the wooden bamboo blind.
Last but not least I finally found a local business to refinish my Clawfoot Tub! Beautiful Baths came to my home, sanded down the interior and reglazed my tub for $1400. So worth it! If you ask me, they are true miracle workers!
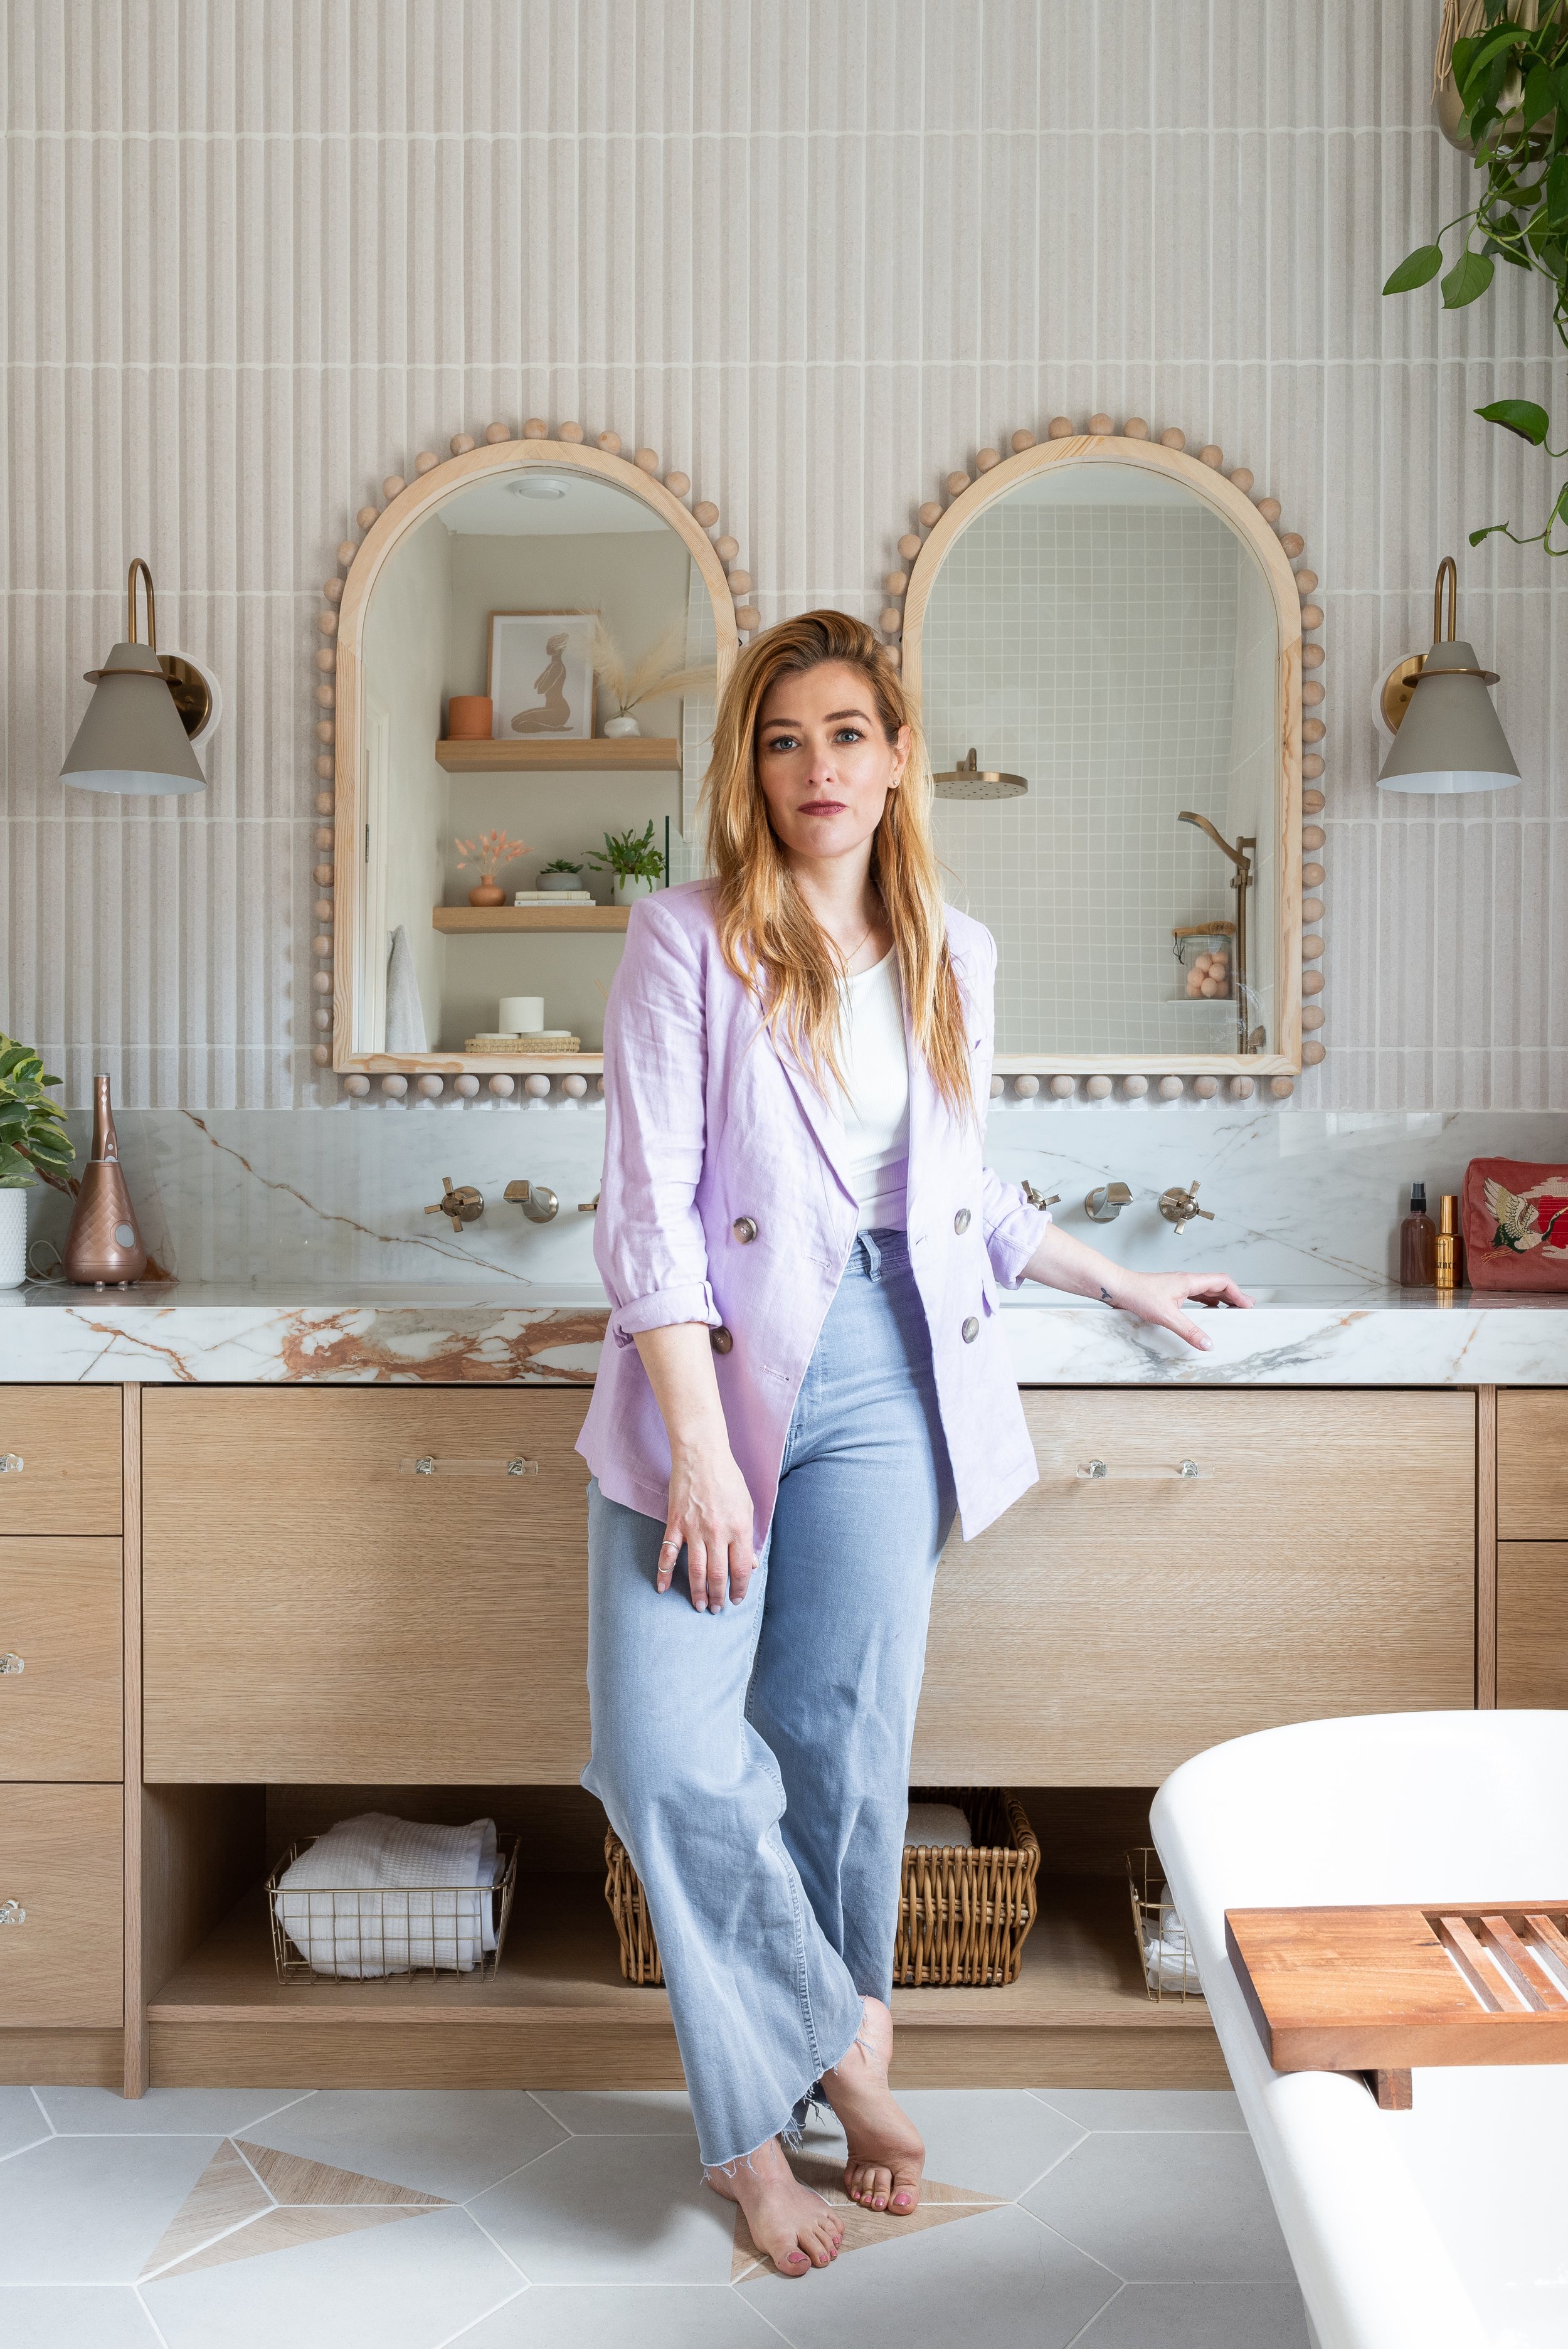
DIY MOM and designer Rebekah Higgs stands barefoot in her completed bathroom space.
So my bathroom is complete, a neutral haven away from the choas of the day. Let me know what you think of my design choices in the comments below! Feel free to share and pin my photos and content if you love it!
When I’m knee-deep in home renovations and DIY projects,
I know Lennon is watching how I handle stressful situations, the way I pause and reassess if I hit a stumbling block, the energy I put into my work and the way I prioritize down time with her.
And while I’m often immersed in work traditionally viewed as masculine, I want her to know this…
What determines her path in life
is not what others believe she can do,
but what she knows she can do.
Gender-specific roles no longer define our capabilities or determine our journey and outcome. It will be Lennon’s effort, her willingness to work through obstacles, her belief that she is smart and able and worthy that will determine her success.
As a single mom, it’s important for me to ensure she is immersed in a culture that values the contributions of women. Even at her young age, females that model strength, resiliency and critical thinking are important for her personal development. That’s one of the reasons we are both die-hard fans of the daytime Emmy nominated series Miss Persona! The main character is curious, industrious and analyzes problems from every angle before trying to solve them. Lennon also loves Miss Persona’s sidekick Brandon Bear.
What’s not to love?
Cuddly, cute, the perfect size for snuggling and a wonderful little friend to Miss Persona. I want Lennon to know that it’s okay to lean on trusted friends and family as we try and navigate the trials of life.
Inspired by Miss Persona’s whimsical approach to life, I created a reward chart that teaches valuable lessons in responsibility, helps sharpen her problem-solving skills, and prompts her to find resourceful ways to handle complex problems. Win/win situation in my books!
A reward system is a great way to reinforce positive behaviour and keep your child motivated to keep pursuing the changes we want to implement. It helps children grasp accountability in small, digestible ways that are also fun, and in typical mom fashion, teach them something without them even knowing. I’m pretty good at recognizing and praising good behaviour, but a reward chart is a good reminder nonetheless.
Here’s how we did it:
I selected a theme that Lennon identifies with and gets excited about. As I mentioned, we are big fans of Miss Persona so we modelled this project using designs and colours that reflect the look and feel of the show.
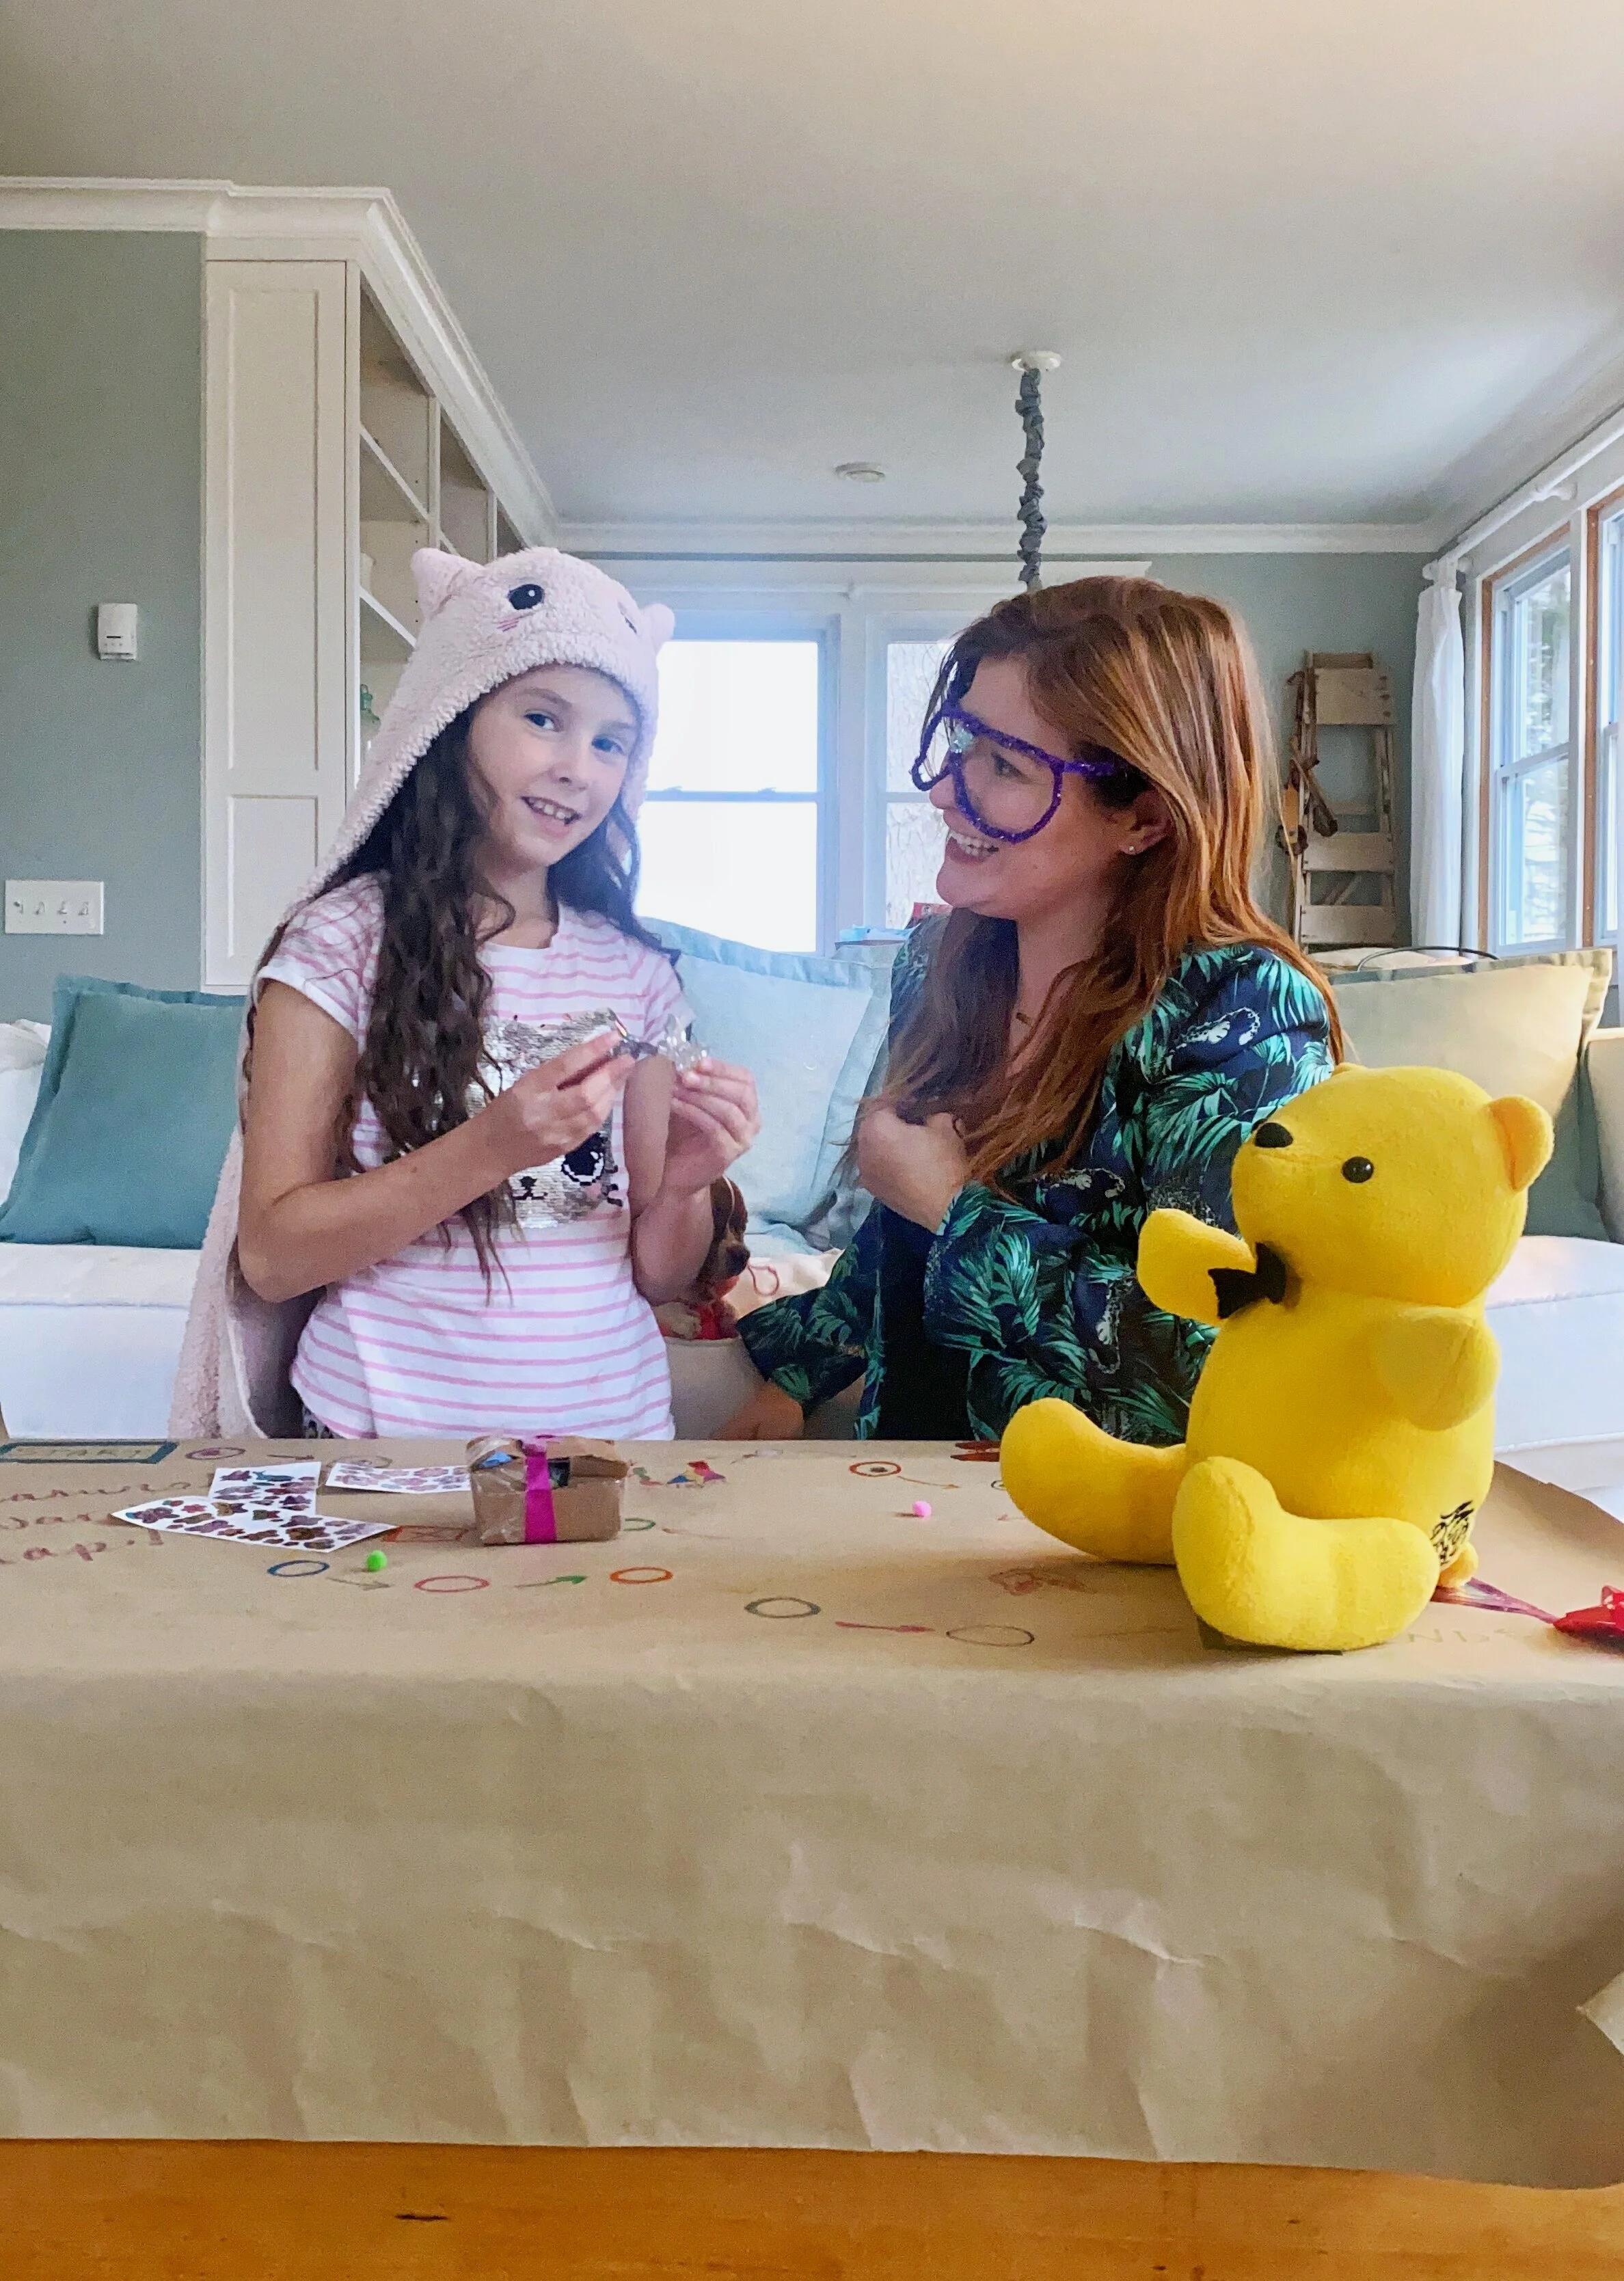
Lennon and I sketched out the plan on brown craft paper to make sure the flow worked for both of us. In true Miss Persona fashion, we got dressed up to play the part of “inventive cartographers.” Brandon Bear was with us too of course. He’s the unofficial member of our little family and has been tagging along with us on all our adventures.
We decided on 3 prize stops. She pressed for more (I would have done the same), but this felt like a good number to help motivate and encourage her along her journey. Each phase gets progressively harder, but not so hard that she’ll want to throw in the towel. The premise is to increase responsibility, but still stay within parameters that are attainable.
Keep the rewards simple but thoughtful. You want your child to know you put some thought and effort into selecting just the right things. They do not have to be expensive, but they should be considerate. Things like hand drawn certificates for activities you can do together, supplies for future craft projects or a book they’ve been wanting are always popular around my house. Choose rewards specific to your child- ones that will keep them motivated to continue putting in the effort.
The most important thing of course is to have fun along the way and be tolerant. Incorporating chores into daily routines or asserting behavioural changes can be a lot of work for young children who are trying to navigate these adjustments with poise and patience. We need to remember to acknowledge their effort.
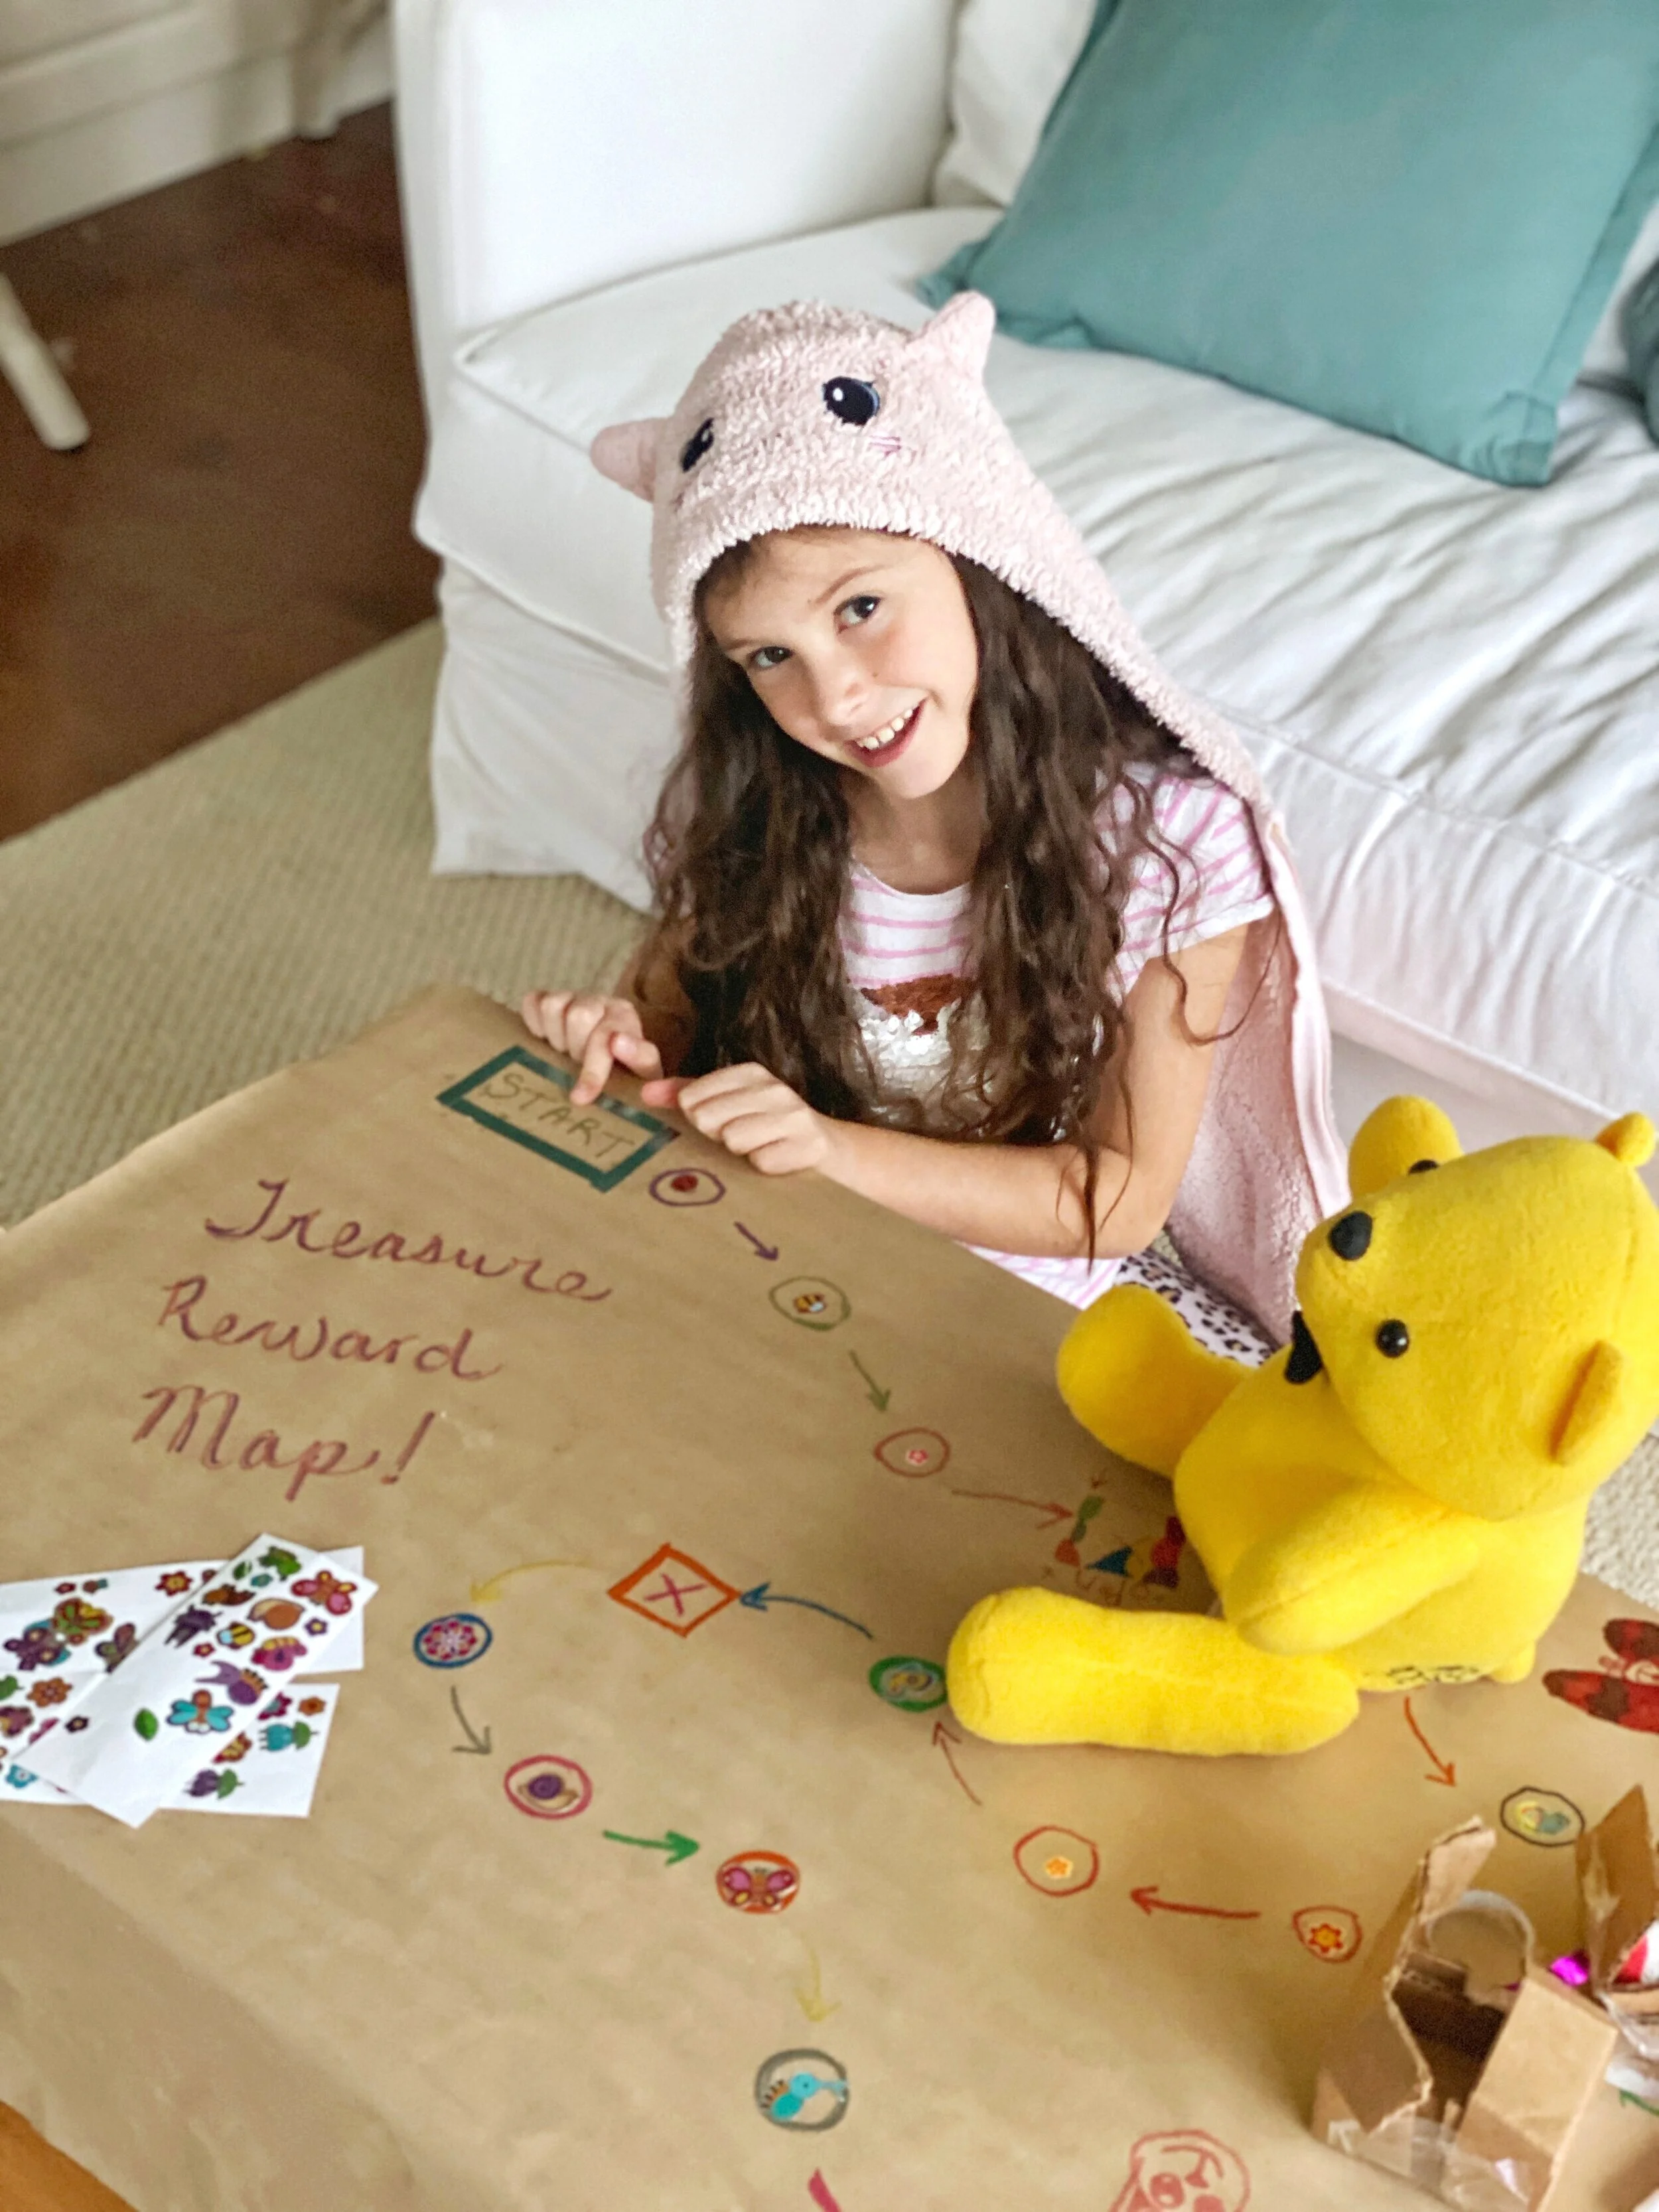
Inspired by Miss Persona's whimsical approach to life, I created a reward chart that teaches valuable lessons in responsibility, helps sharpen problem-solvin...
Lennon’s Treasure Reward Map Download; Click the map above to open image in new window.
You can download this free reward chart and personalize it by writing your child’s name at the top in fancy letters. Lennon likes glitter, so her name is adorned in pink and blue sparkles. Be sure to let me know how this is working for you and your family and tag me in your stories so I don’t miss it.
Join us in your best dress up to watch the new season premiere of Miss Persona (December 7th) at 6:30pm EST on Treehouse with new episodes premiering every weekday!
What’s one thing a bedroom needs? A bed, definitely. Forever the centrepiece of these self-titled rooms, beds act as a comfortable place to rest while doubling as great decorative pieces. Often, beds set the standards for the rest of the rooms decor. However finding an affordable piece of art to lounge over your mattress can be quite challenging. Purchasing even a simple duvet cover from a retailer could cost a fortune, regardless of the quality and material. Well I’m here to tell you to cut out the middle man, and DIY. Duvet It Yourself.
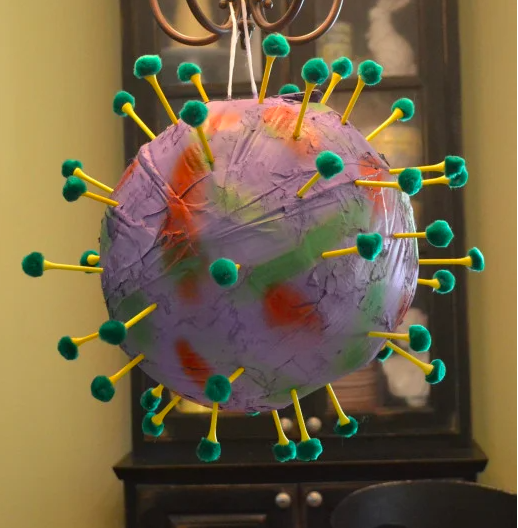
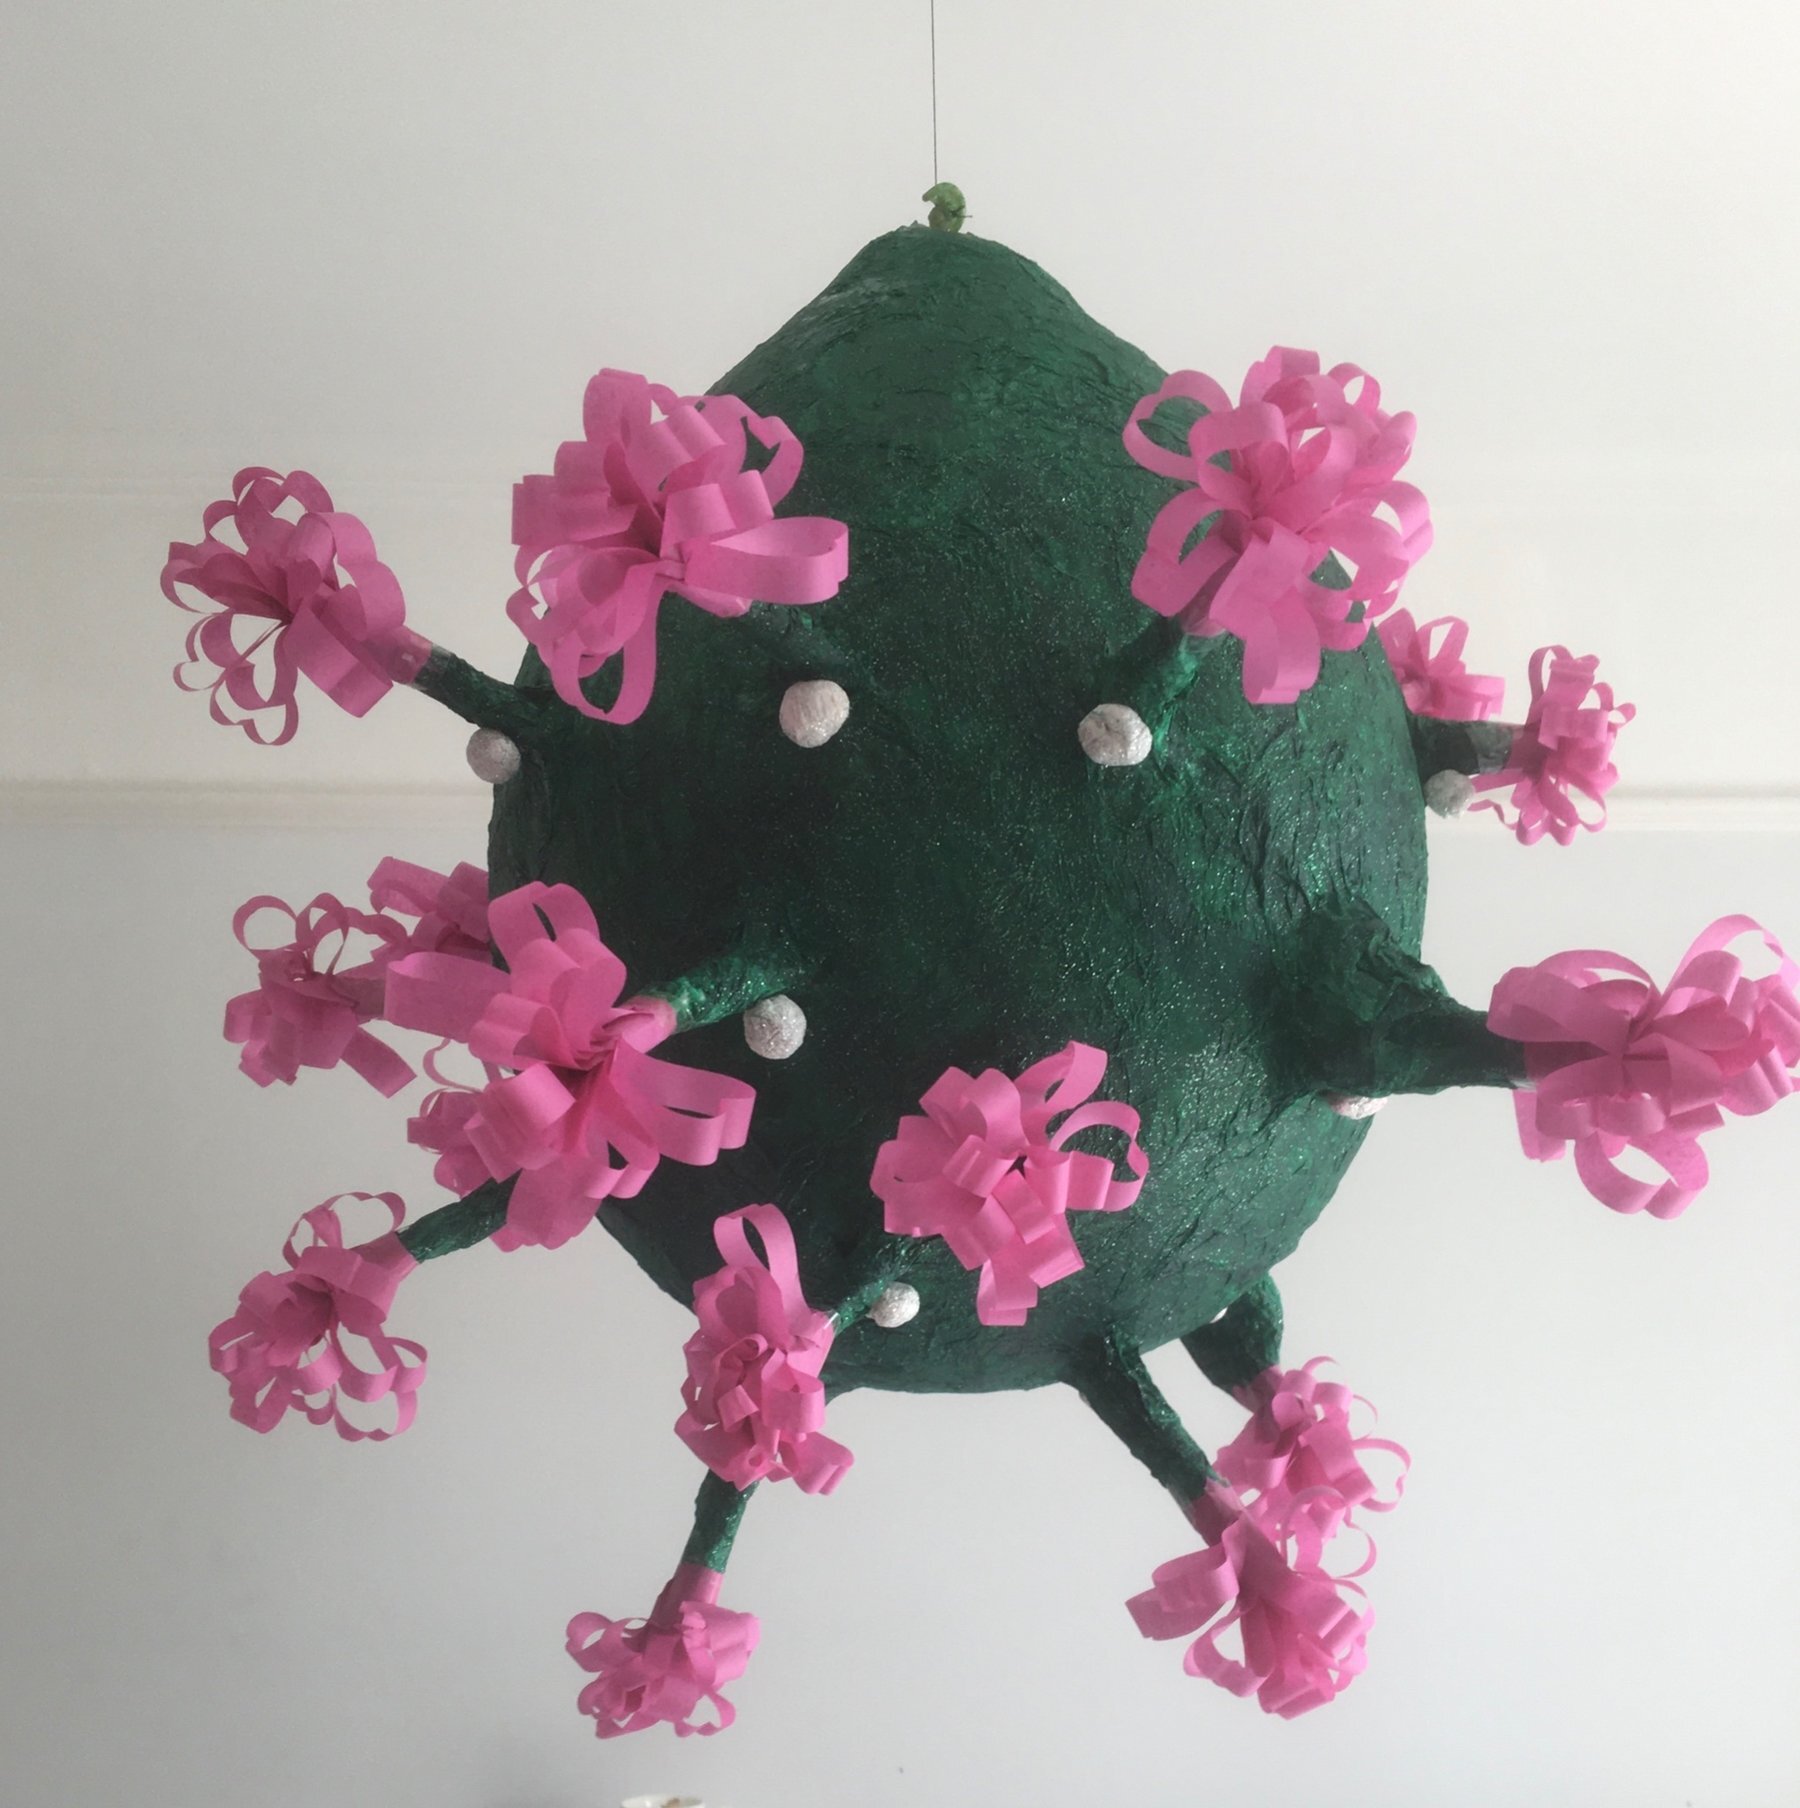
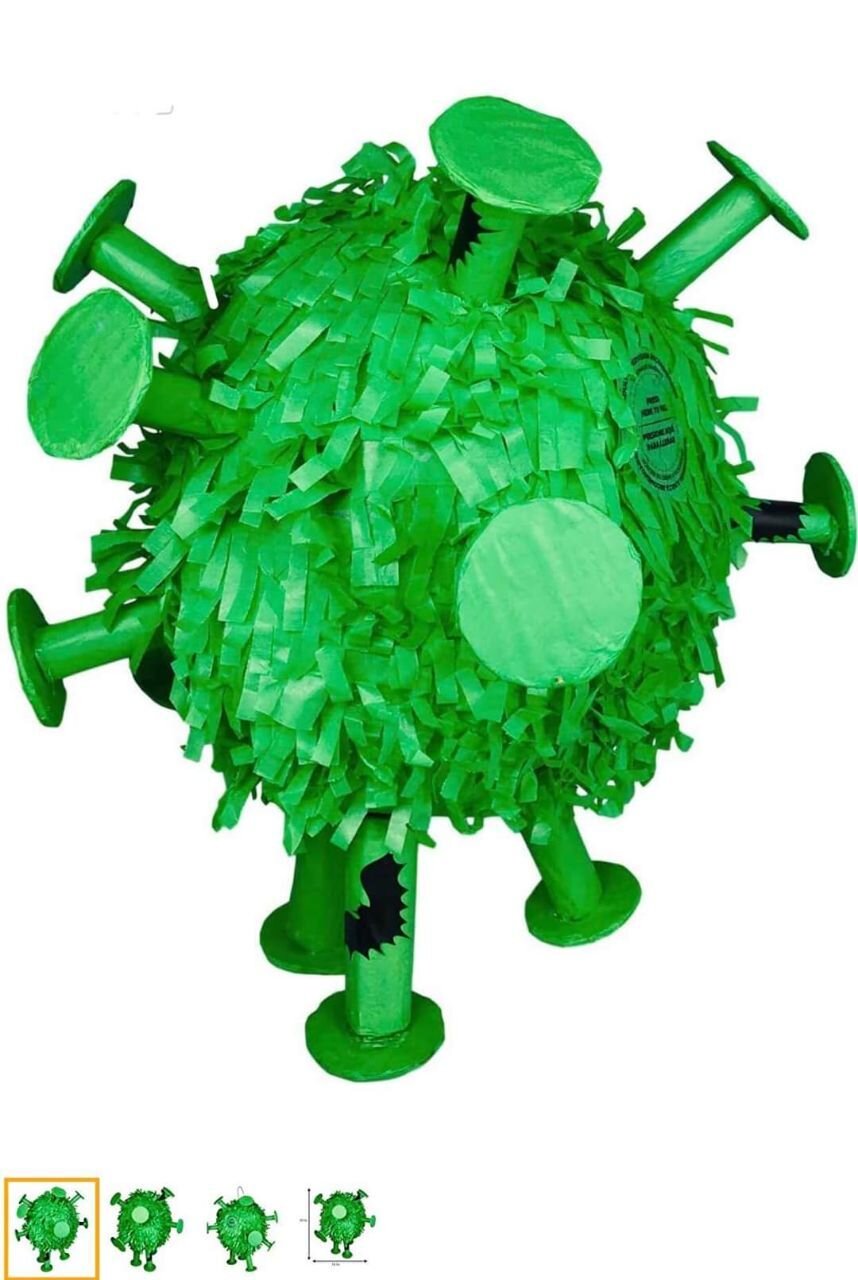
This DIY Piñata Is A Fun and Creative Way to Help “Beat” The Coronavirus
The times are in fact, a-changin’. I must admit that the Covid pandemic has proven difficult to navigate. Being a self-employed, single mother naturally comes with it’s own set of challenges. Throw a quarantine into the mix and then suddenly I need to be a teacher and full-time entertainer on top of it all! I have always had a profound respect and admiration for our school teachers and child care providers, however over the past few weeks, that appreciation has grown leaps and bounds. Finding innovative ways to educate Lennon while maintaining her interest (especially while being surrounded by the temptation of her toys…) was quite the conundrum. Upon some reflection, I decided to teach Lennon the best way that I knew how: DIY Crafts!
Learning doesn’t always have to be sit down, do your work, study and memorize. Sometimes learning can be a little more tactile and hands-on. For example: This Coronavirus Piñata that Lennon and I made for her (quarantine) birthday. Let’s call it Chemistry, Science and Art class all mixed into one dynamic lesson! So let’s gather our materials and get ready to get a little messy with this Piñata DIY.
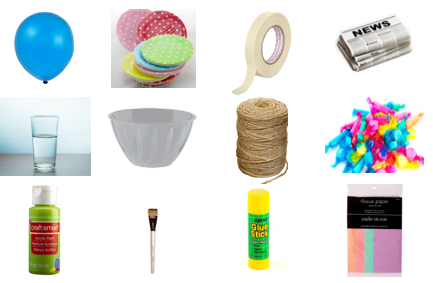
SUPPLIES
Most of these supplies you will likely already have around your house!!
BALLOON
PAPER PLATES
MASKING TAPE
NEWSPAPER
WATER
BOWL (large enough to hold piñata)
TWINE/STRING
CANDY
GREEN PAINT AND BRUSH
GLUE STICK
TISSUE PAPER
DIRECTIONS
STEP 1.
Blow up your balloon and tie a knot at the base.
STEP 2.
Cut a paper plate into quarters (pizza shaped pieces).
Step 3.
Roll the paper plate pieces into cones, tape them so they remain in this shape, and cut one-inch strips at the bottom of the cone.
Step 4.
Flare out the strips and tape them to the balloon.
STEP 5.
Make the paper mache with equal parts water and flour, then mix.
STEP 6.
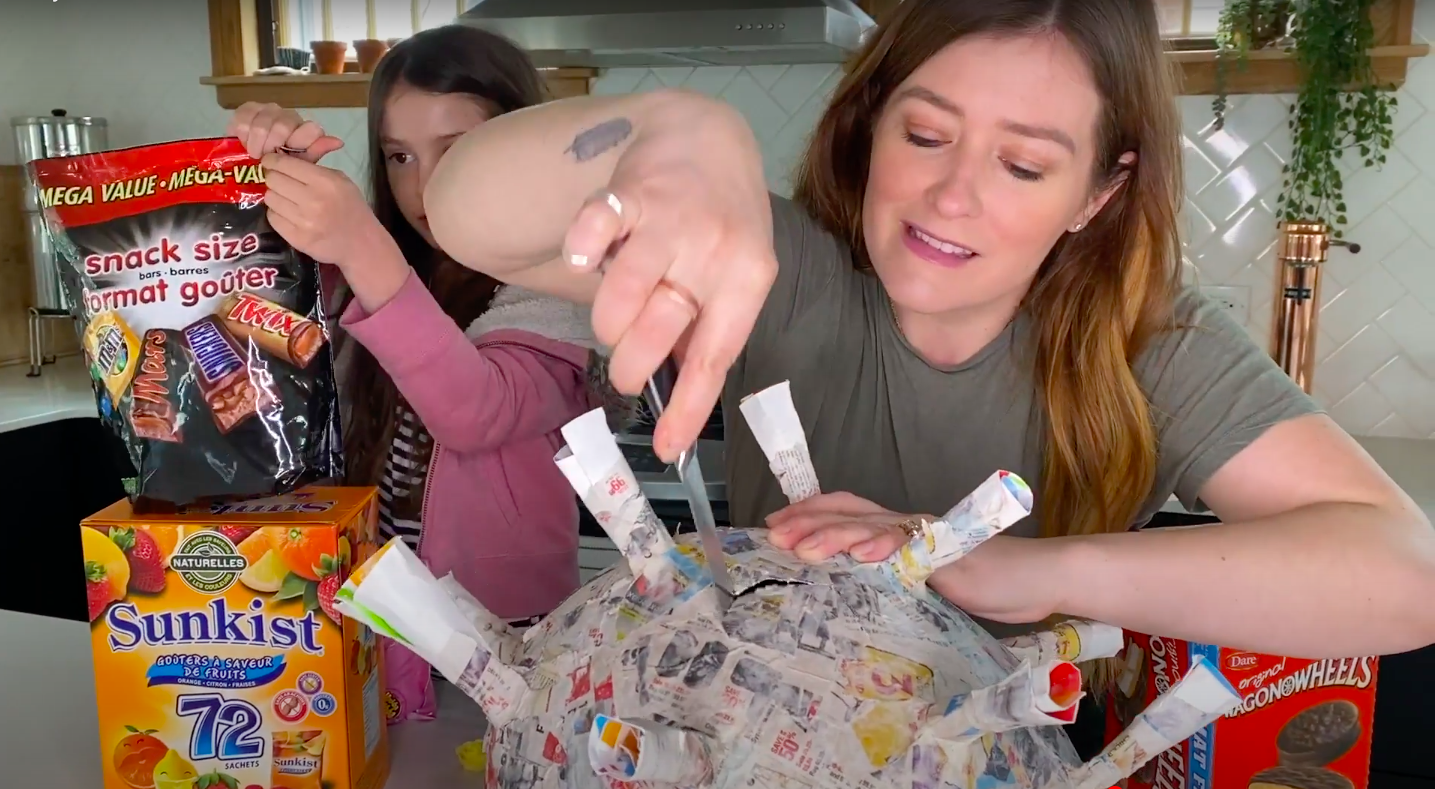
Tear your newspaper into strips and coat them in the paper mache mixture. Layer them onto your balloon in different directions smoothing out any bubbles.
STEP 7.
Let the paper mache dry overnight. Once dry, cut a small flap in order to put the candy in the pinata.
STEP 8.
Stuff the pinata with candy!
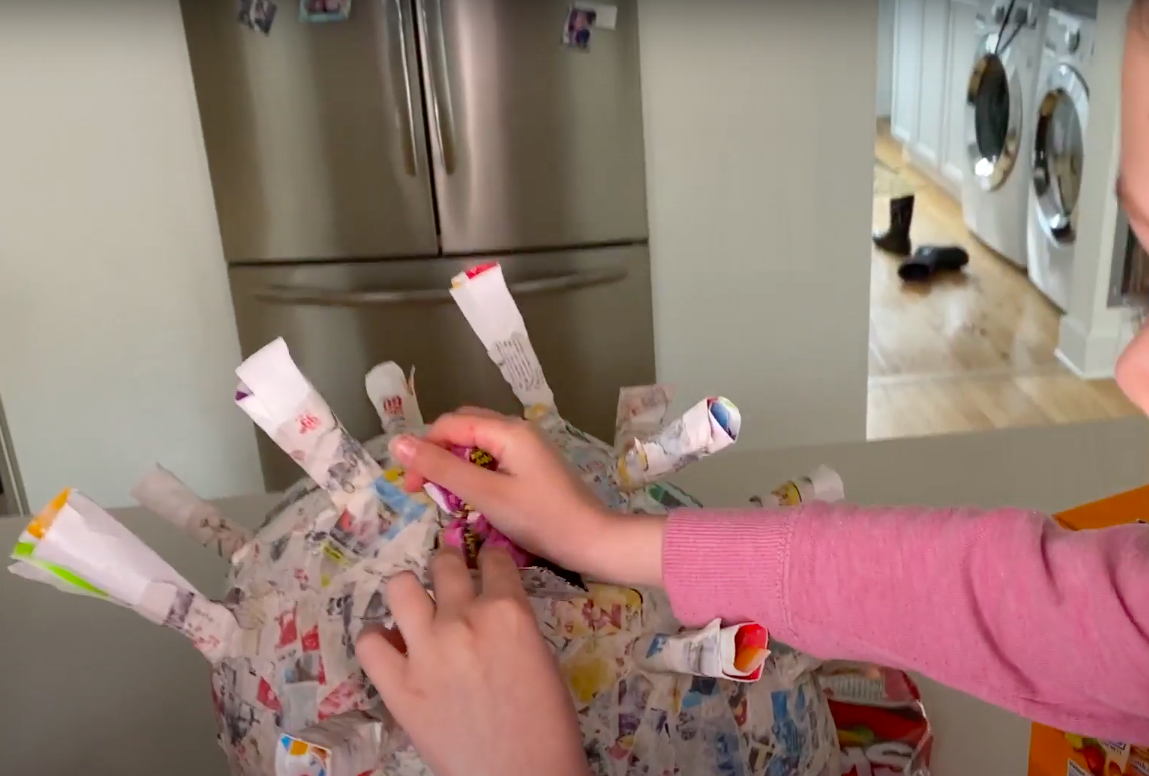
STEP 9.
Using the twine, tie a knot around the balloon leaving some excess to allow the pinata to hang.
STEP 10.
Paper mache over the twine to keep it in place.
STEP 11.
Paint the pinata using your green paint.
STEP 13.
Roll your tissue paper and stick them into the spikes. Using the end of a paintbrush helps!
STEP 12.
Cut your tissue paper into small squares and glue them onto the pinata.
Step 14.
It’s time to finally get the upper-hand! Here’s Lennon showing the villainous virus what she’s made of! Smash away and retrieve all of the goodies as your reward. Hopefully being a little “batter” will make you feel a little better, about these pandemic vibes.
That’s it! It’s that simple.
I would love to see if any of you attempt a coronavirus piñata! Share with me in the comment section below your projects and how they turned out.
Thanks for following my blog and I can’t wait to connect with you on my next project!
Stay tuned for more do it yourself projects coming soon as well as a sneak preview of Season 3.
xox
DIY MOM
Finding Inspiration…
Inspiration can come from anywhere at anytime. The internet is a great resource for sparking your creative energies and discovering projects that you may enjoy trying! The case could never be truer than for this project here. Being cooped up in the house all day, I did tend to find myself peering on social media sites more often than usual. But upon stumbling onto this New York Times article and doing a bit more research (as well as taking some creative liberties), I decided that this would be the perfect project to elevate Lennon’s Bday and really make it a SMASH!
Now that I have three properties that I am renting on a short-term basis, I find myself offering up a lot of advice and tips to people who are looking to start their own instant hotel.
I thought it would be a great idea to answer some of those frequently asked questions by writing a blog dedicated to my tips and tricks when it comes to attracting short-term renters while protecting your property.
Easy solutions for busy mom’s to cut down on single-Use Plastics
There has been a lot of discussion lately about our overuse of single-use plastics and the harmful effects they are having on our environment. The recent coverage in the news has made me take a closer look at my own single plastic consumption in the home and thinking about practical ways that I can cut down, or cut back on the amount of plastic we throw out. For so long we thought we were recycling all the plastic that goes into the blue bags but as it turns out Canada only recycles about %10 of our plastics and what we are unable to recycle we’ve been shipping off to poorer Asian Countries. Those countries are now taking a stand against the rich world’s plastic waste signalling a change in the global recycling system. There is a growing movement against non- recyclable plastic.